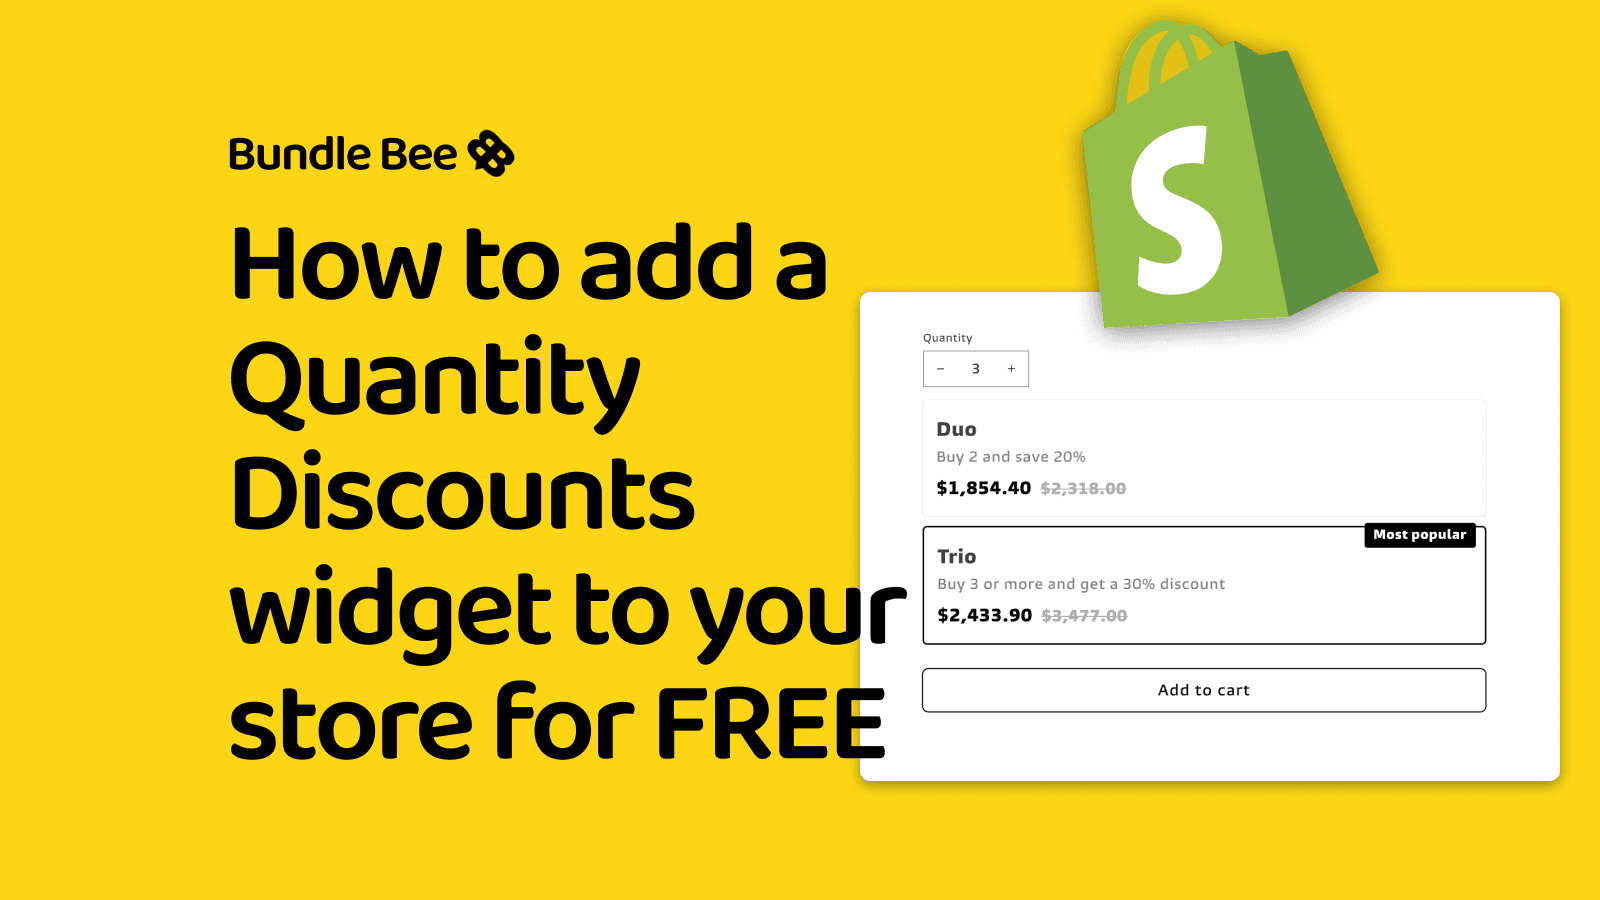
Quantity breaks can be an effective way to encourage customers to purchase more by offering discounts based on the quantity of items they buy. As the creator of Bundle Bee, a premium app for Shopify that allows you to easily create quantity discounts and bundles, I understand how valuable this functionality can be for store owners.
I created this guide because I believe it would be amazing to have this basic functionality available by default for Shopify stores. While Bundle Bee offers a robust, user-friendly solution for a monthly fee, I also want to show you how you can achieve similar results for free, provided you have some basic technical knowledge.
In this guide, we’ll walk you through setting up simple quantity breaks natively in Shopify. This method is suitable for small stores with straightforward discount configurations and can be a bit complex if you’re not familiar with adding custom code to your theme, but it’s completely doable with a little guidance.
1. Creating Automatic Discounts
To begin, you'll need to create an automatic discount for each quantity break you want to offer. For example, if you want to offer a discount for purchasing 2 items ("Duo") and another for 3 items ("Trio"), you’ll create two separate discounts.
Steps to Create Automatic Discounts:
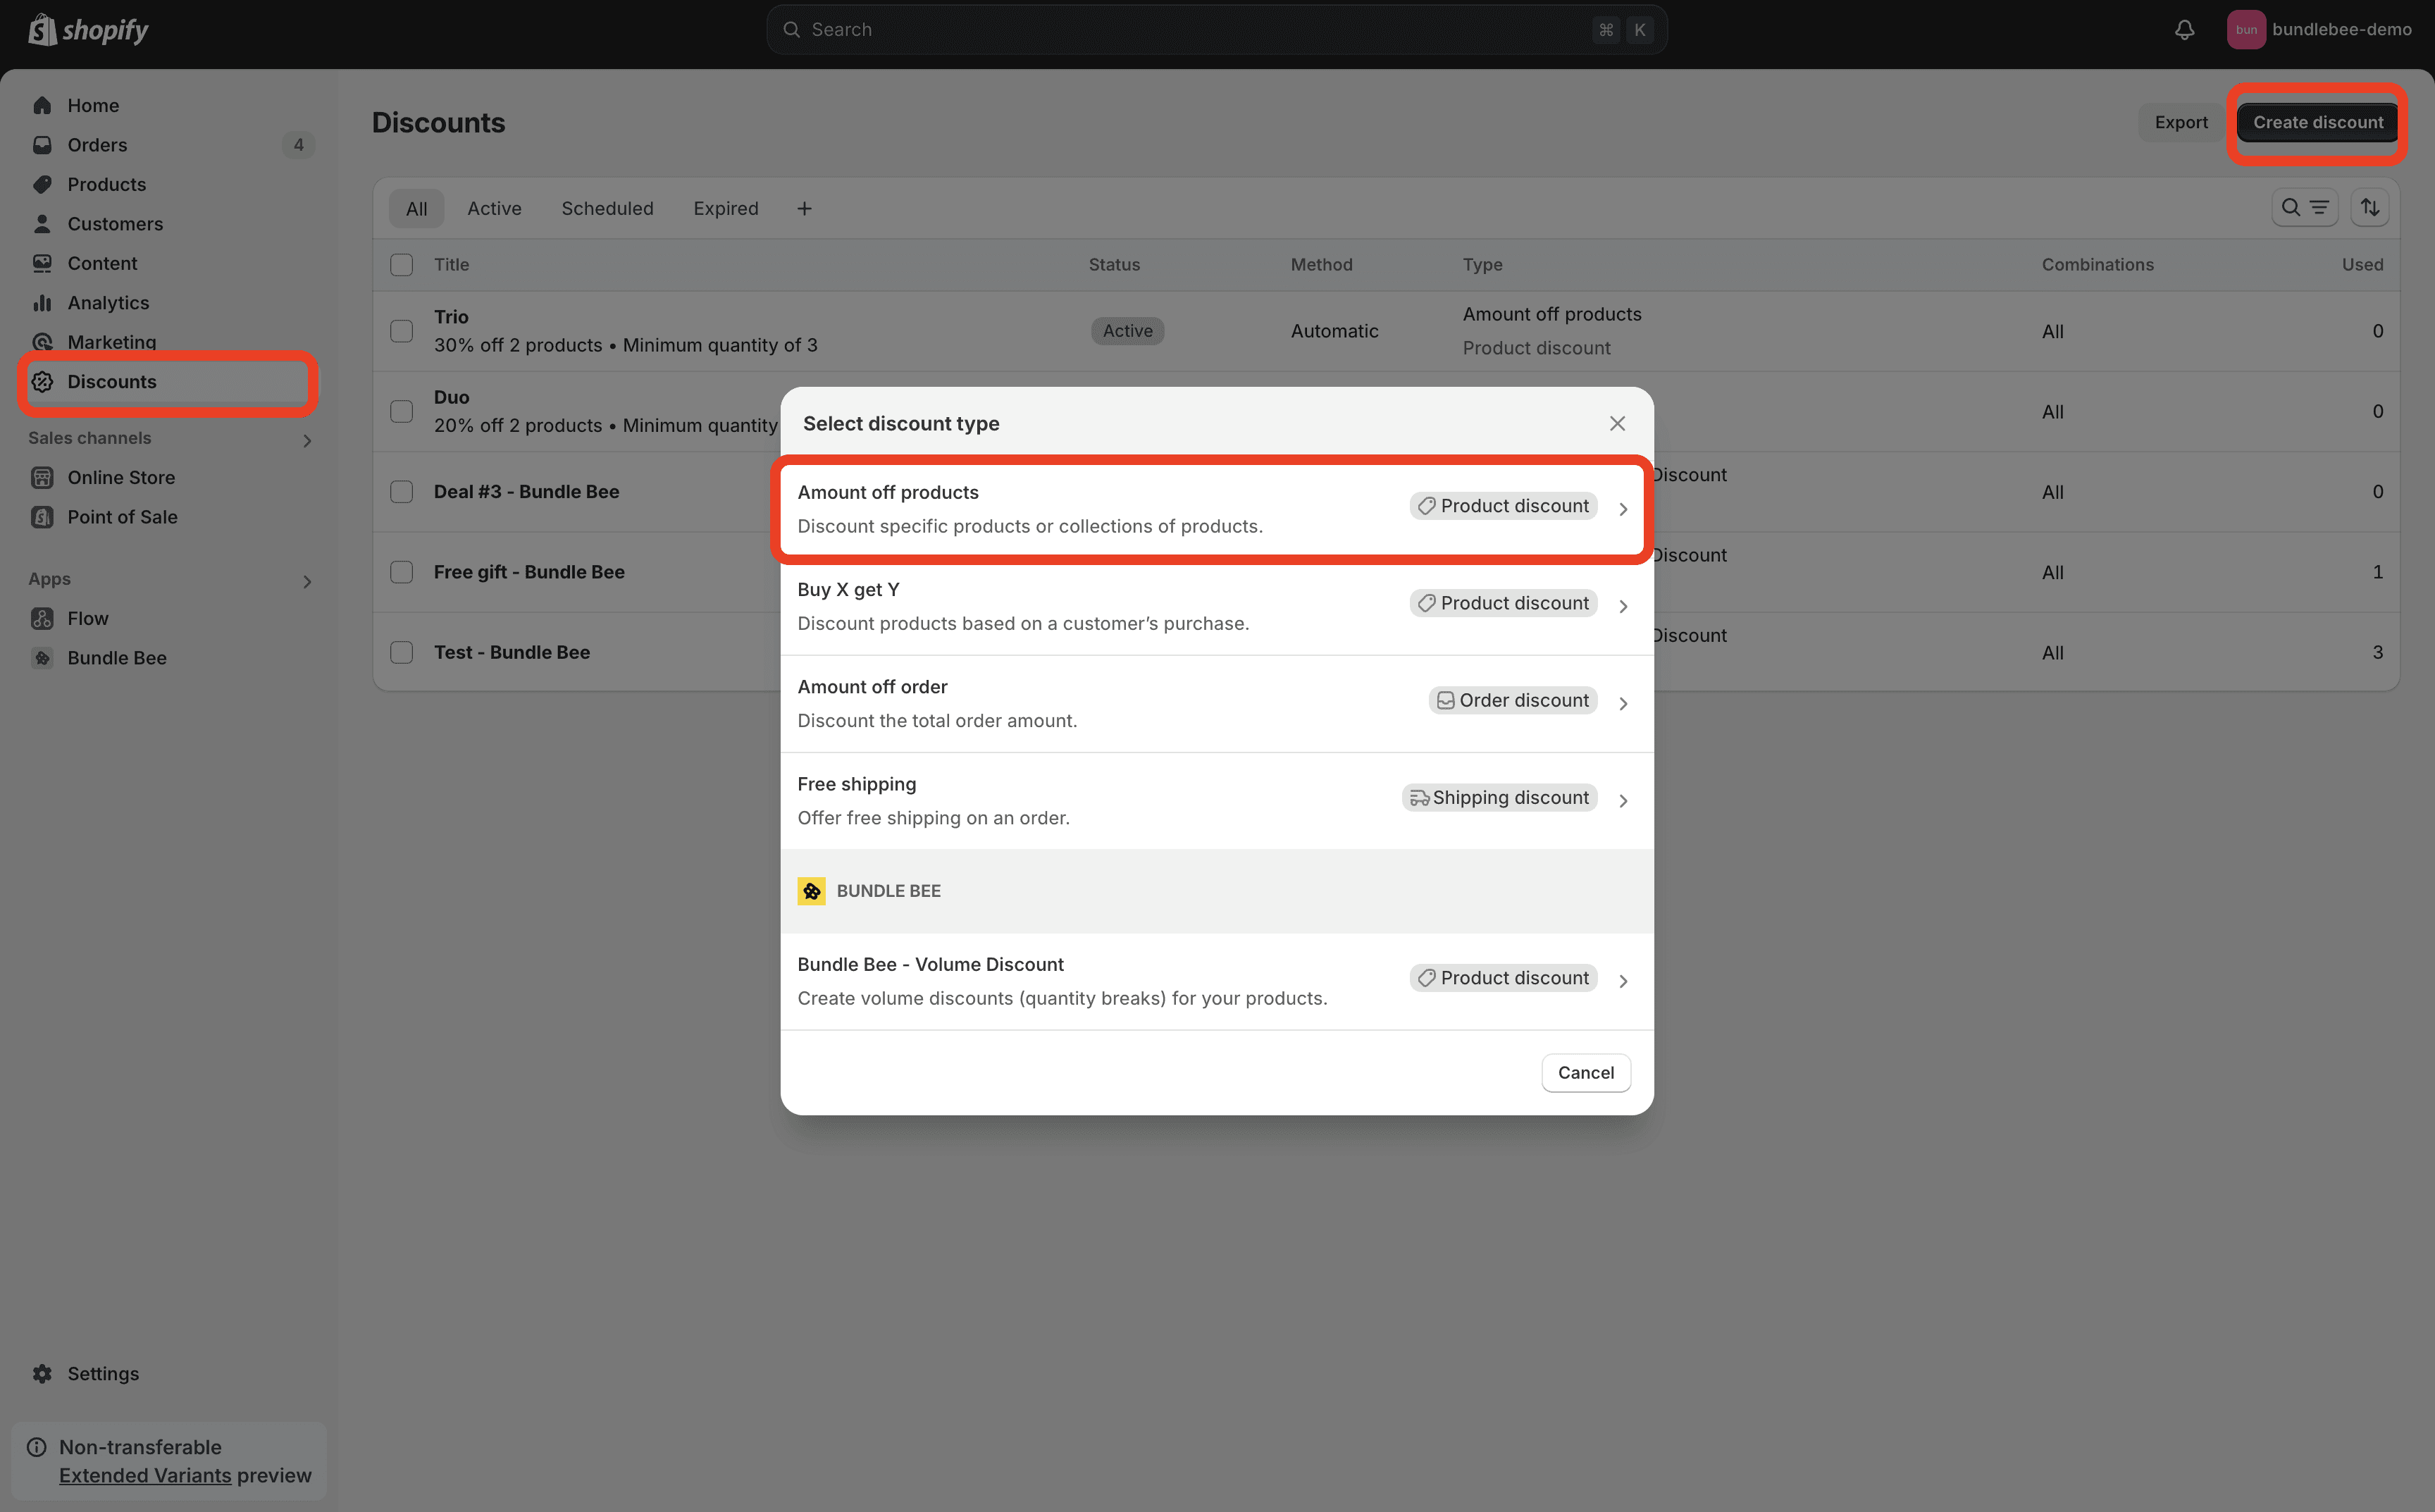
Go to the Discounts Page:
In your Shopify Admin, navigate to Discounts.
Click on Create Discount and select Amount off products.
Create the "Duo" Discount:
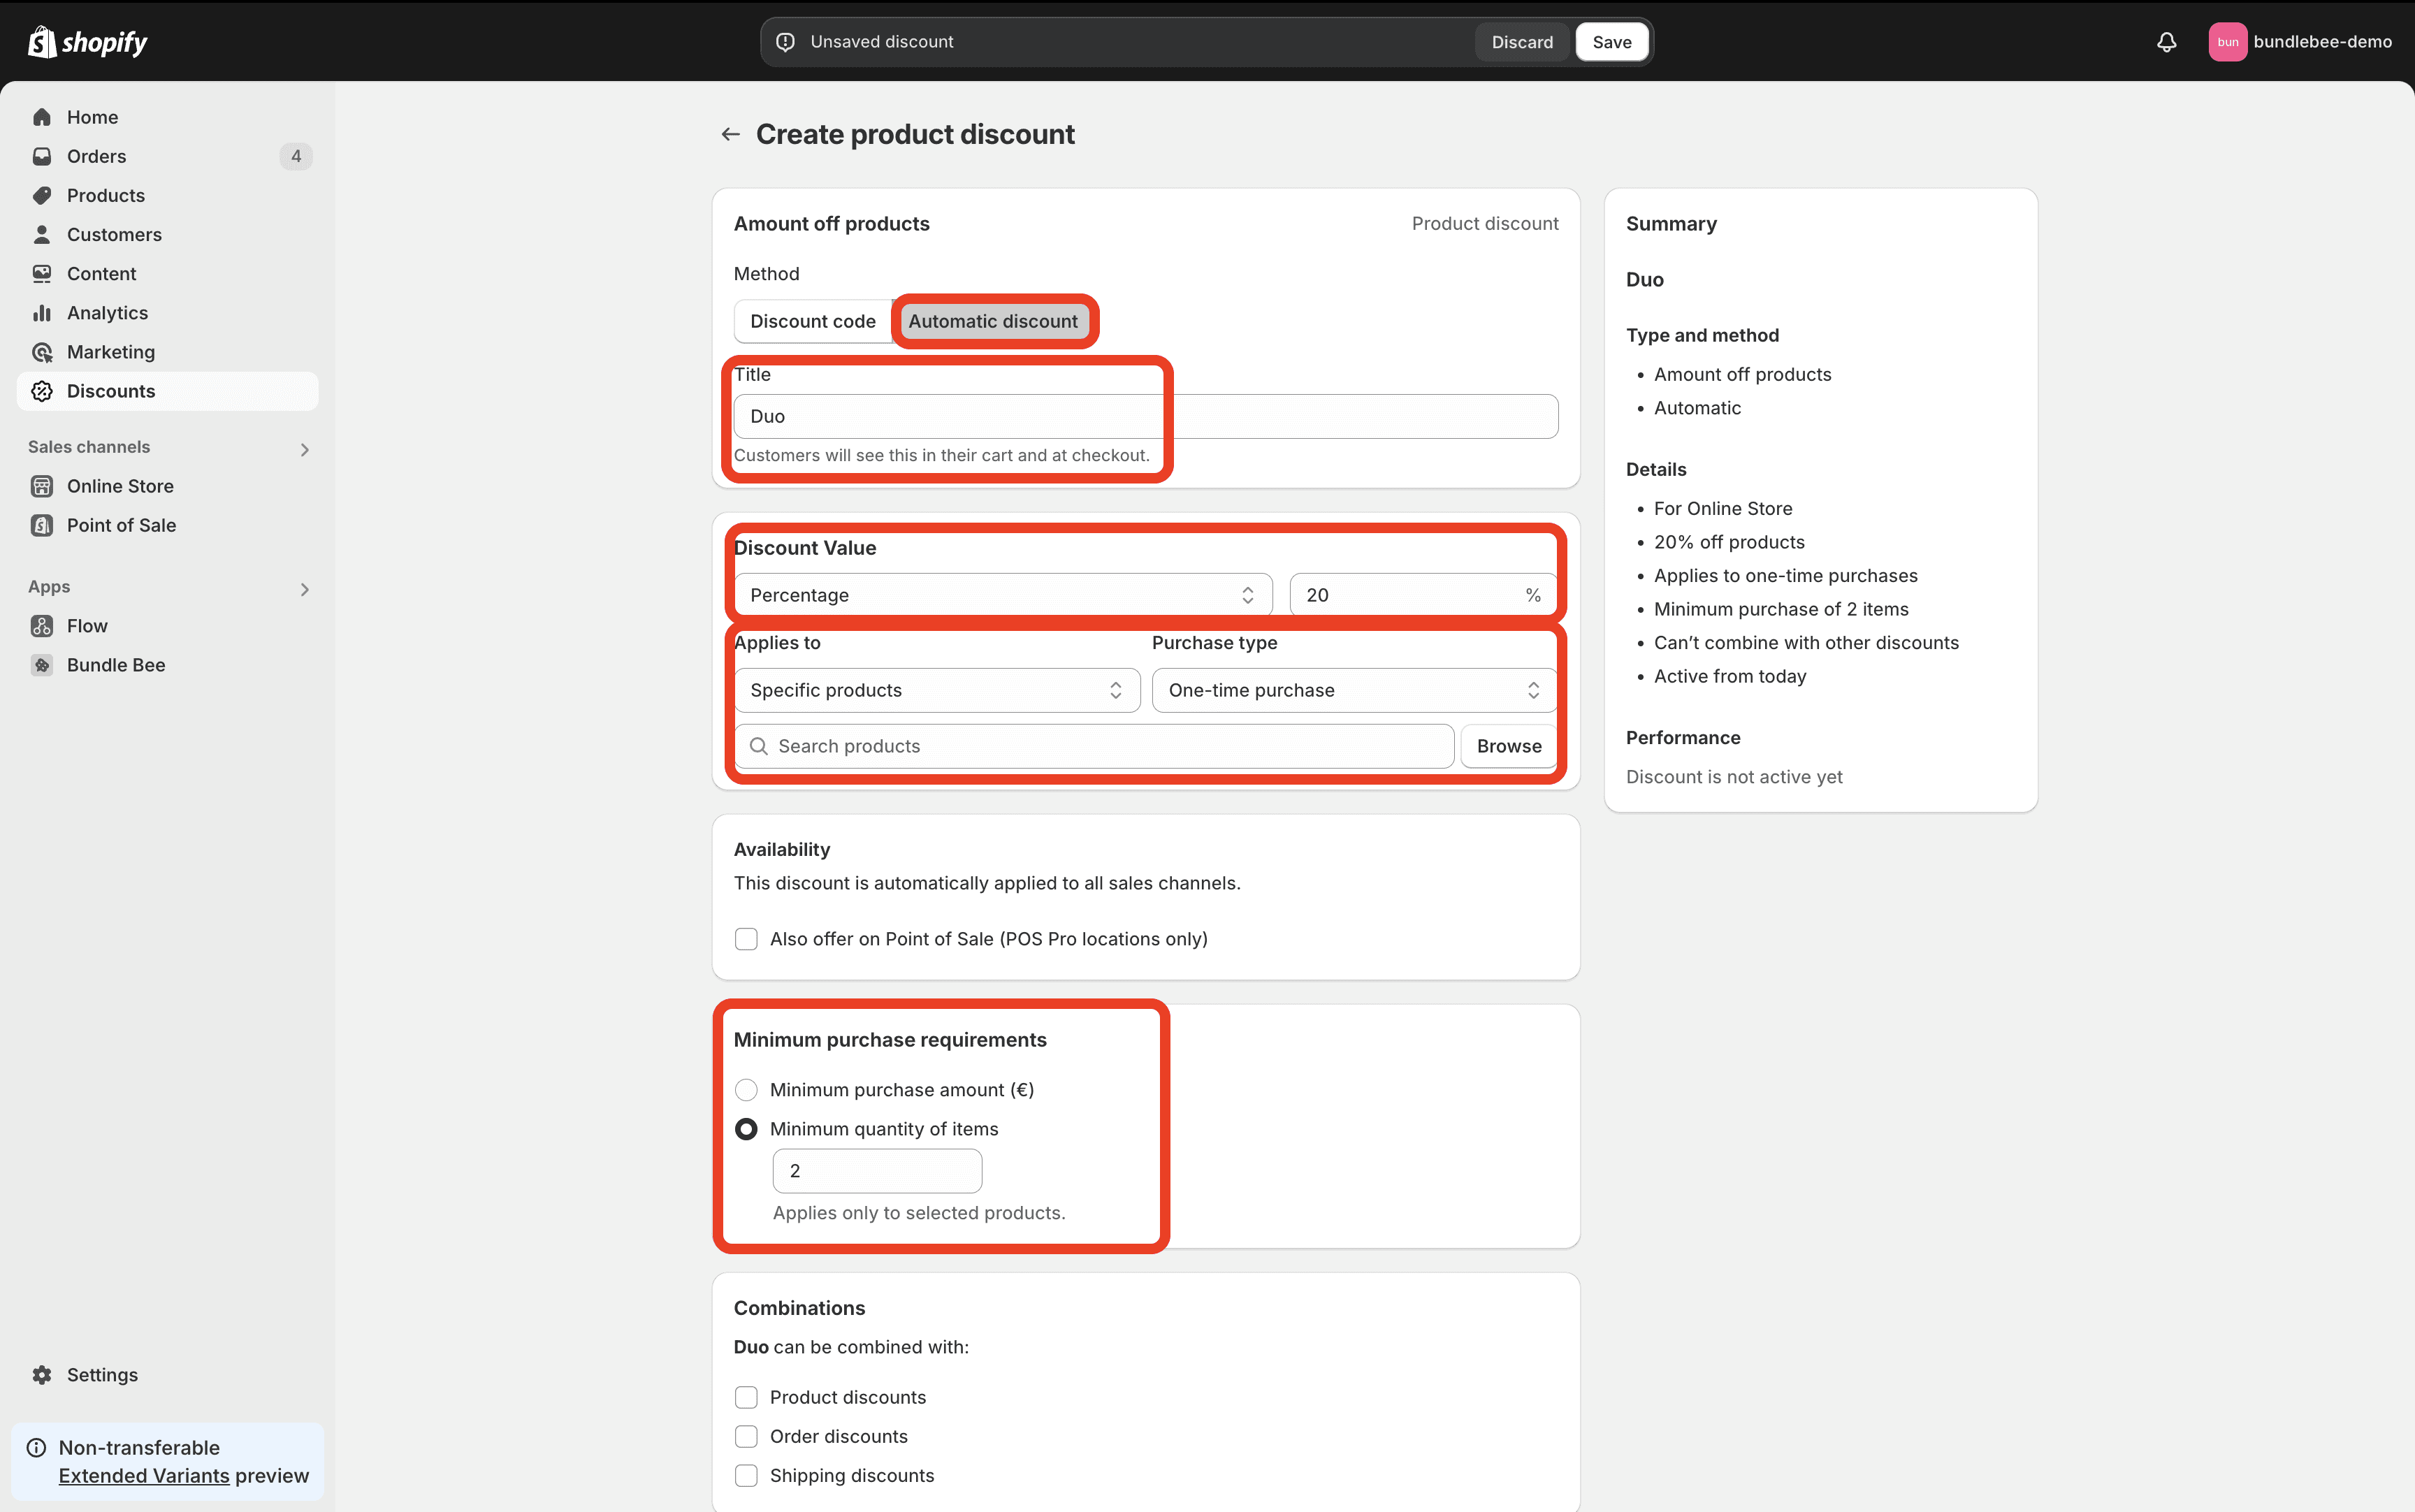
Choose Automatic discount for the method setting.
Name the discount "Duo" (Customers will see this in their cart and at checkout).
Set the discount amount to 20% (or your desired percentage).
In the Applies to settings section, select Specific products and make sure to select the products this quantity discount should apply to.
In the Minimum purchase requirements settings section, click on the Minimum quantity of items radio button and then enter the minimum quantity that should be purchased in order for a the discount to be triggered on a product. In our example we will set it to 2.
Combinations are up to you, depending on whether or not you'd like this discount to combine with other types of discounts that you can create in your Shopify store.
Create the "Trio" Discount:
Follow the same steps as above to create a "Trio" discount that offers a 30% off discount when the quantity is 3 or greater.
Repeat for Additional Breaks:
If you have more quantity breaks, repeat the process for each one, adjusting the minimum quantity and discount according to your needs.
2. Create a Quantity Break Metaobject Definition
Metaobjects are custom data structures in Shopify that allow you to store and manage additional information for your products.
Steps to Create a Quantity Break Metaobject Definition:
Access Shopify Admin:
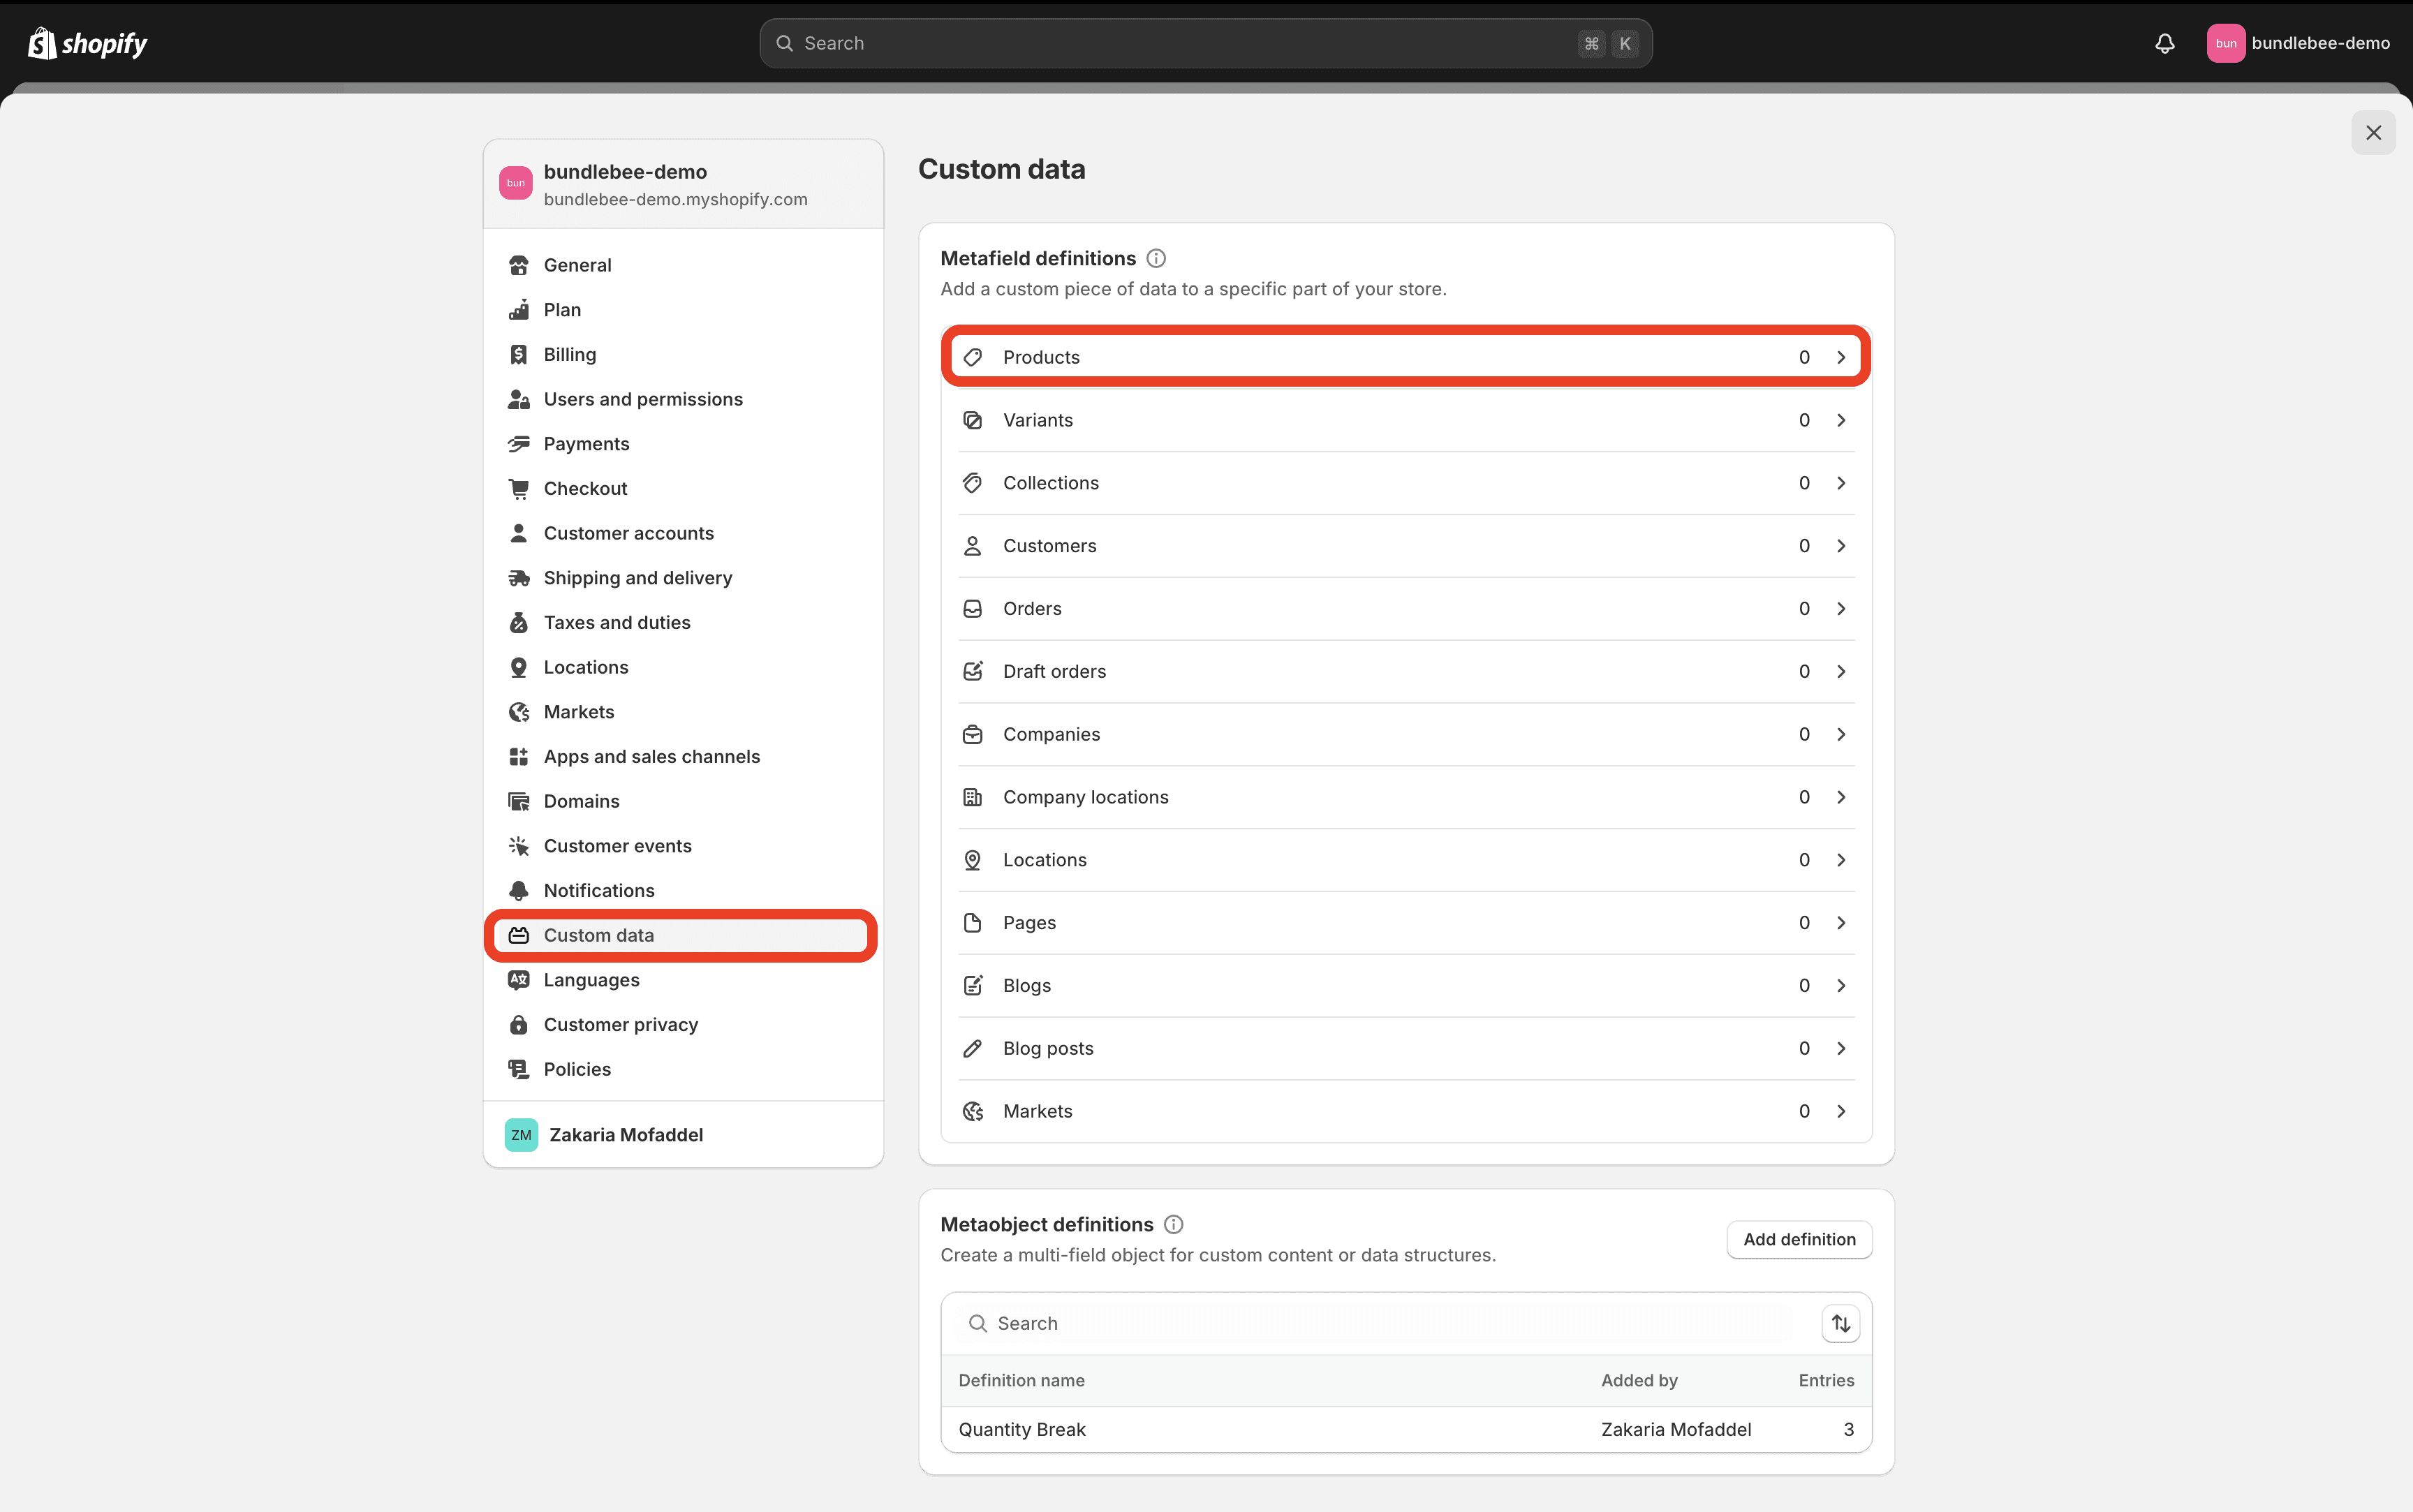
Navigate to Settings > Custom Data > Metaobject definitions.
Click on the Add Definition button (I have already created mine as you can see in the image below).
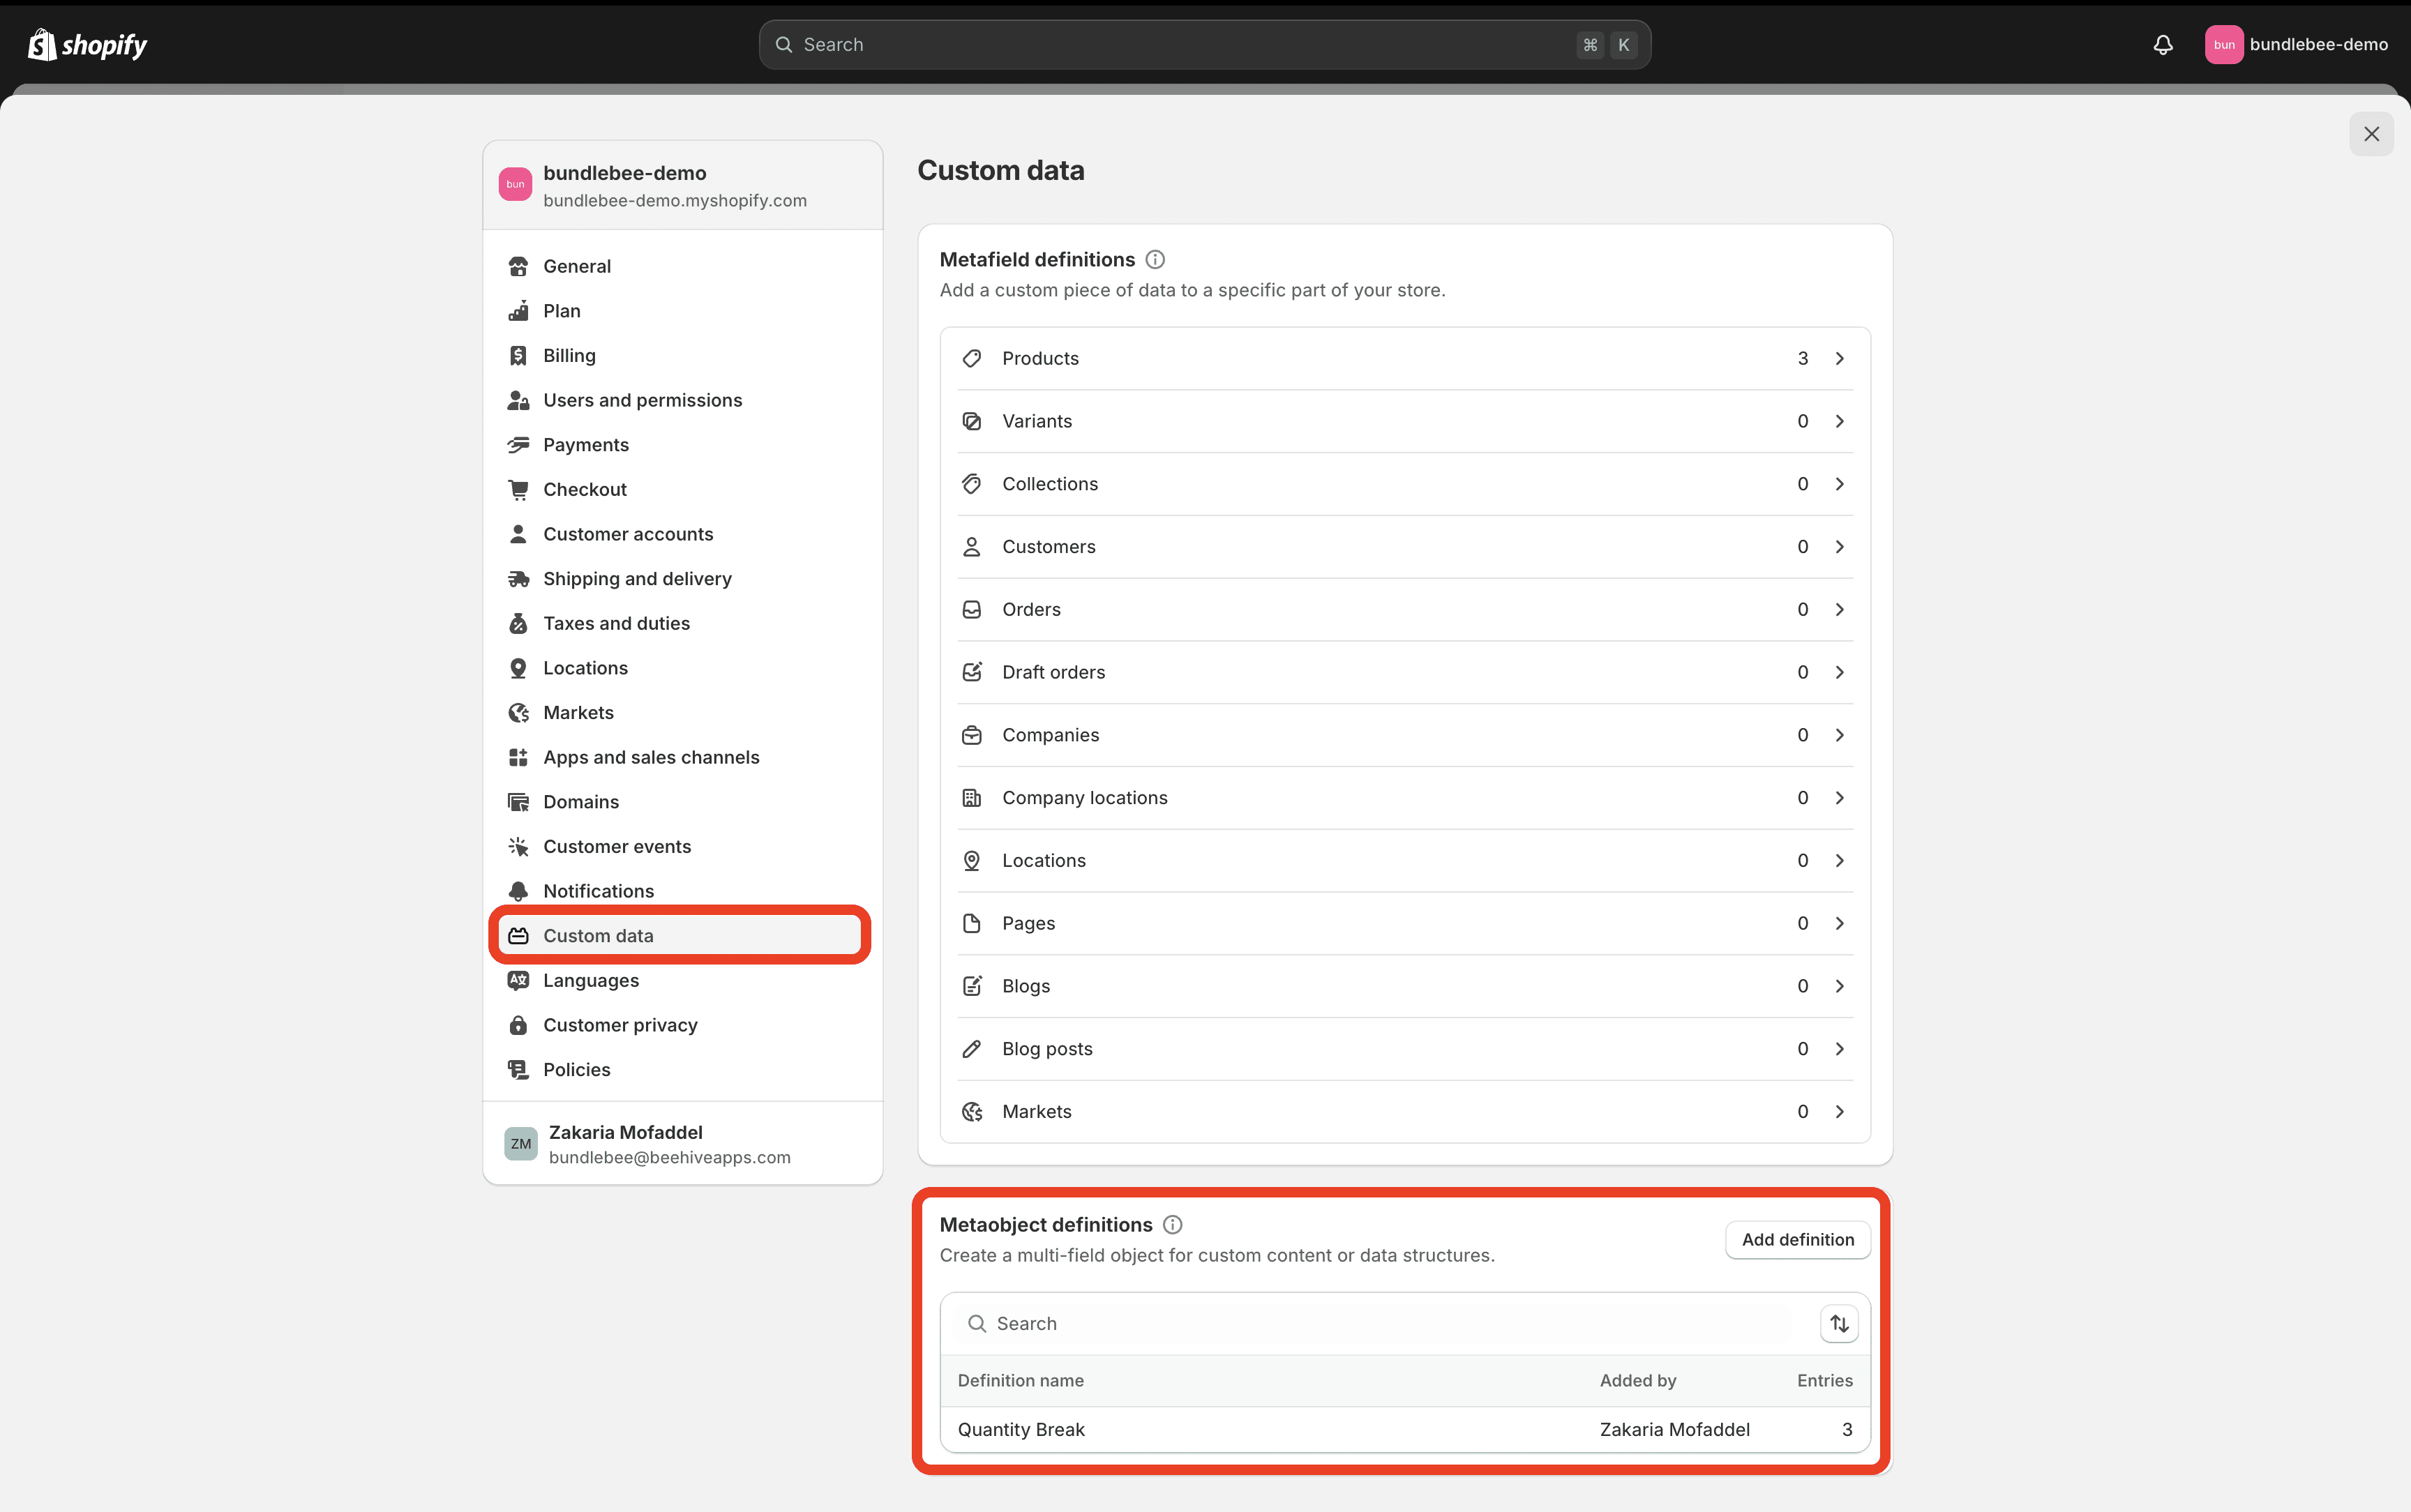
Create a New Metaobject Definition:
Name it Quantity Break (I have already done this step in the screenshot above, but
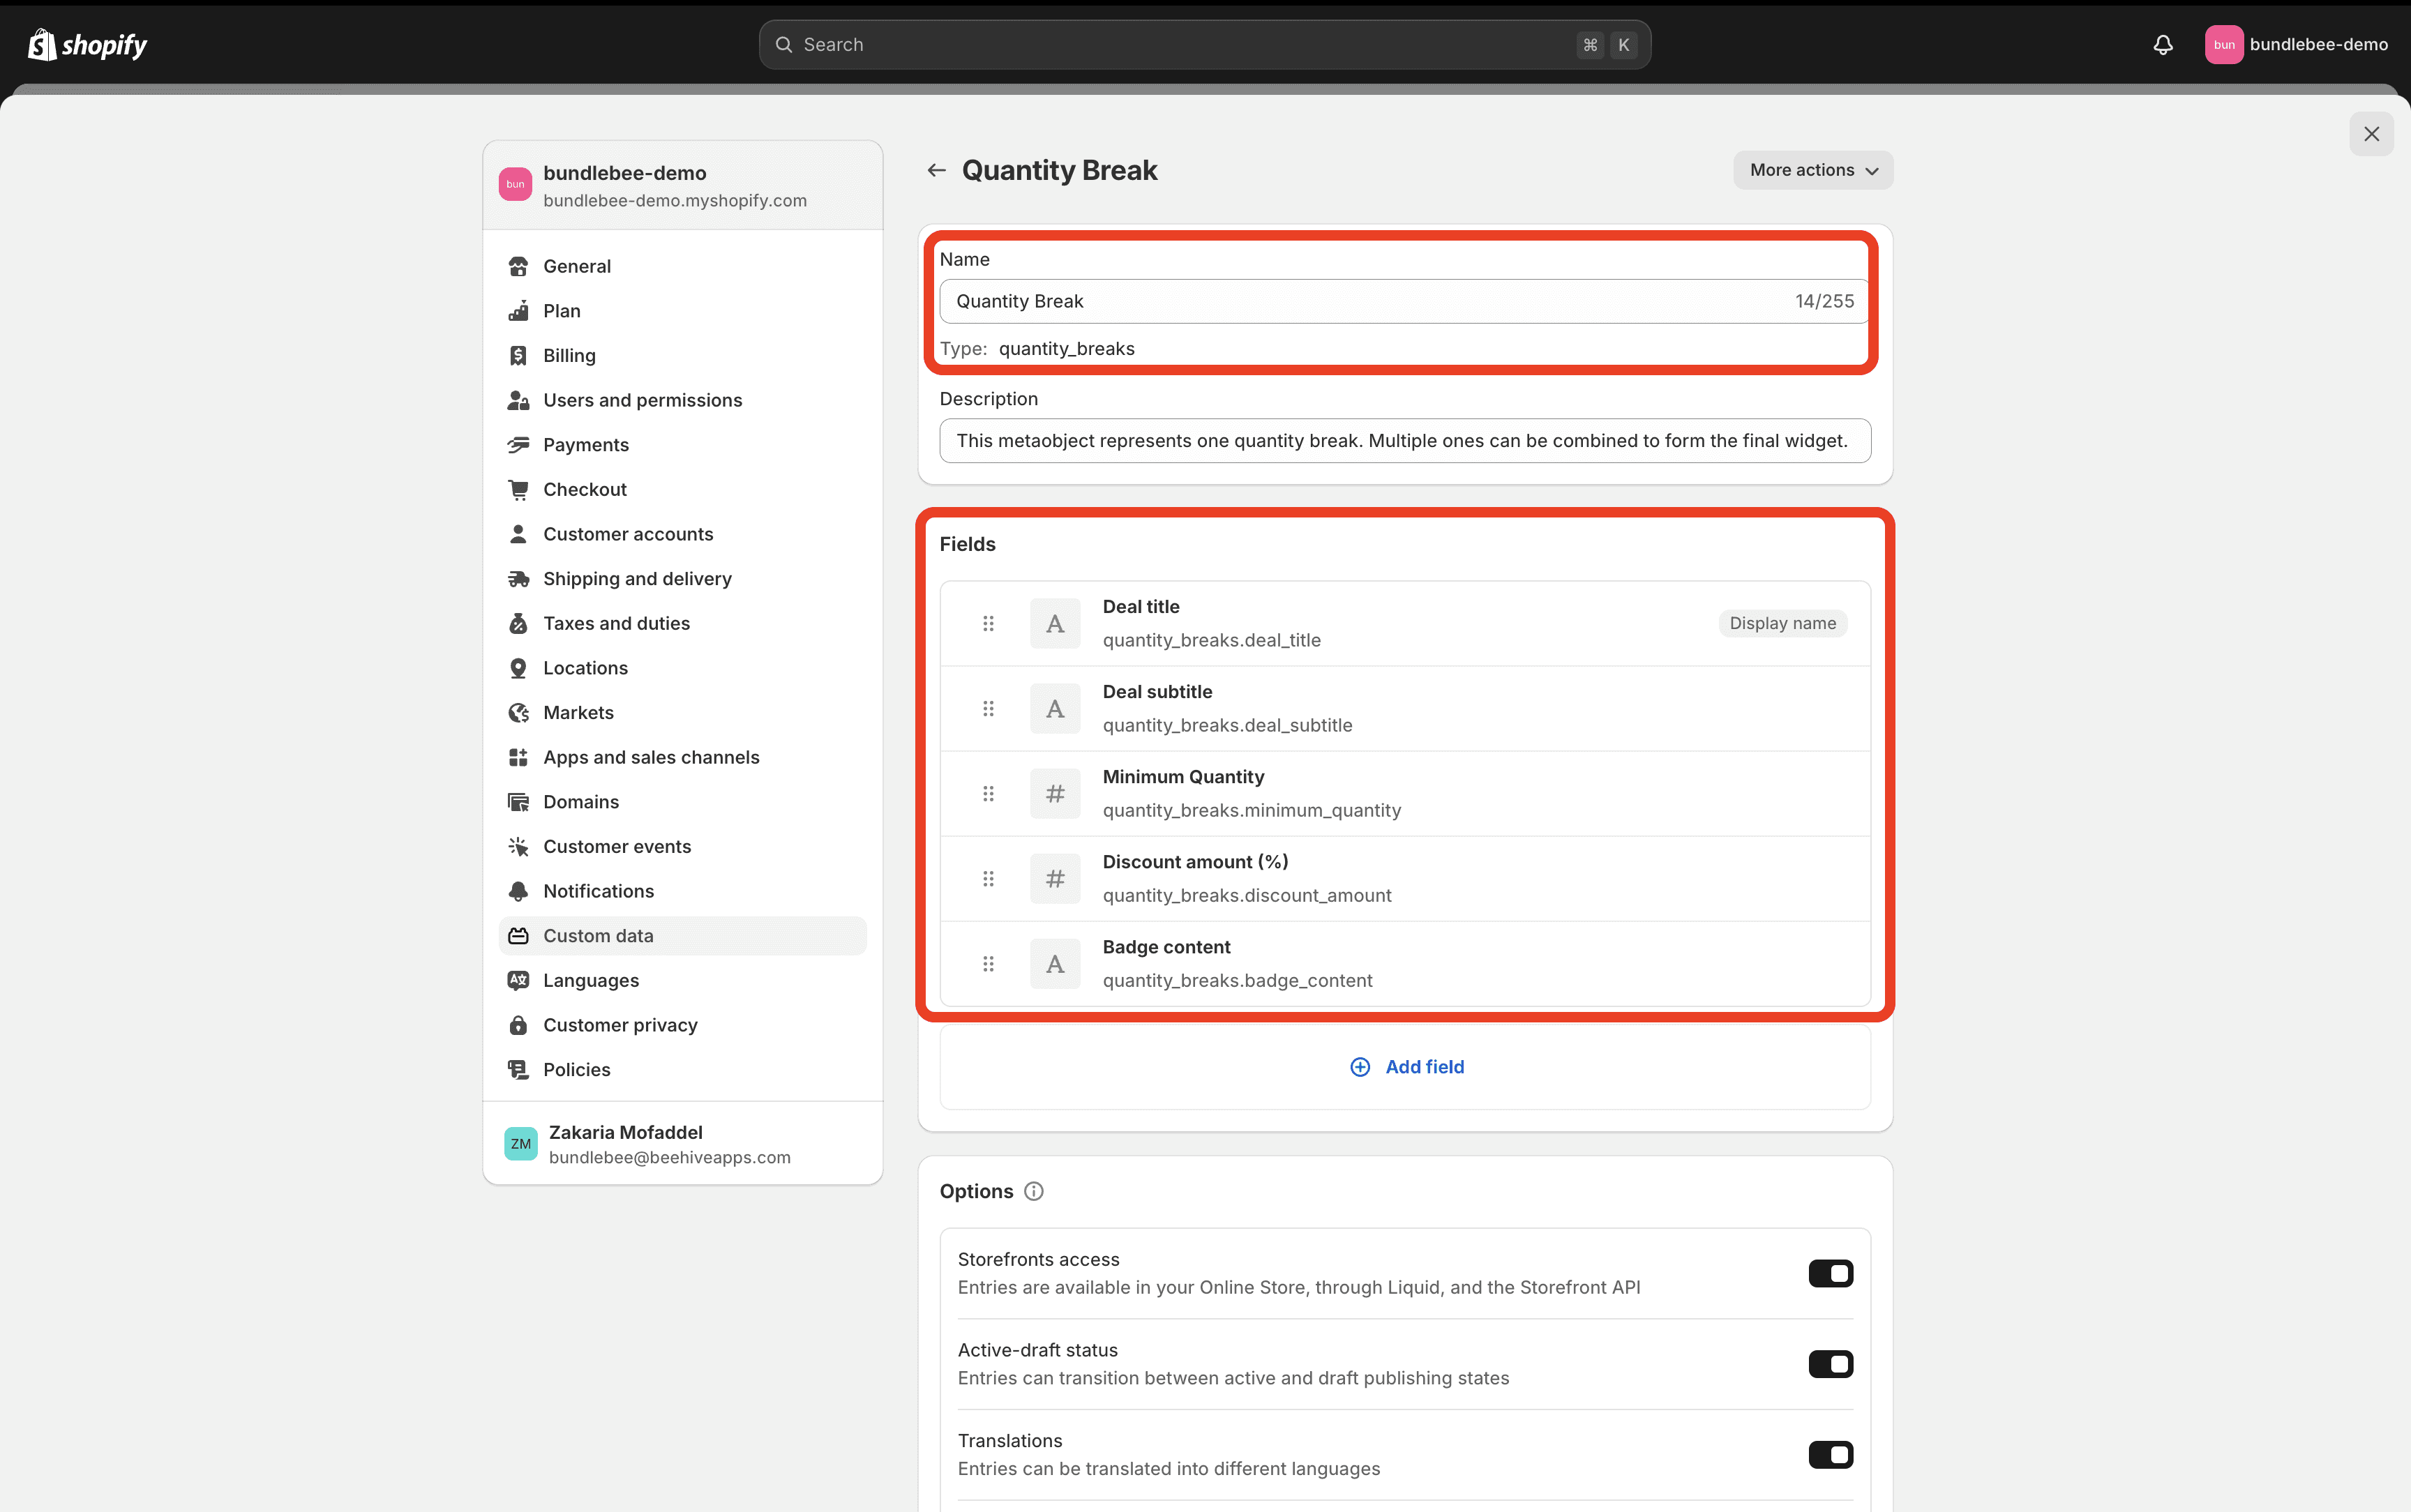
Add the fields to the Metaobject Definition:
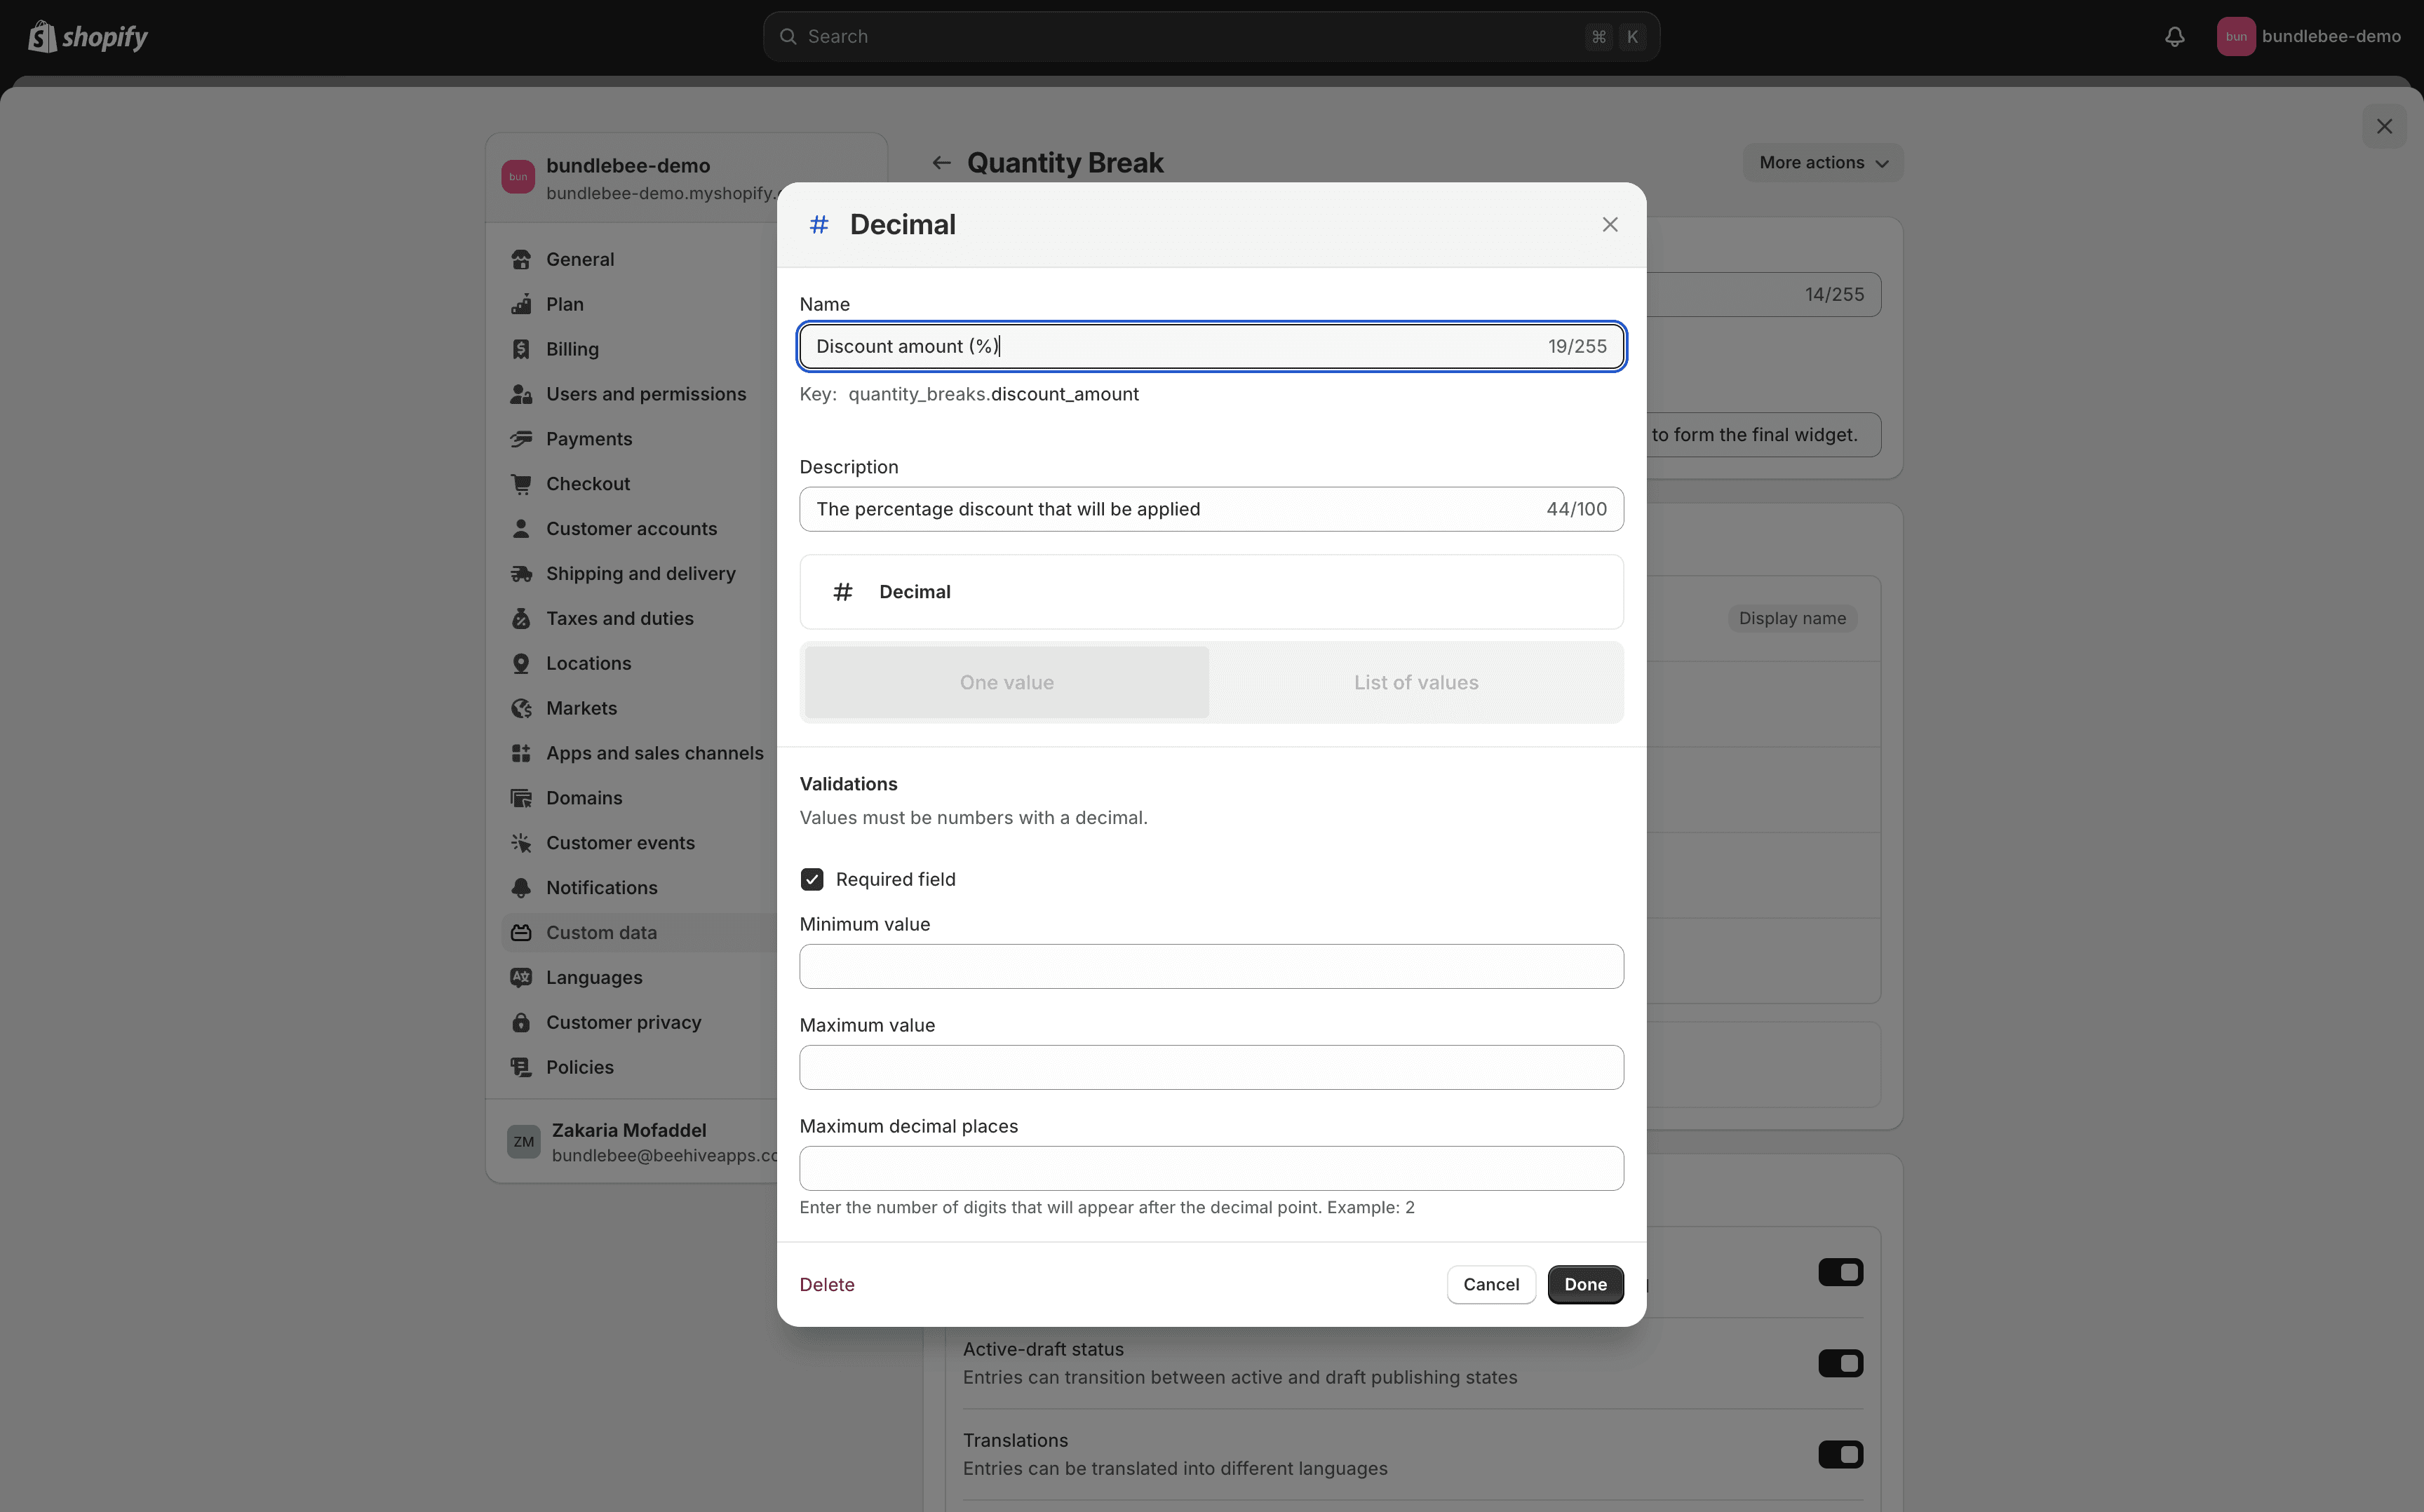
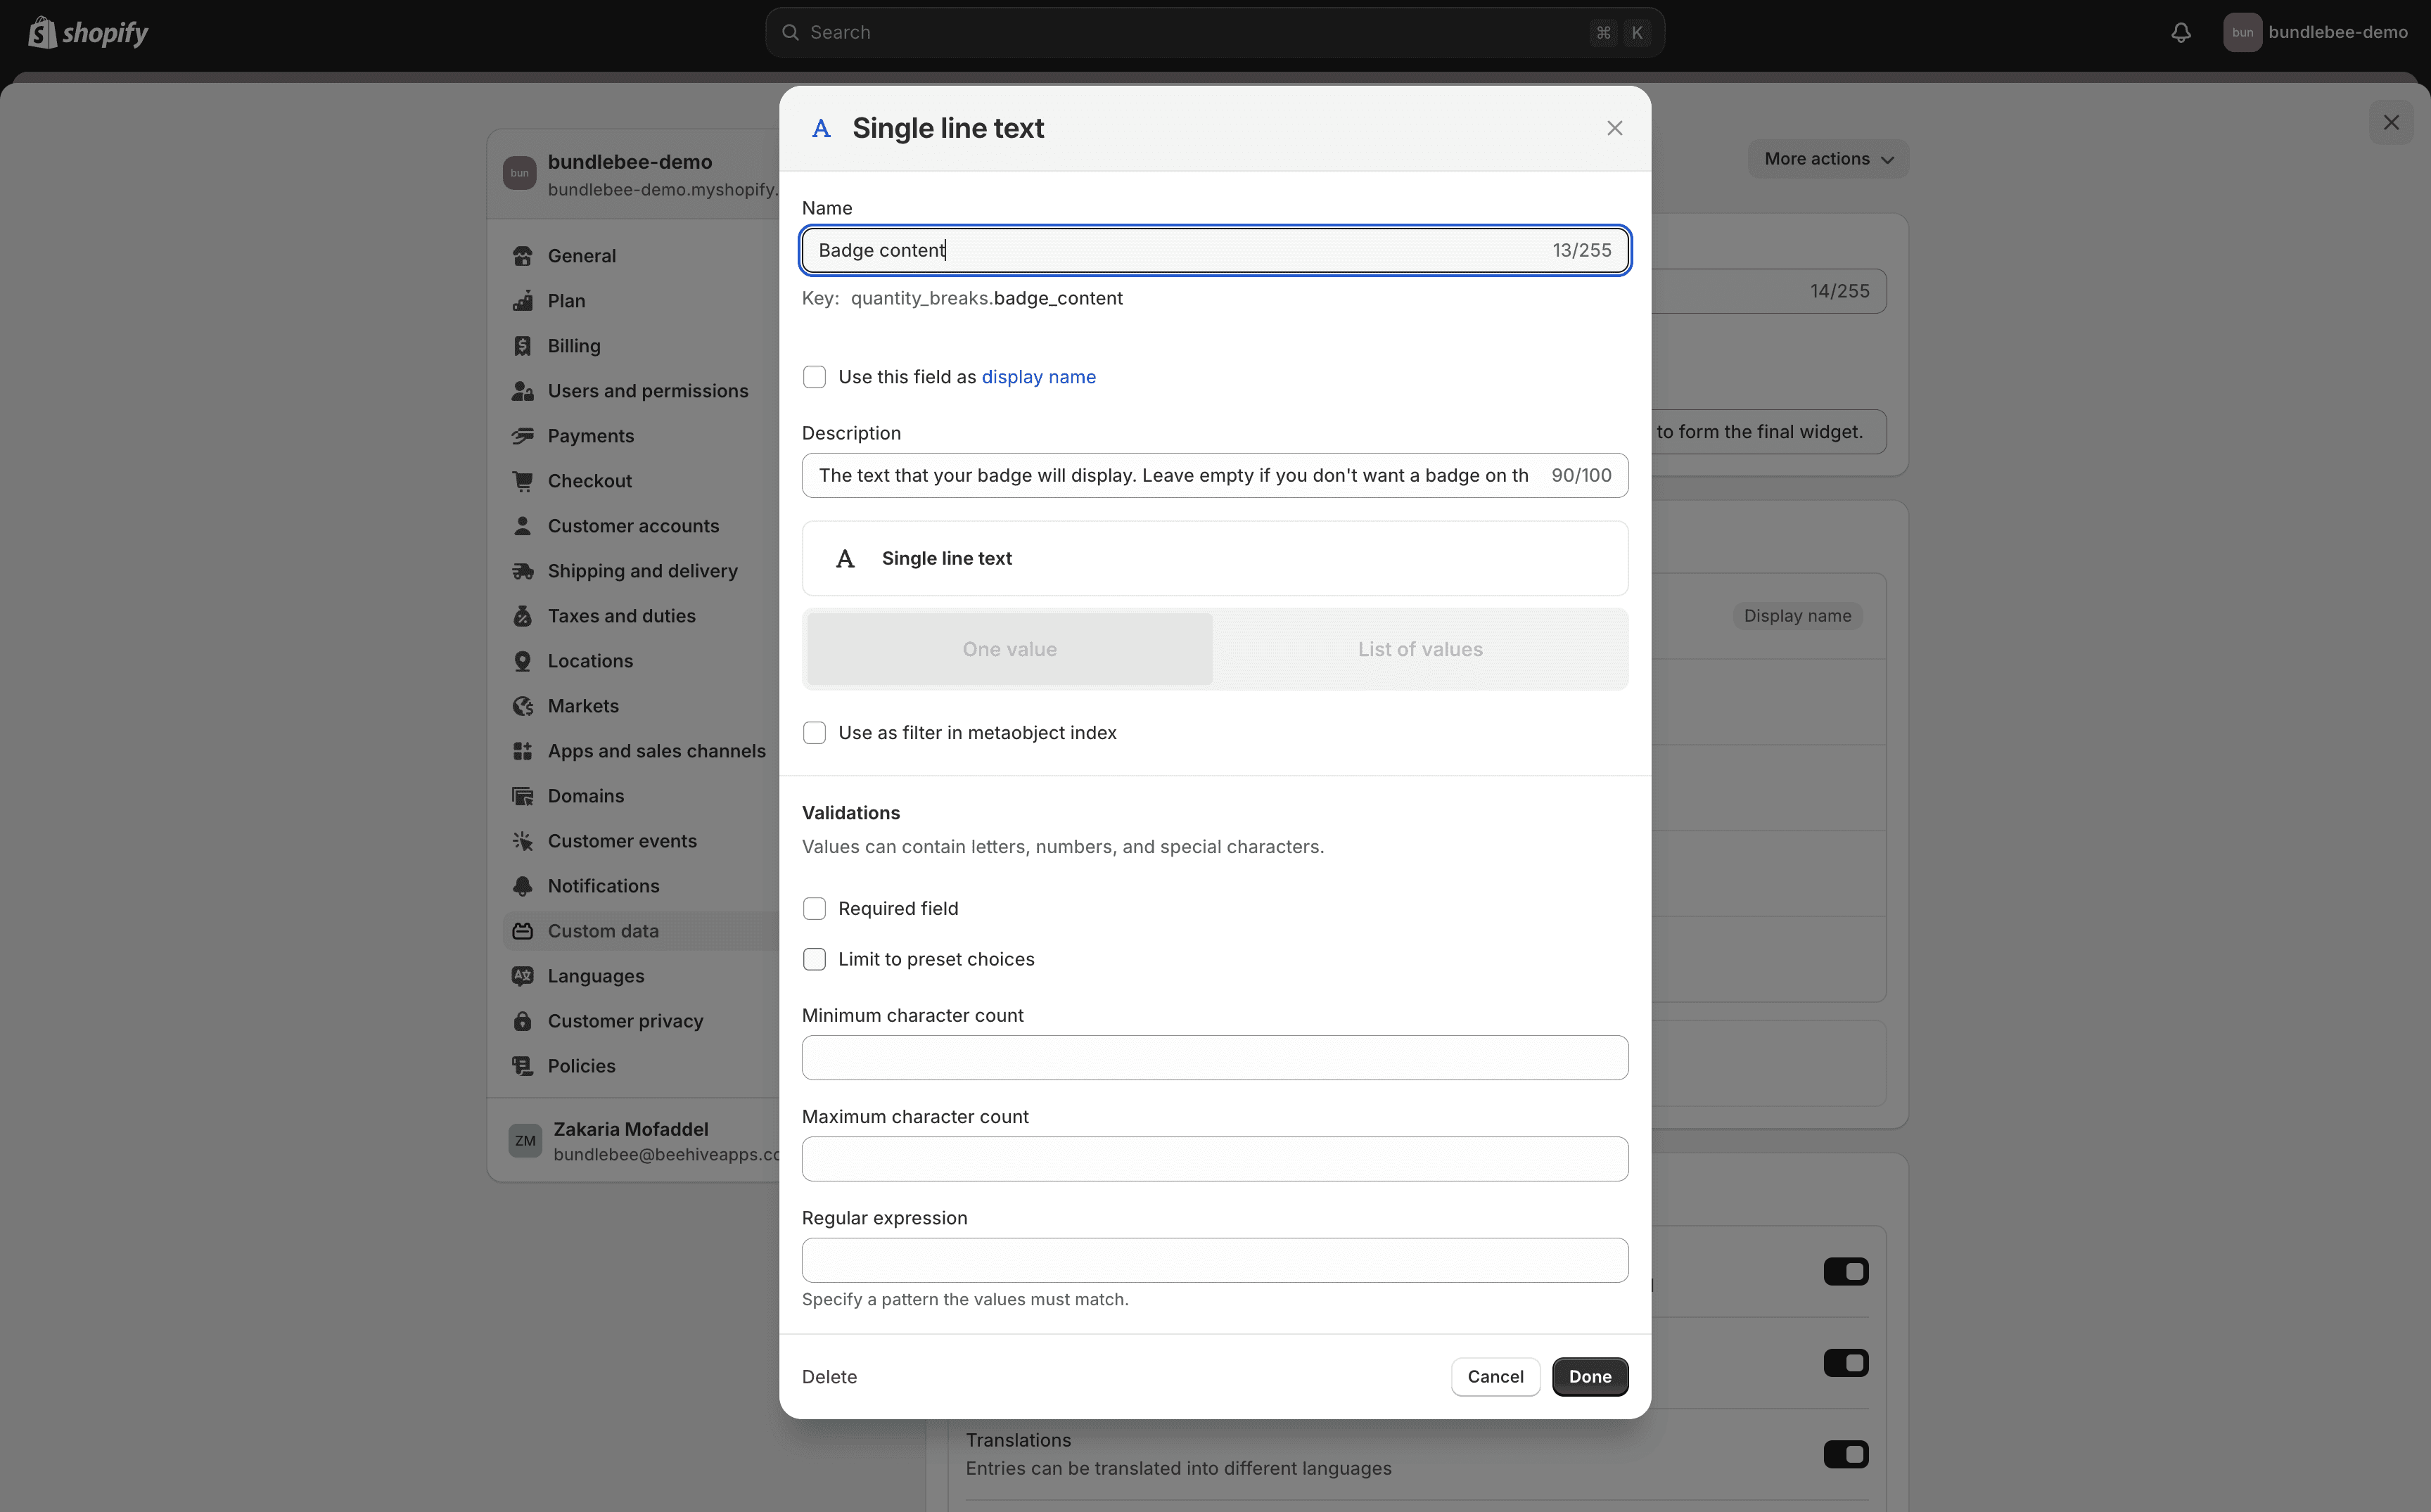
Make sure the names and settings perfectly match the ones shown below in order for this to work correctly.
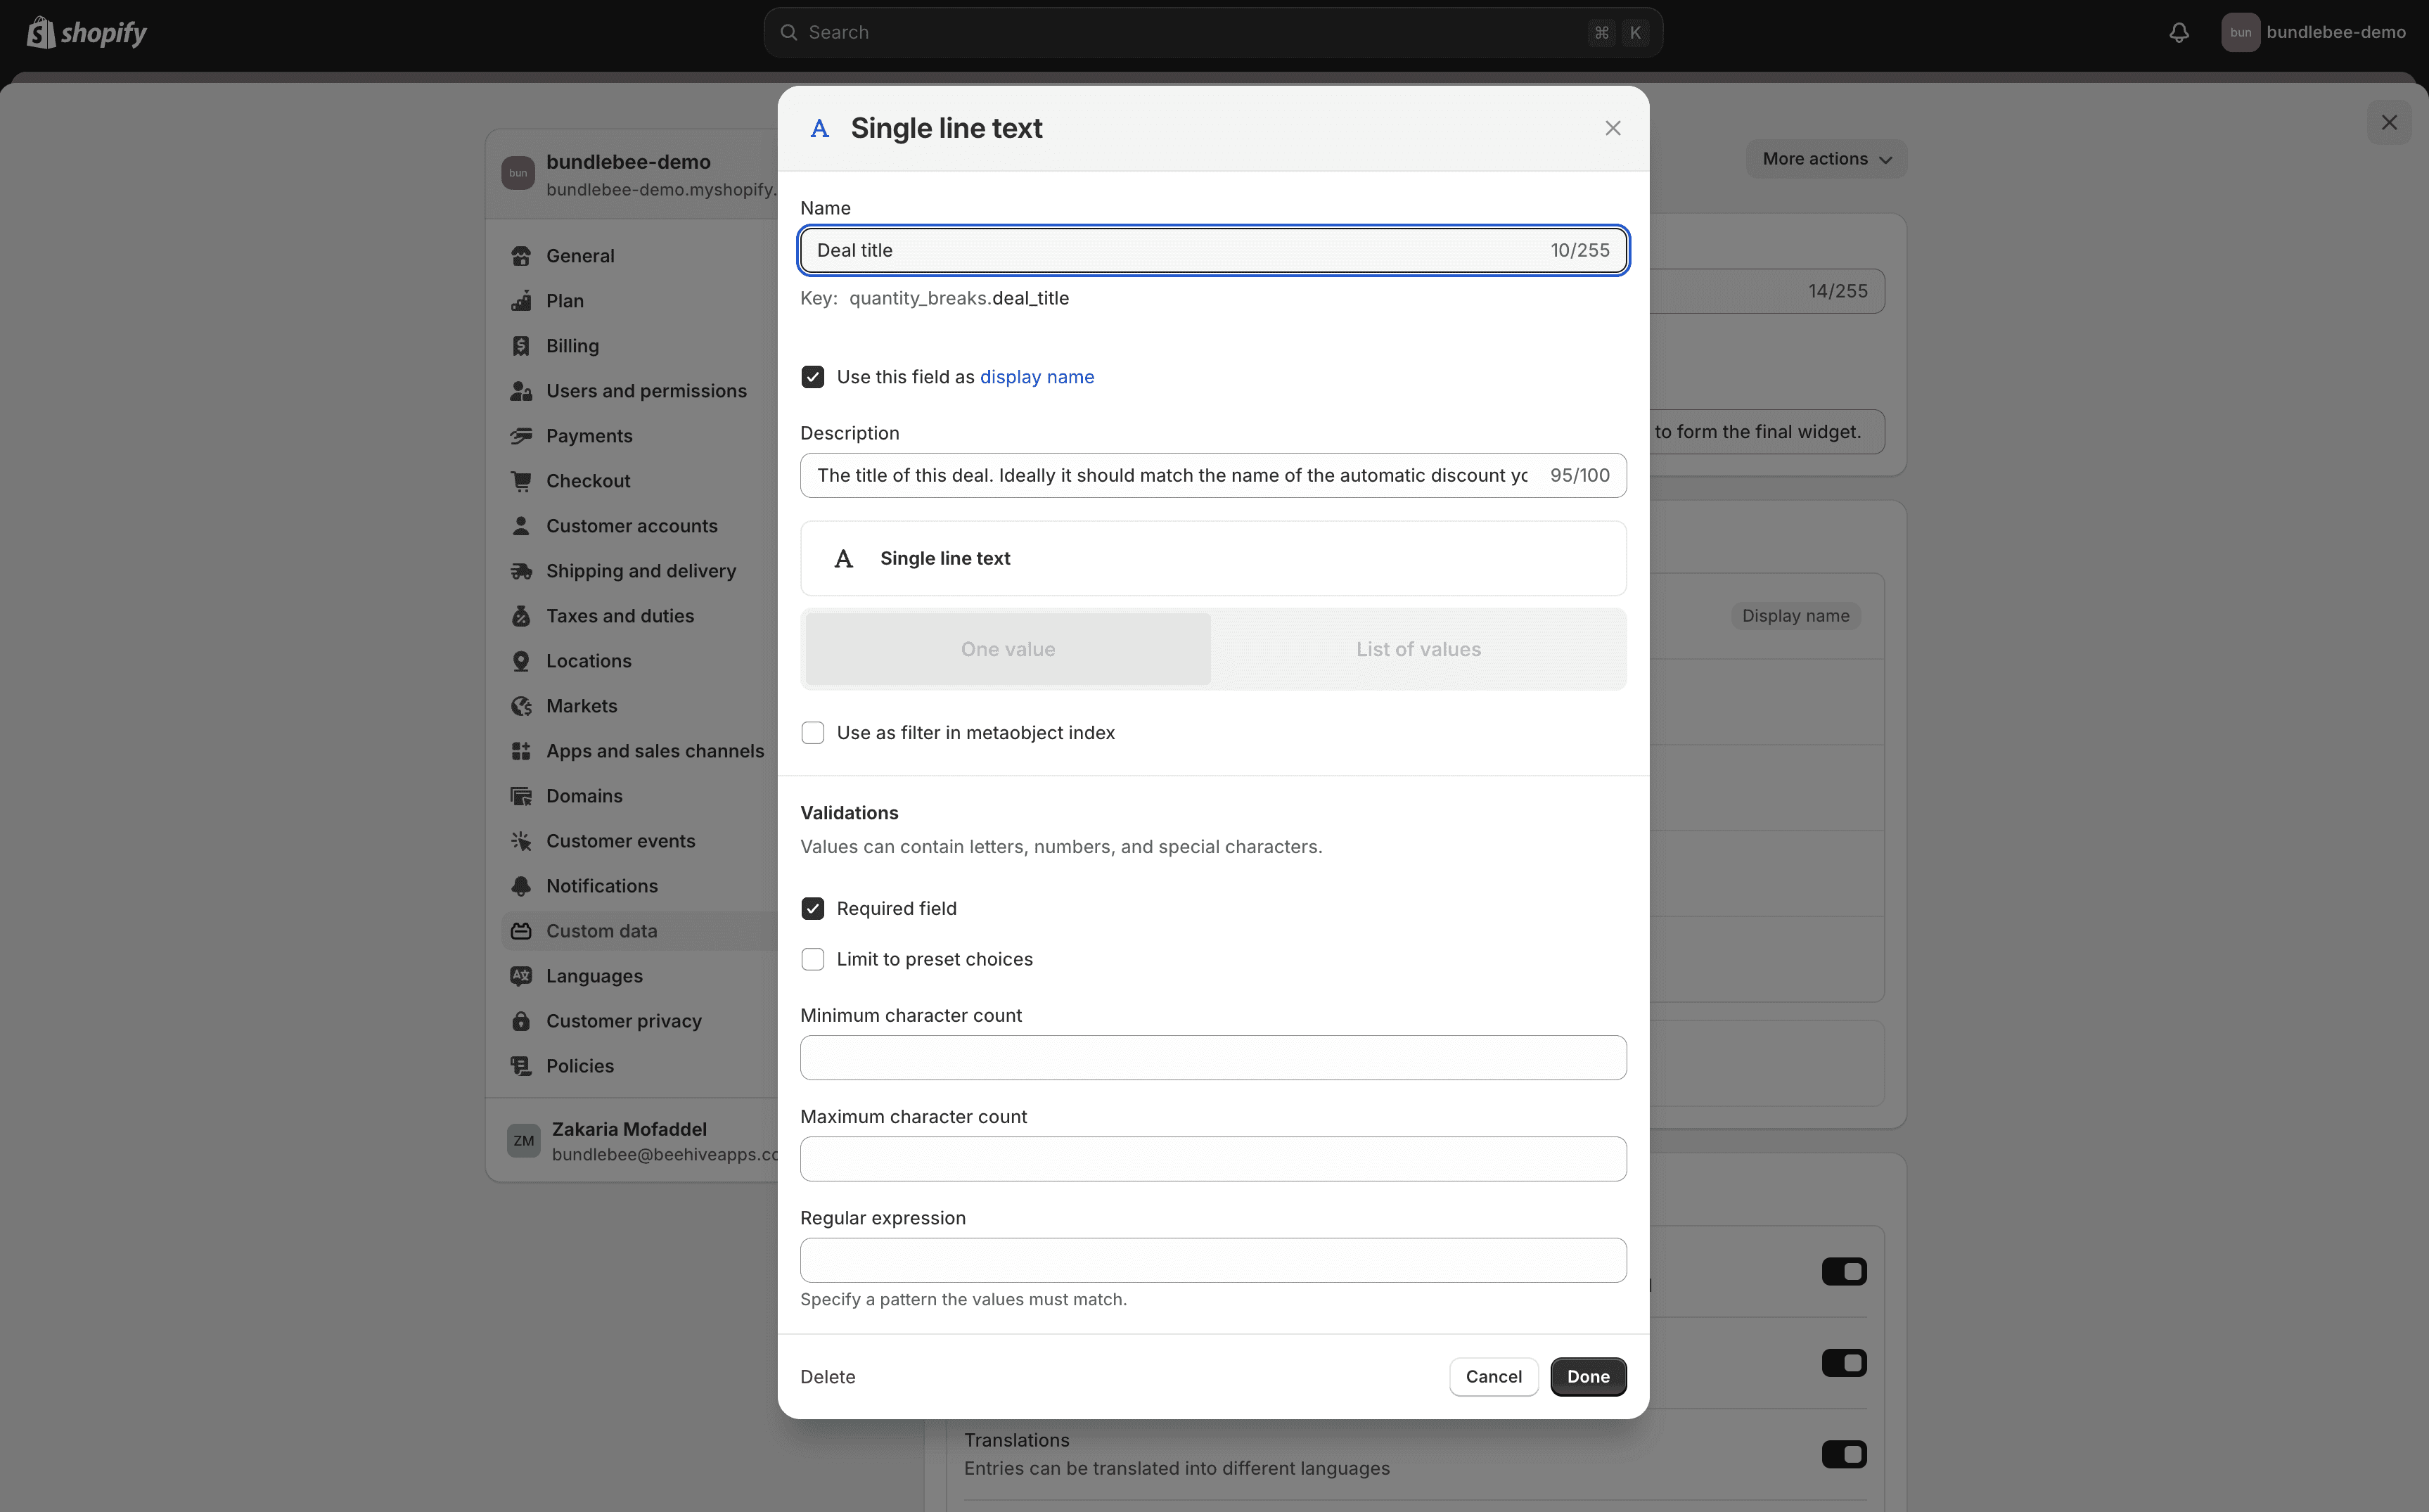
Deal title:
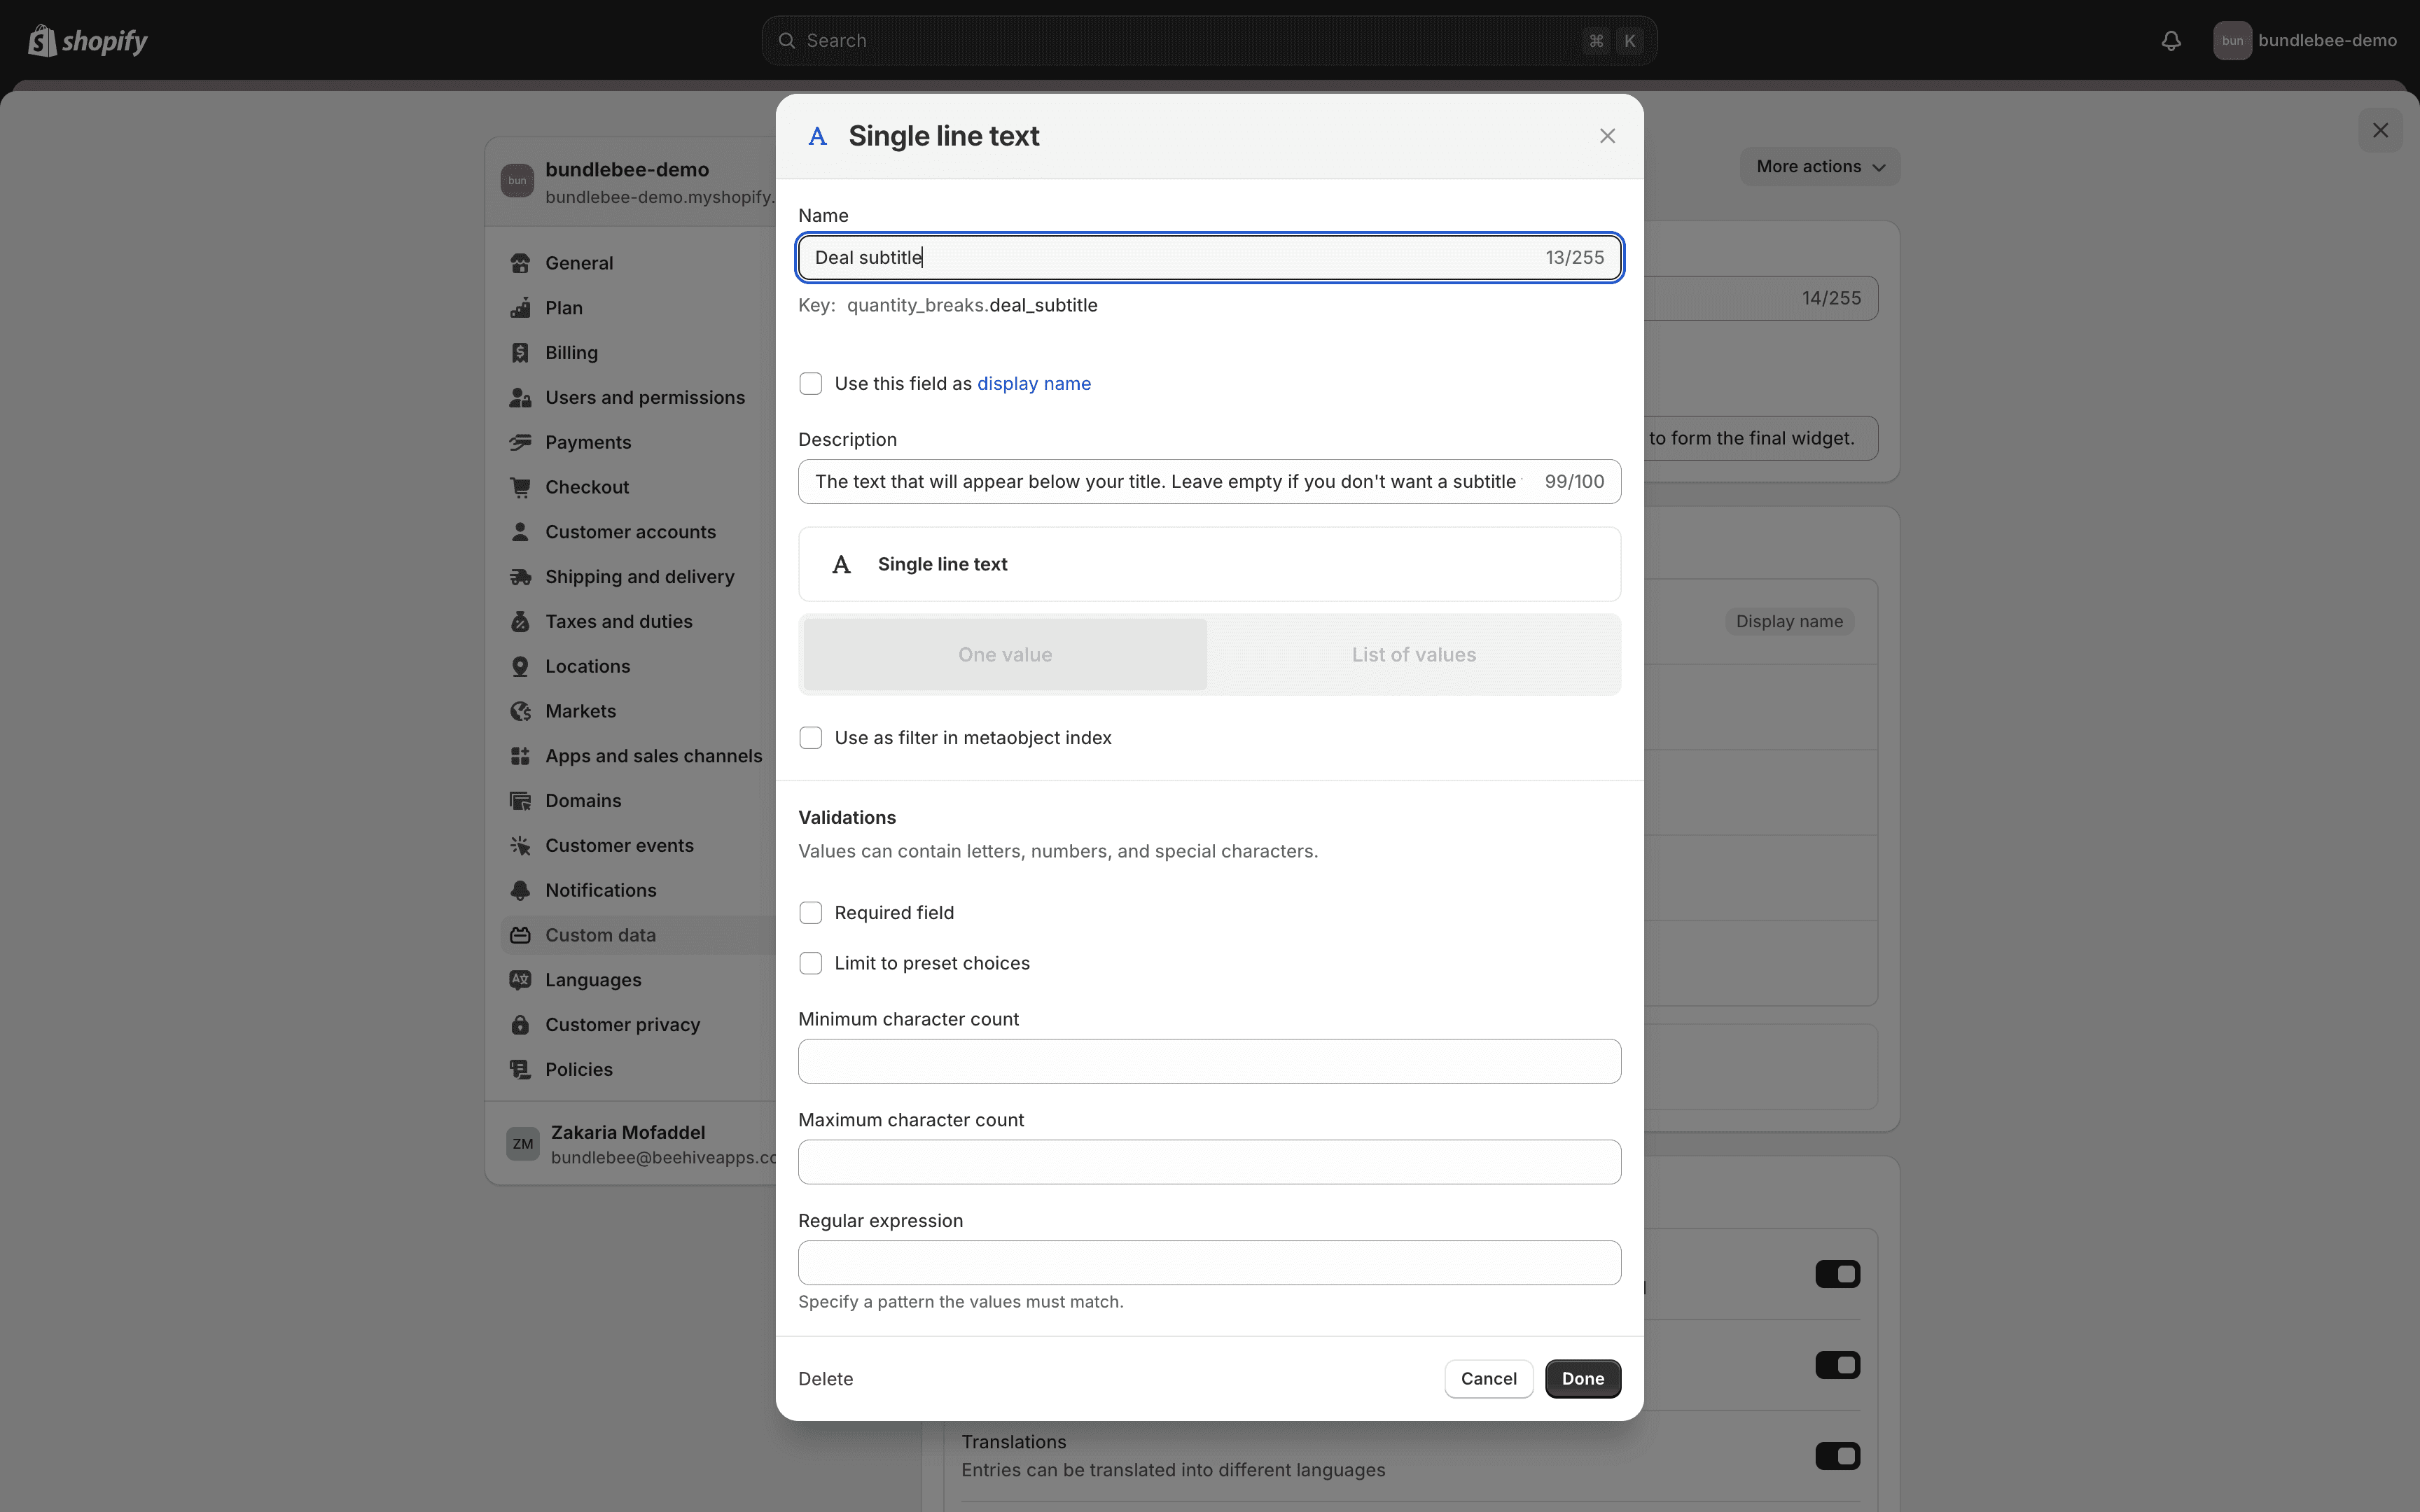
Deal subtitle
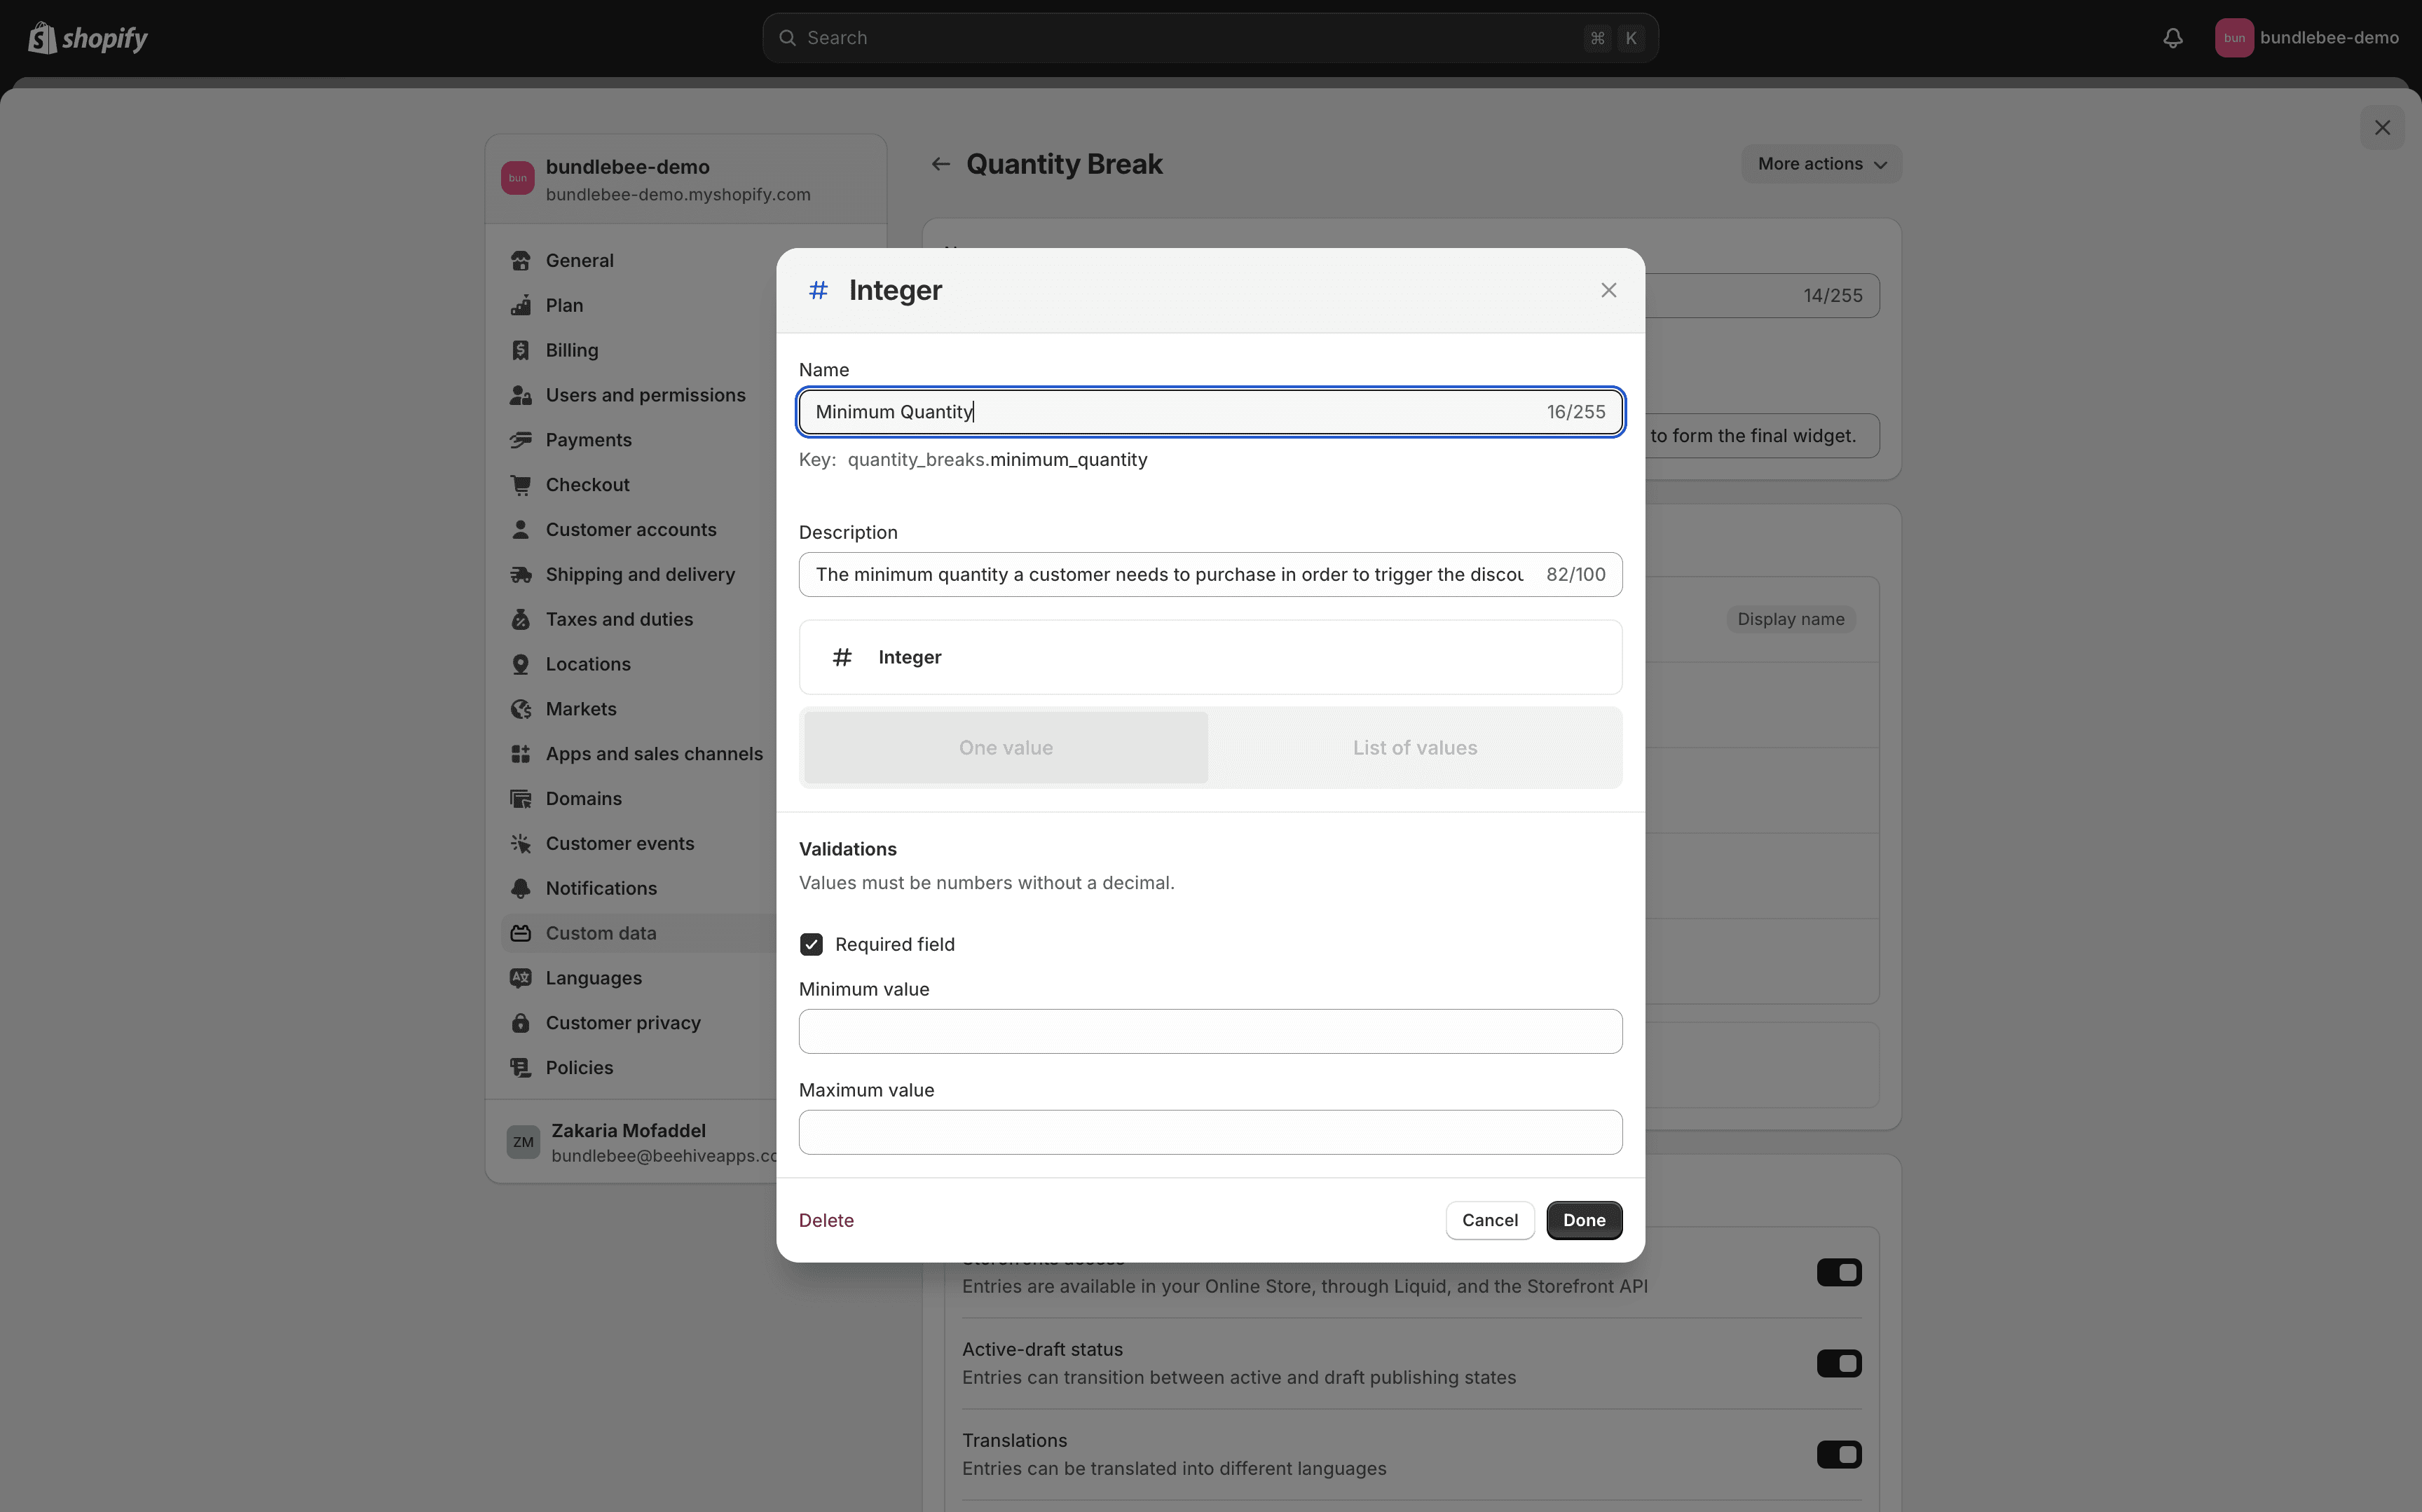
Minimum Quantity
Discount amount (%)
Badge content
Save the Metaobject Definition:
After adding all necessary fields, make sure to save the definition.
3. Create a Quantity Breaks List Metaobject Definition
Next, you’ll create a metaobject that acts as a list to hold multiple quantity breaks on your products. This will only make sure that the quantity breaks widget, that we will create later, correctly displays, but it doesn't add any actual discount to the product (the Shopify automatic discounts we created initially are the ones that make sure the discount is added in the cart and checkout).
Steps to Create a Quantity Breaks List Metaobject Definition:
Navigate to Settings > Custom Data > Products:
Create a New Metaobject Definition:
Click on the Add Definition button.
IMPORTANT: Make sure to name it Quantity Breaks List and that the namespace and key are called
custom.quantity_breaks_list.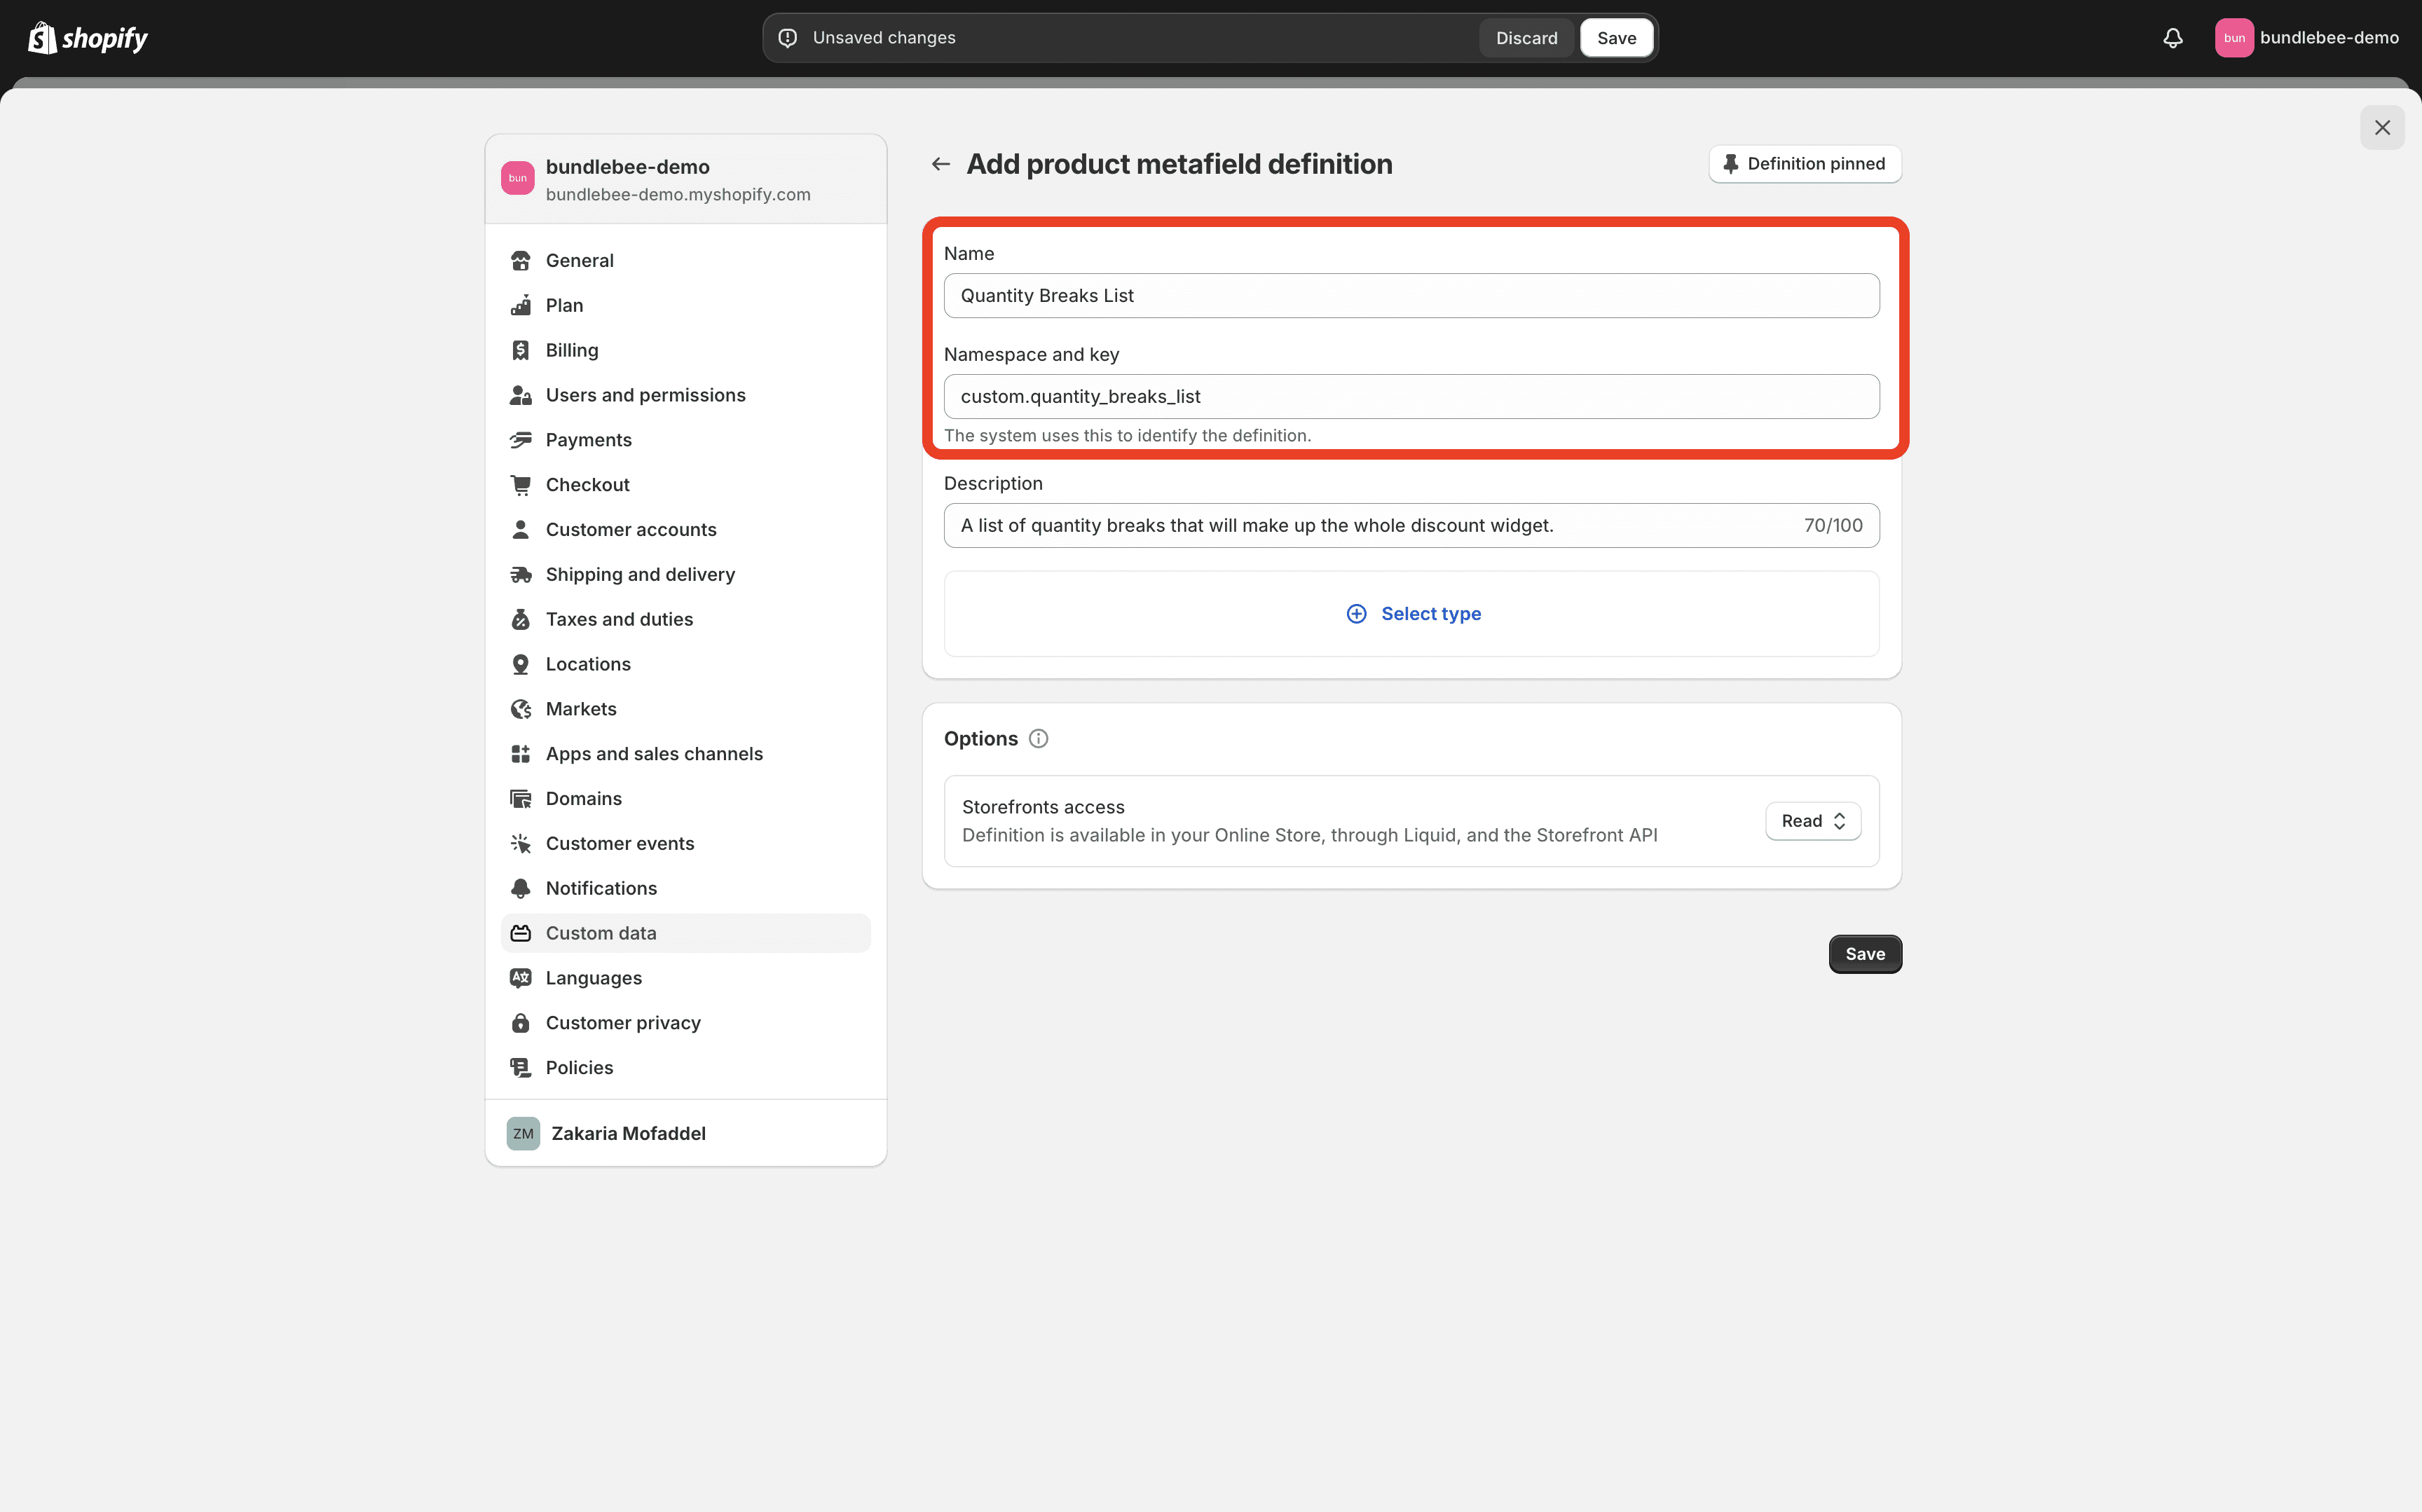
Click on Select type > Metaobject.
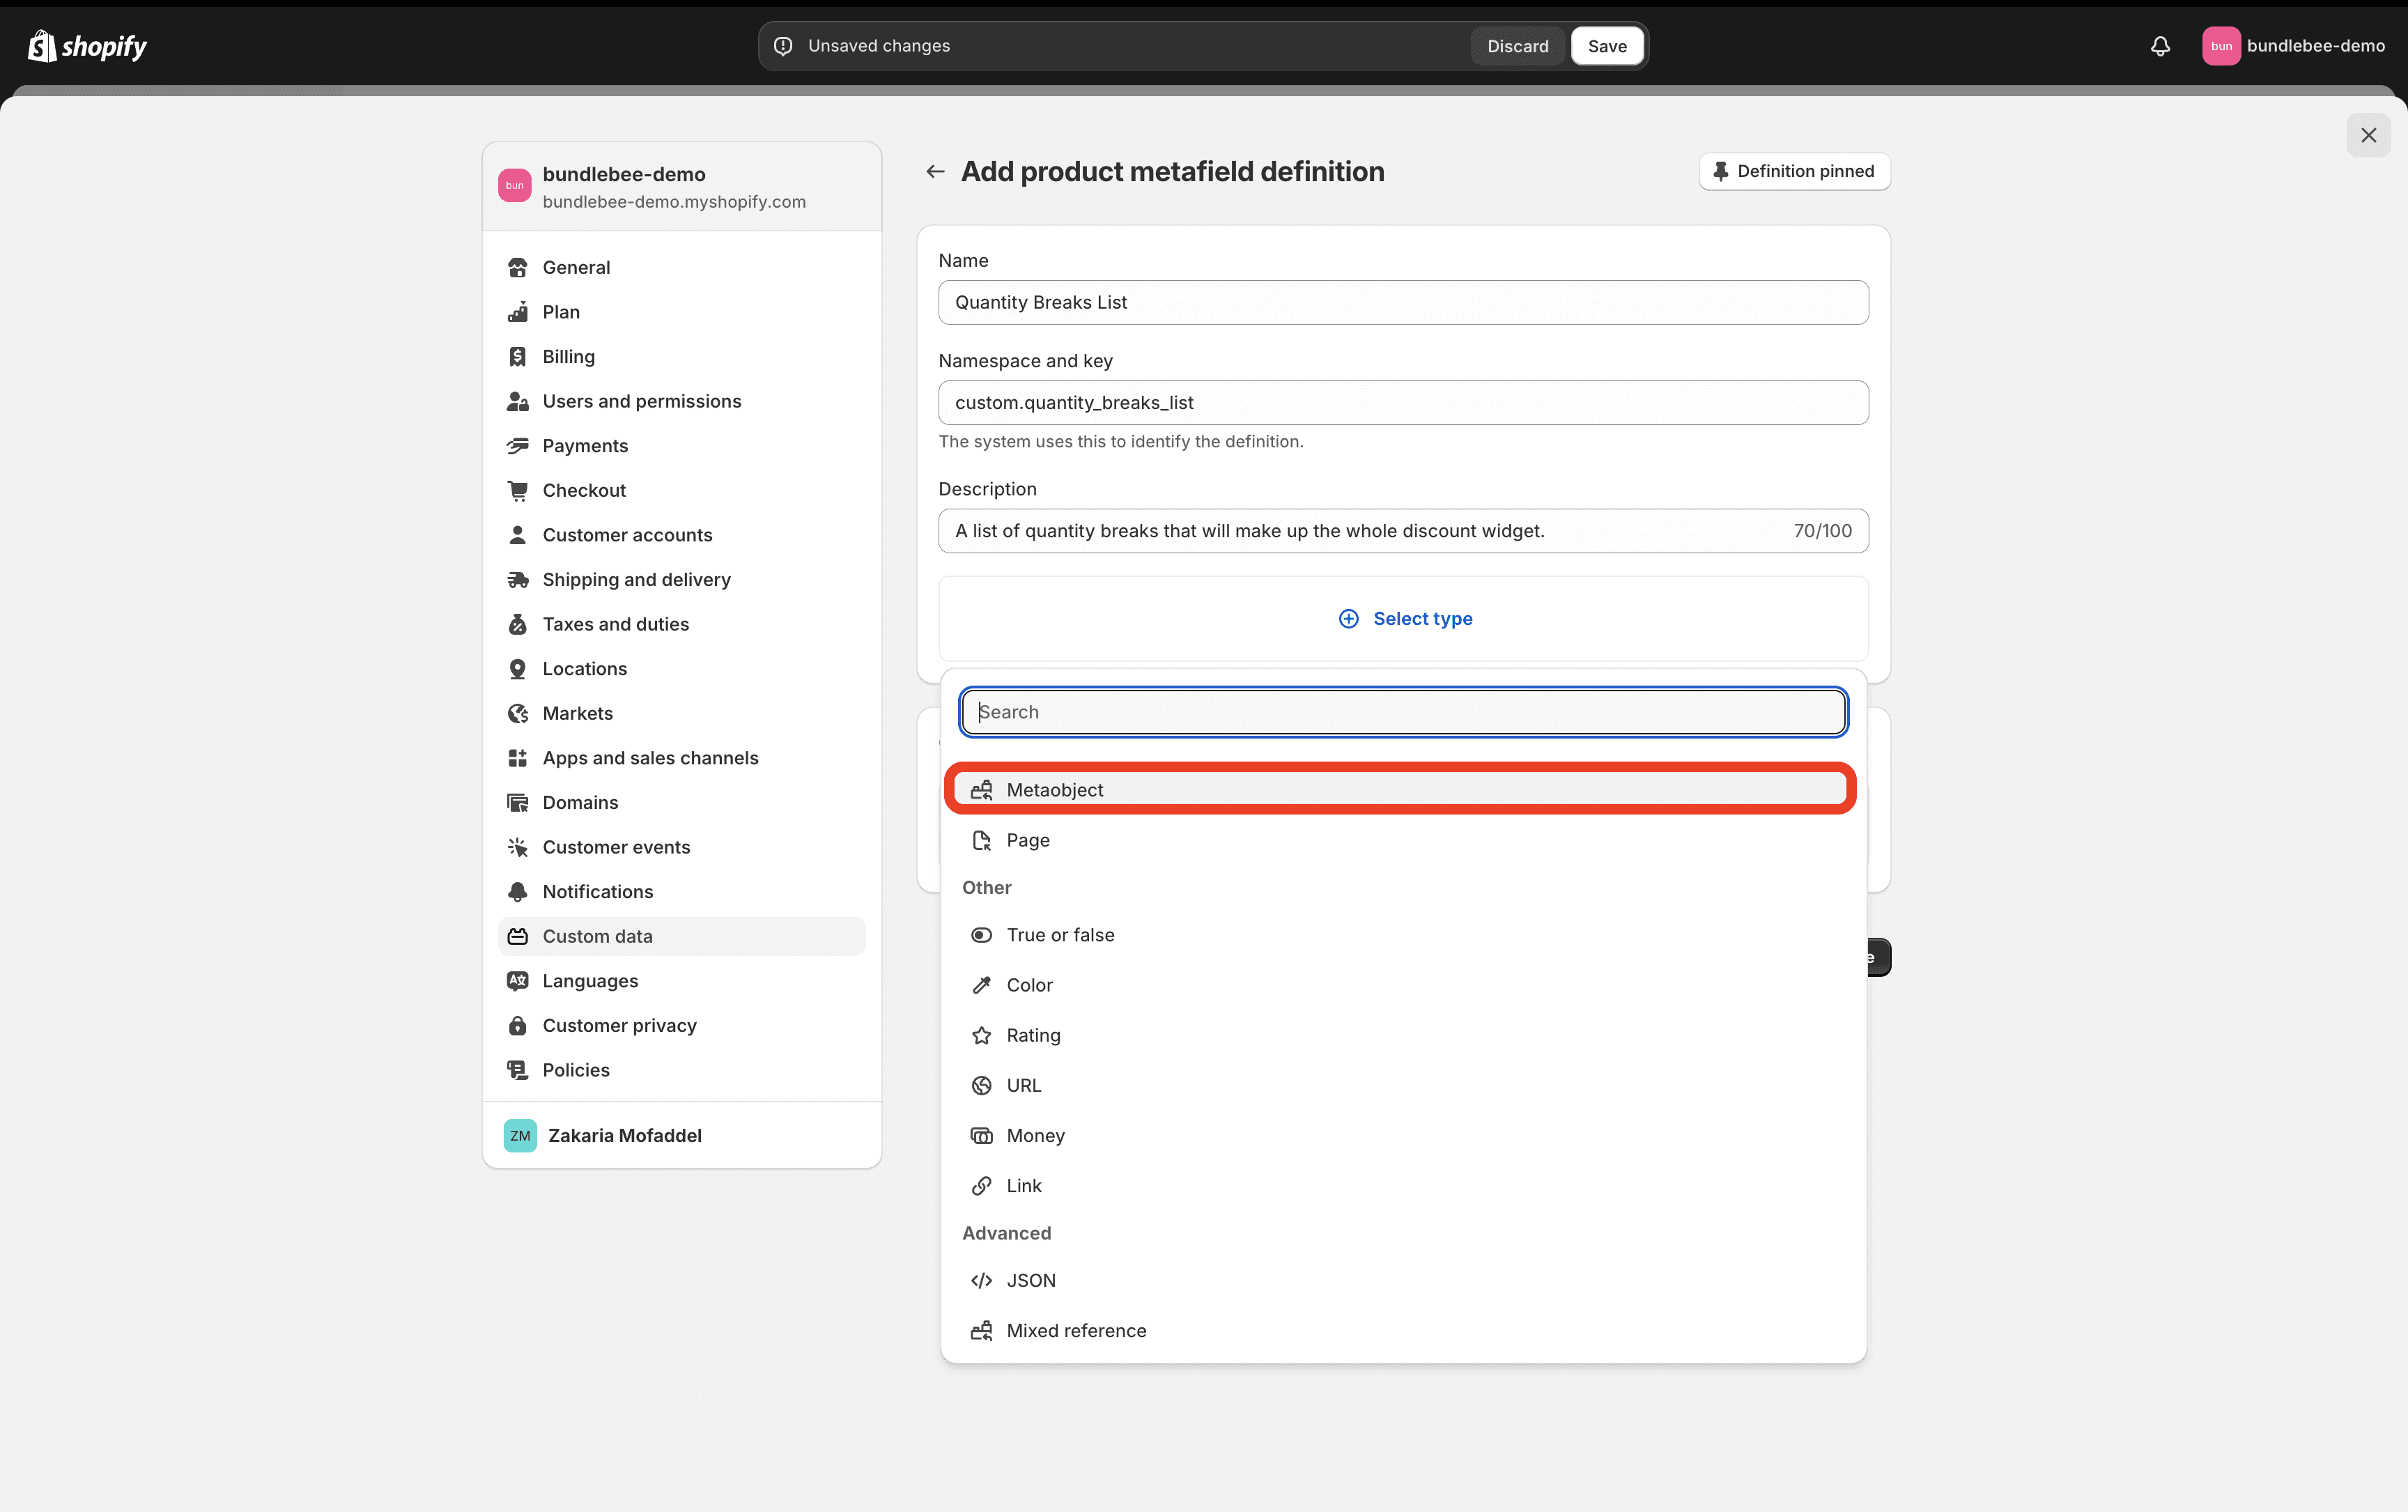
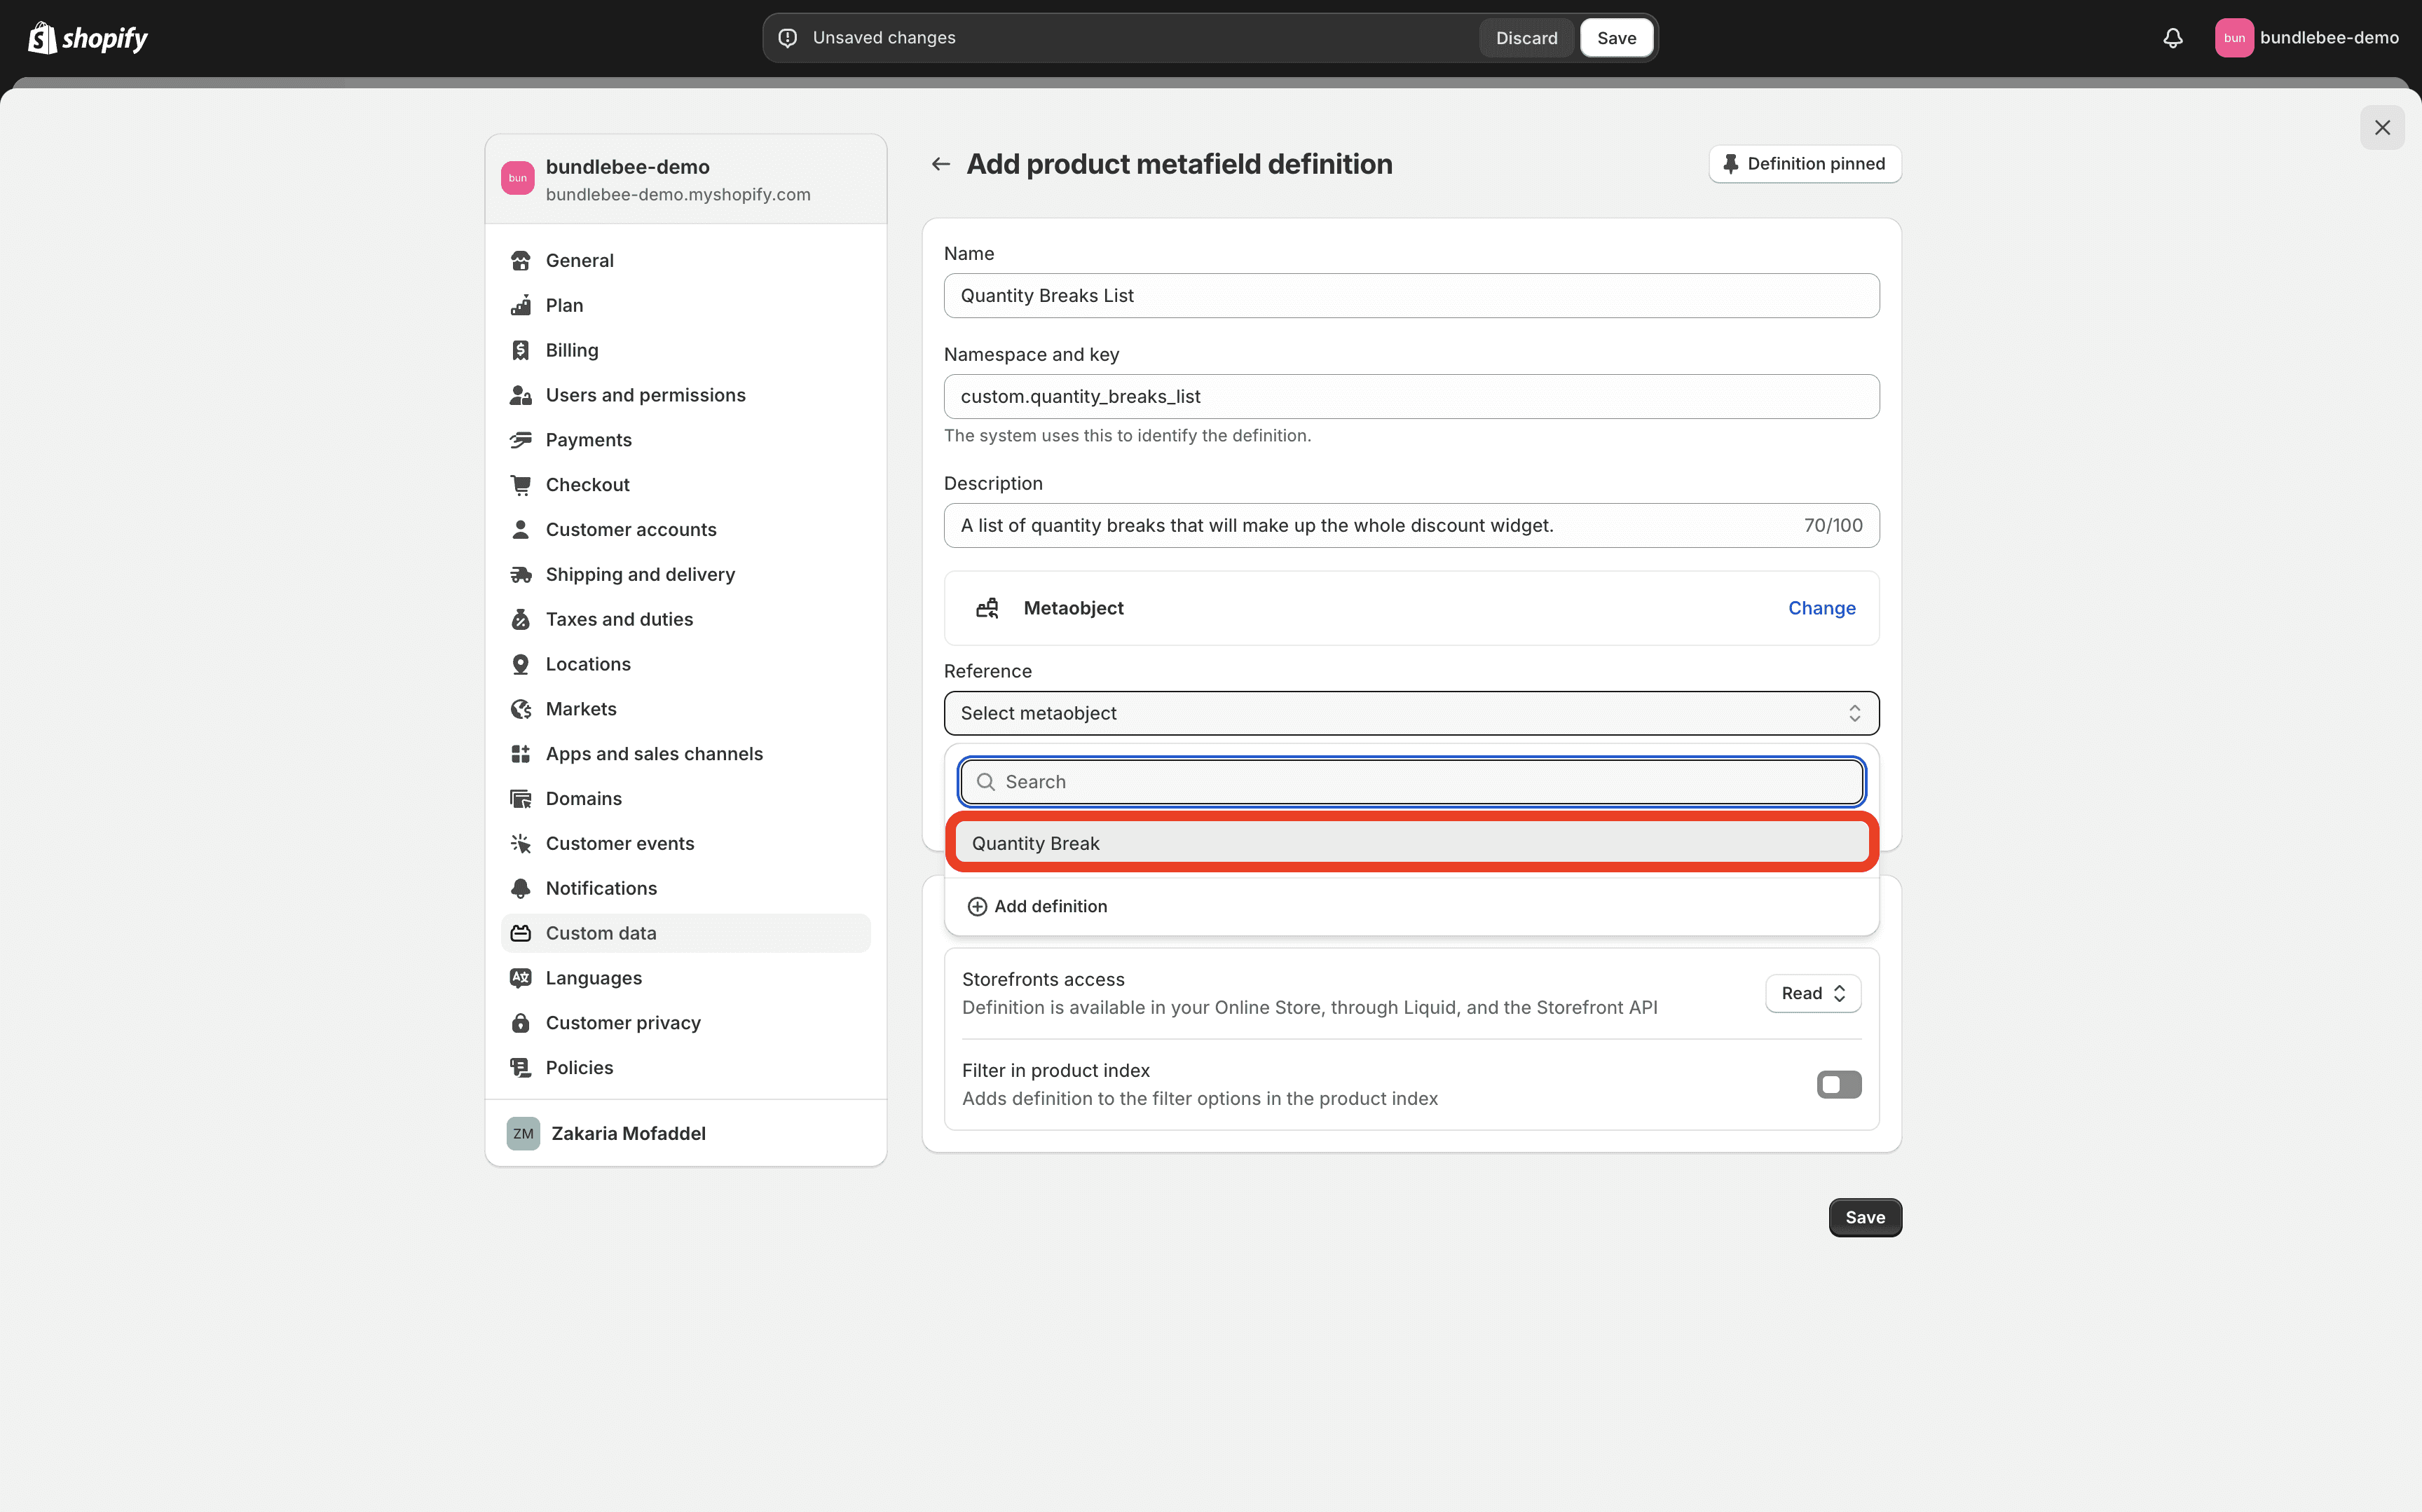
Click on Select metaobject > Quantity Break (the metaobject we created earlier).
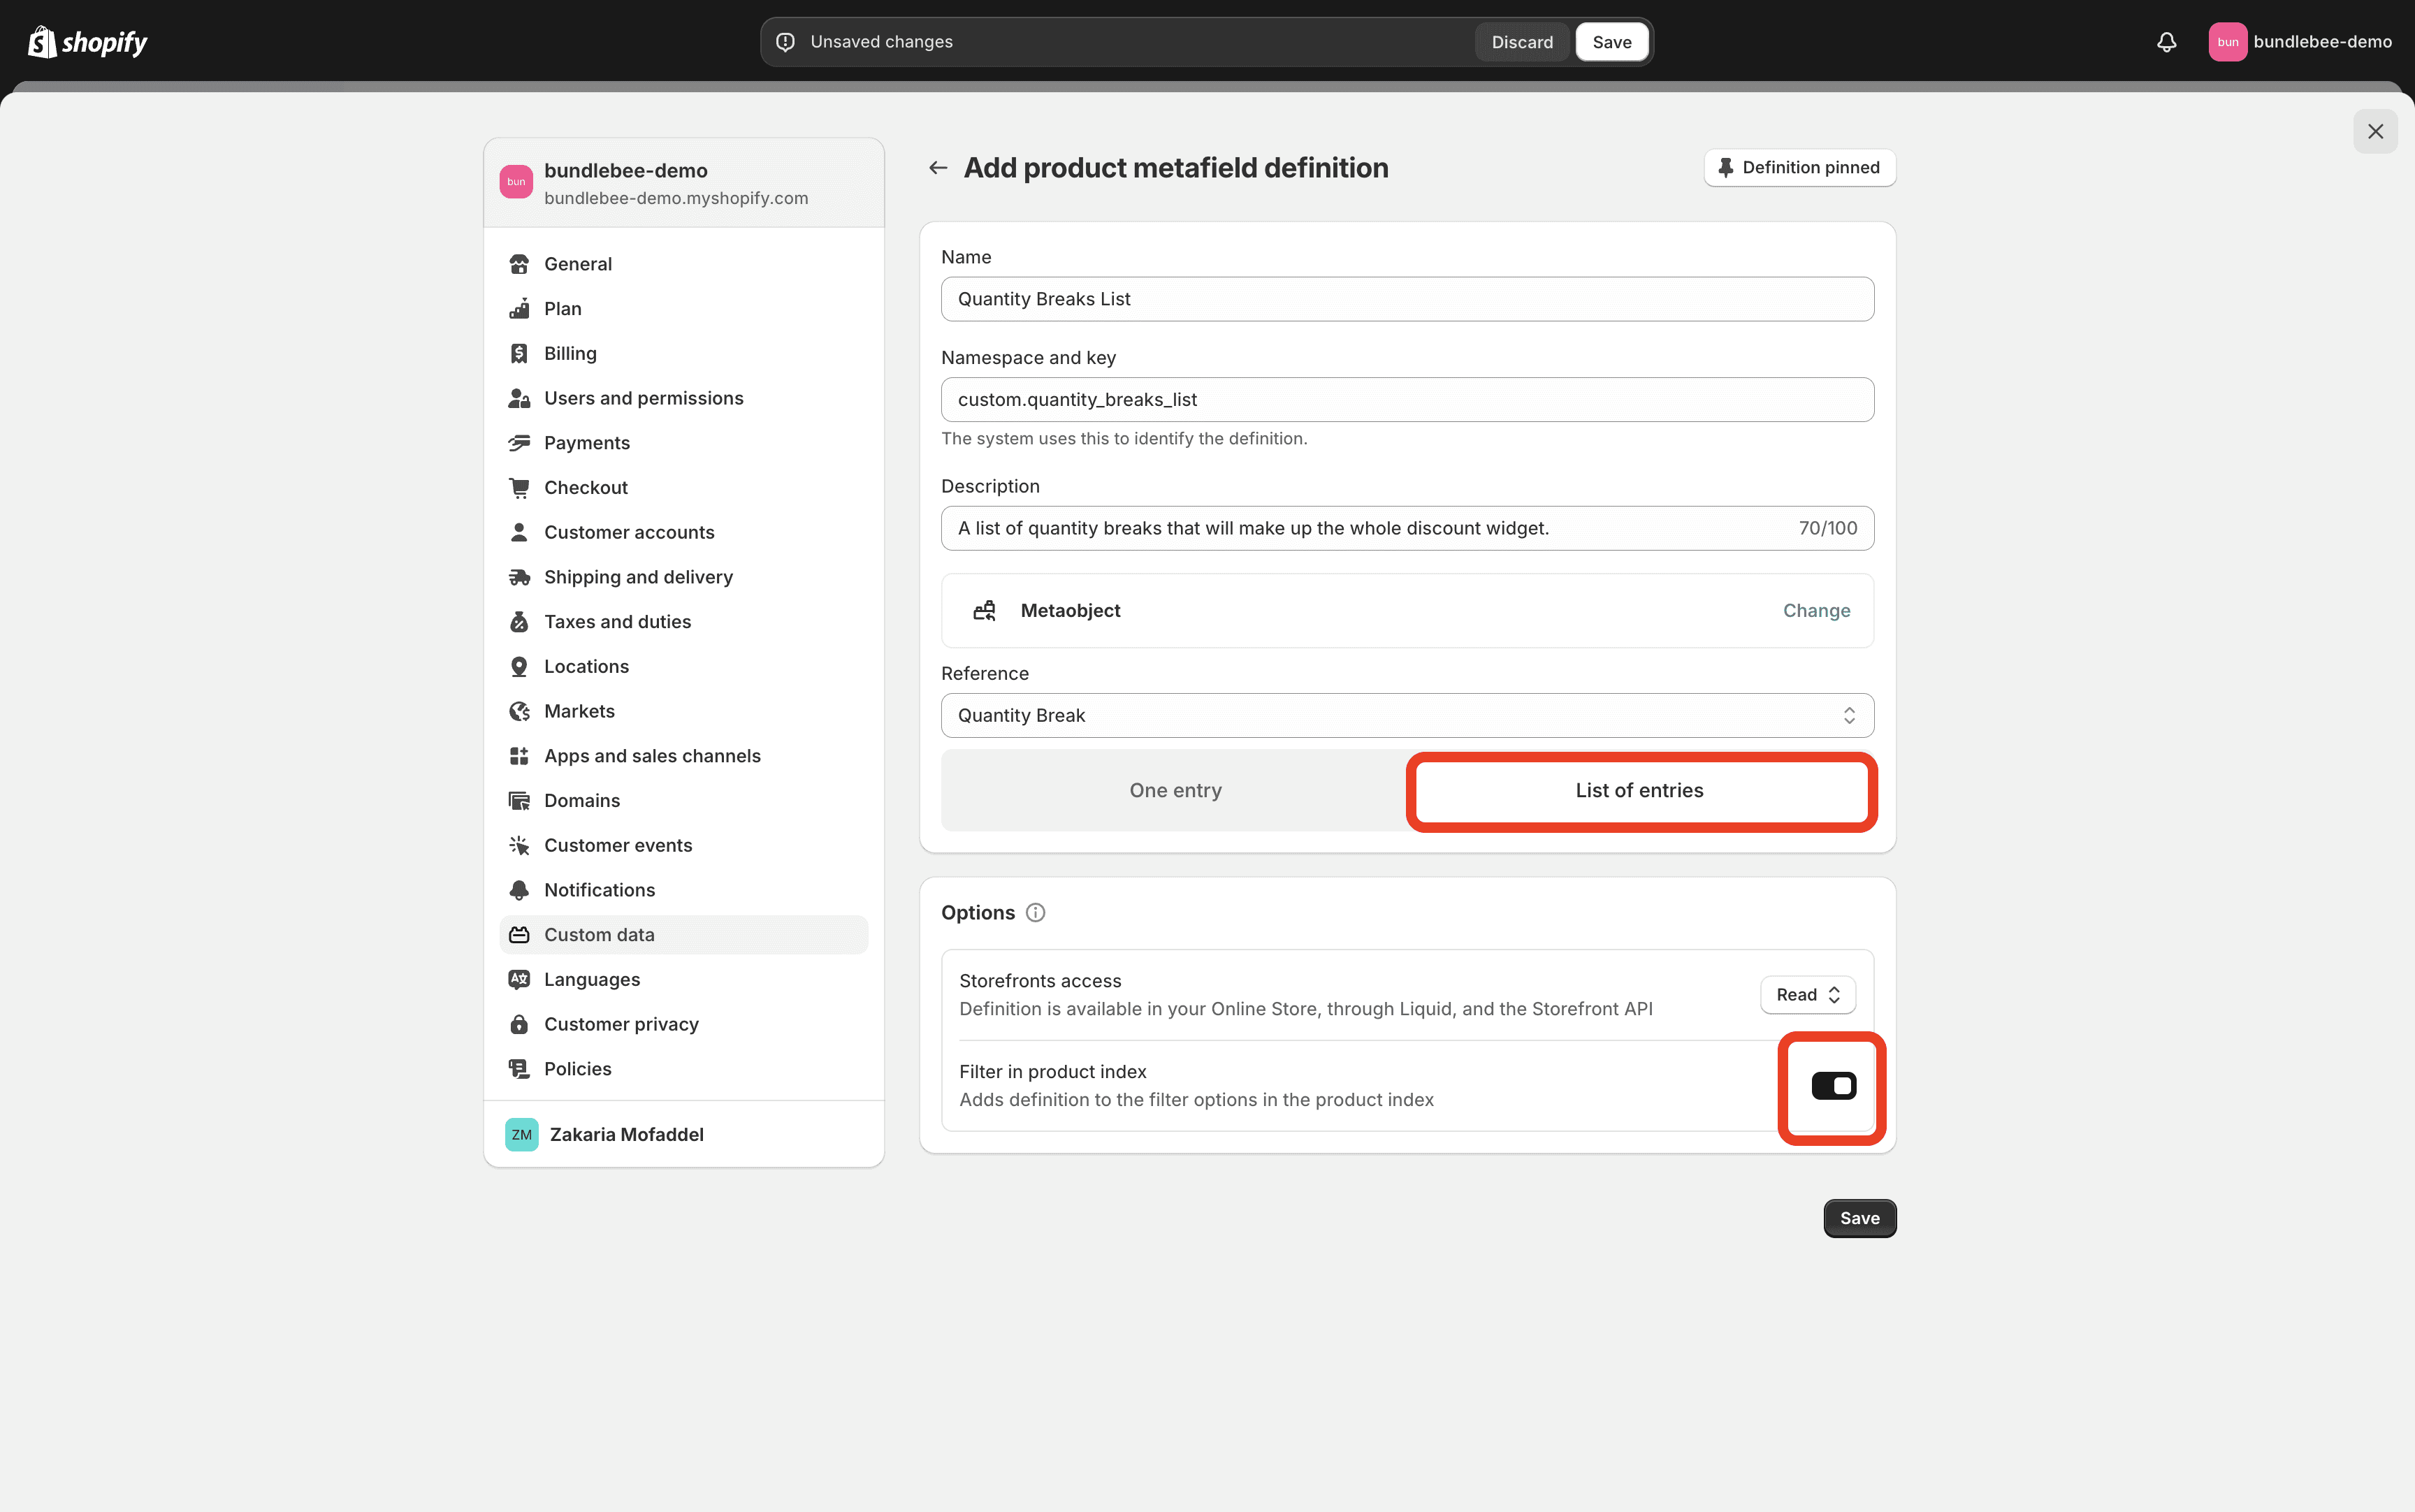
Click on List of entries. This allows us to add multiple Quantity Break metaobjects inside the one we are creating. Optionally you can also make your products filterable using this metaobject by toggling the Filter in product index setting (see image below).
Save the Metaobject Definition:
Save the new metaobject definition.
4. Add Quantity Break Metaobjects to Products
Now, you'll add quantity break metaobjects to the products that currently have an automatic discount running.
Steps to Add Quantity Break Metaobjects:
Go to Products:
Navigate to the Products section in your Shopify Admin.
Open the product you want to add quantity breaks to.
Add Quantity Breaks:
Scroll to the Metafields section of the product.
Add a new "Quantity Break" metaobject to the "Quantity Breaks List" metaobject. I know, it can be confusing, but you'll get a hang of it the more you play around with it.
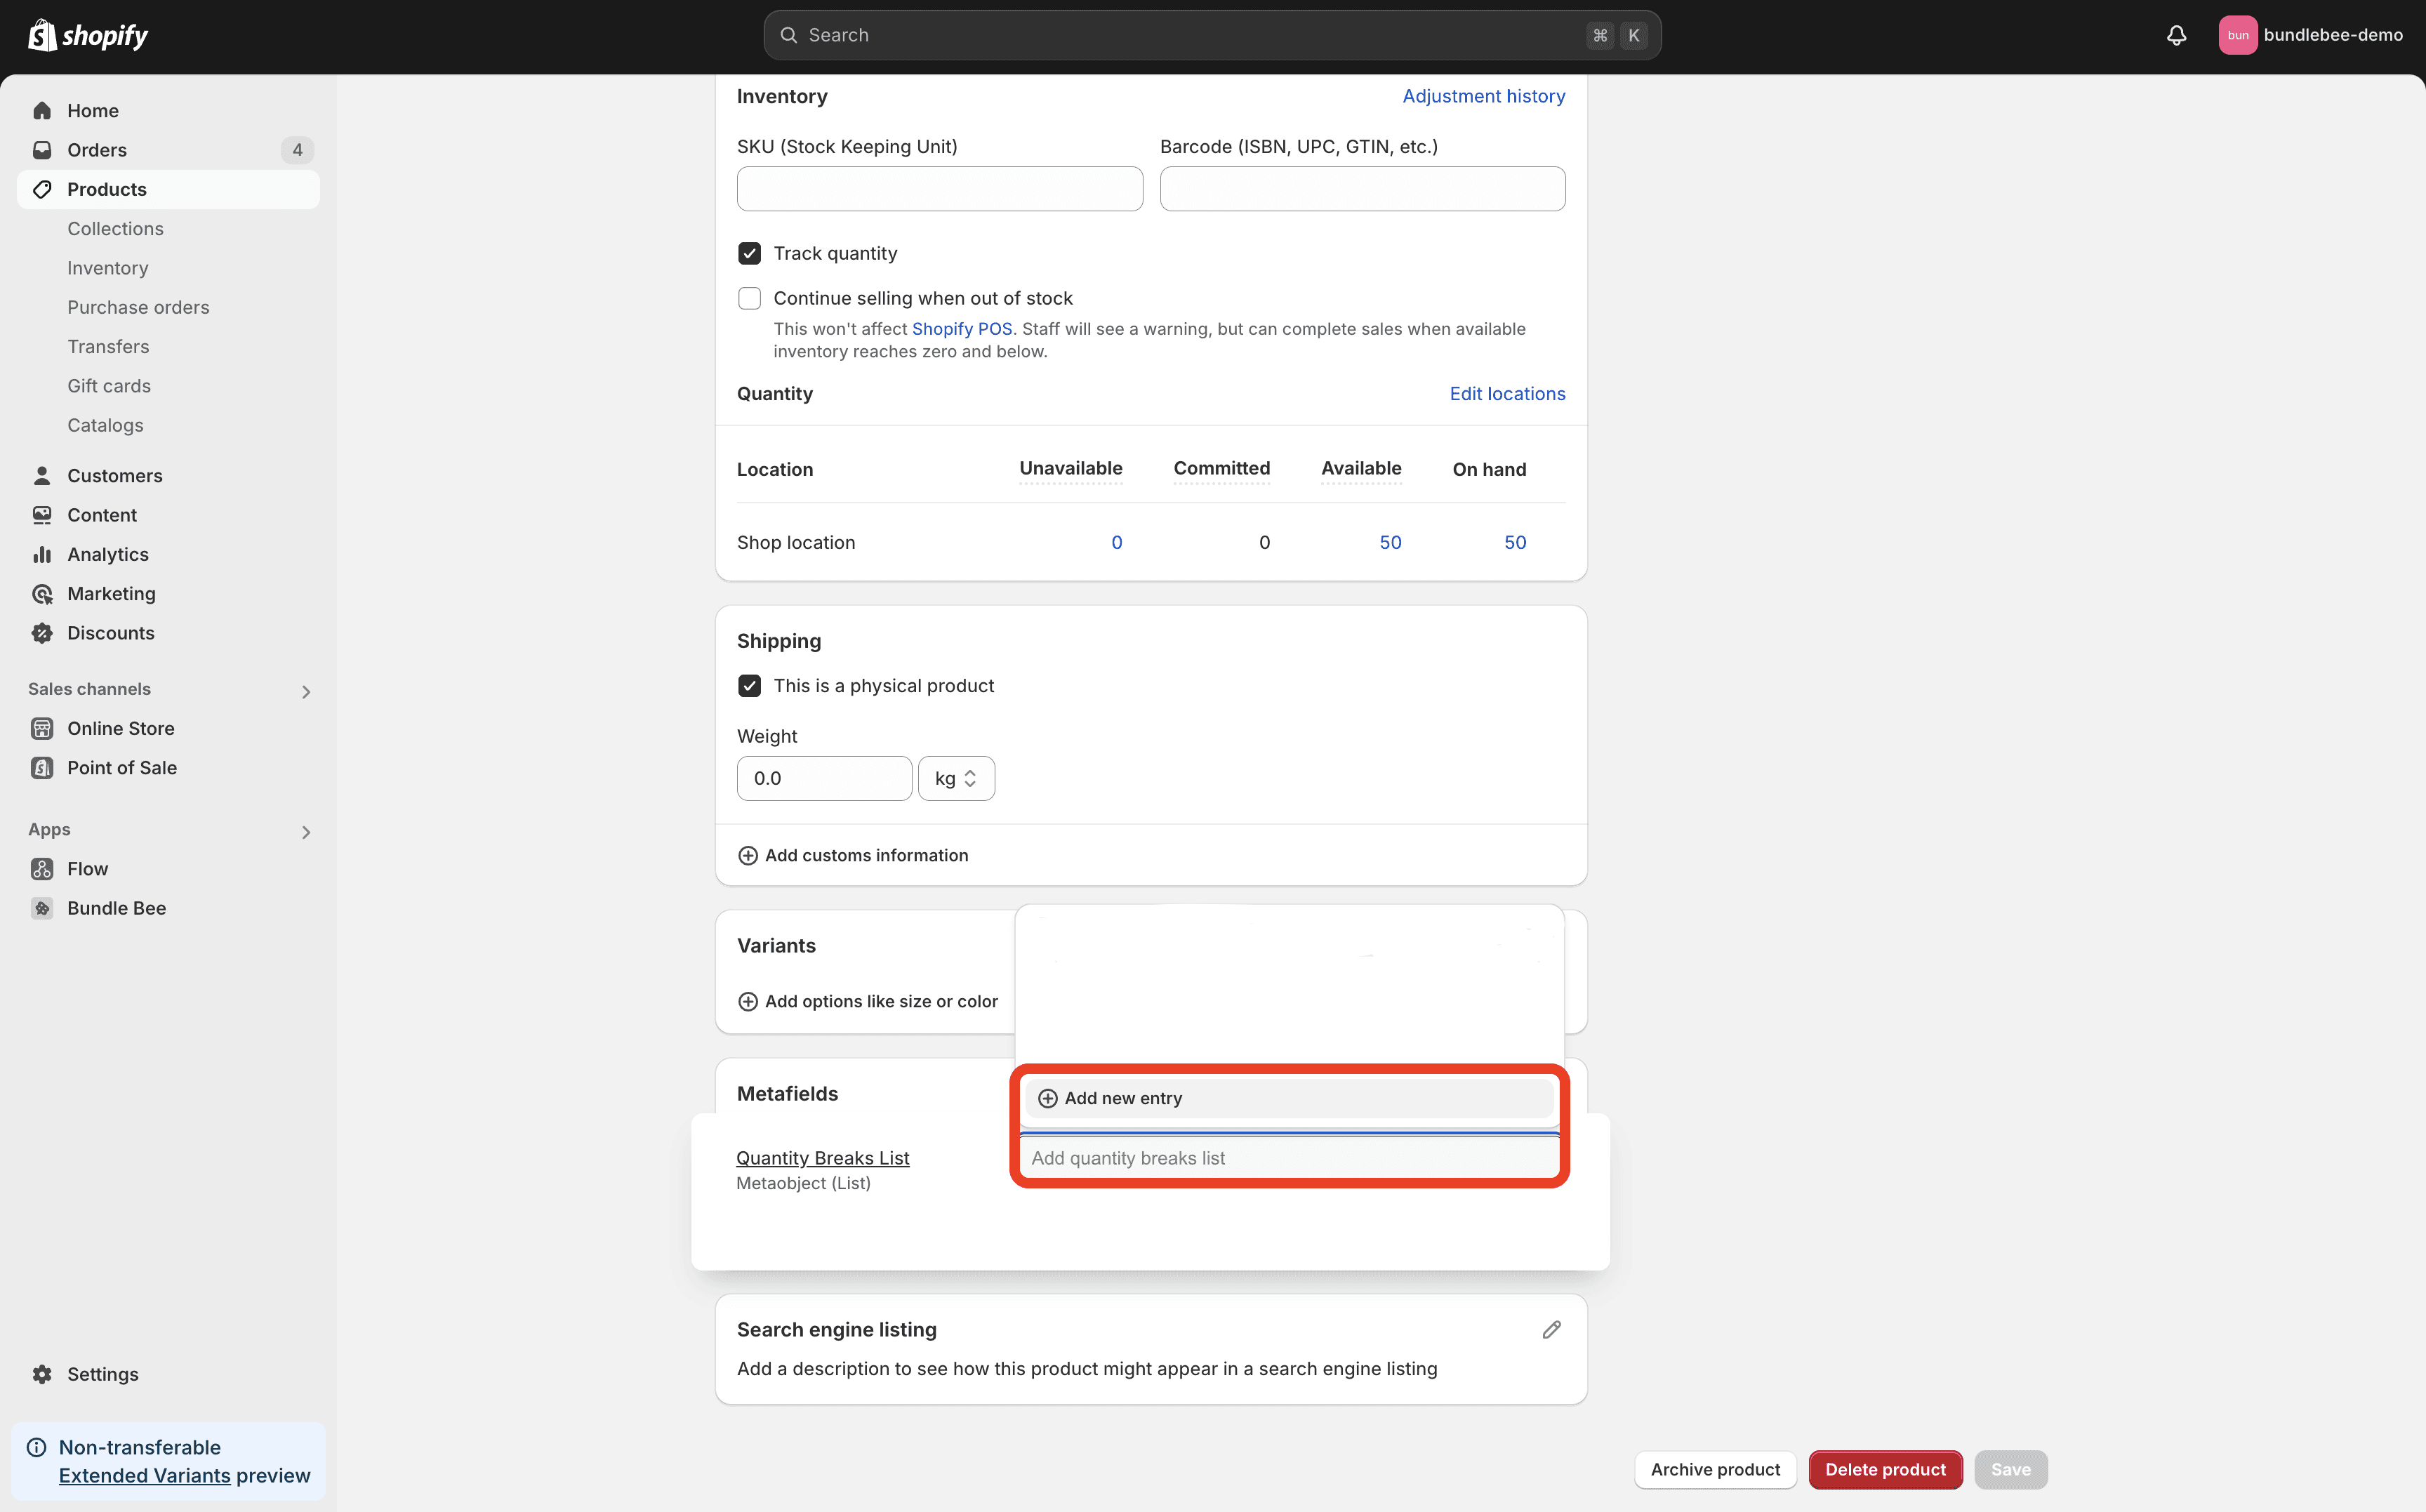
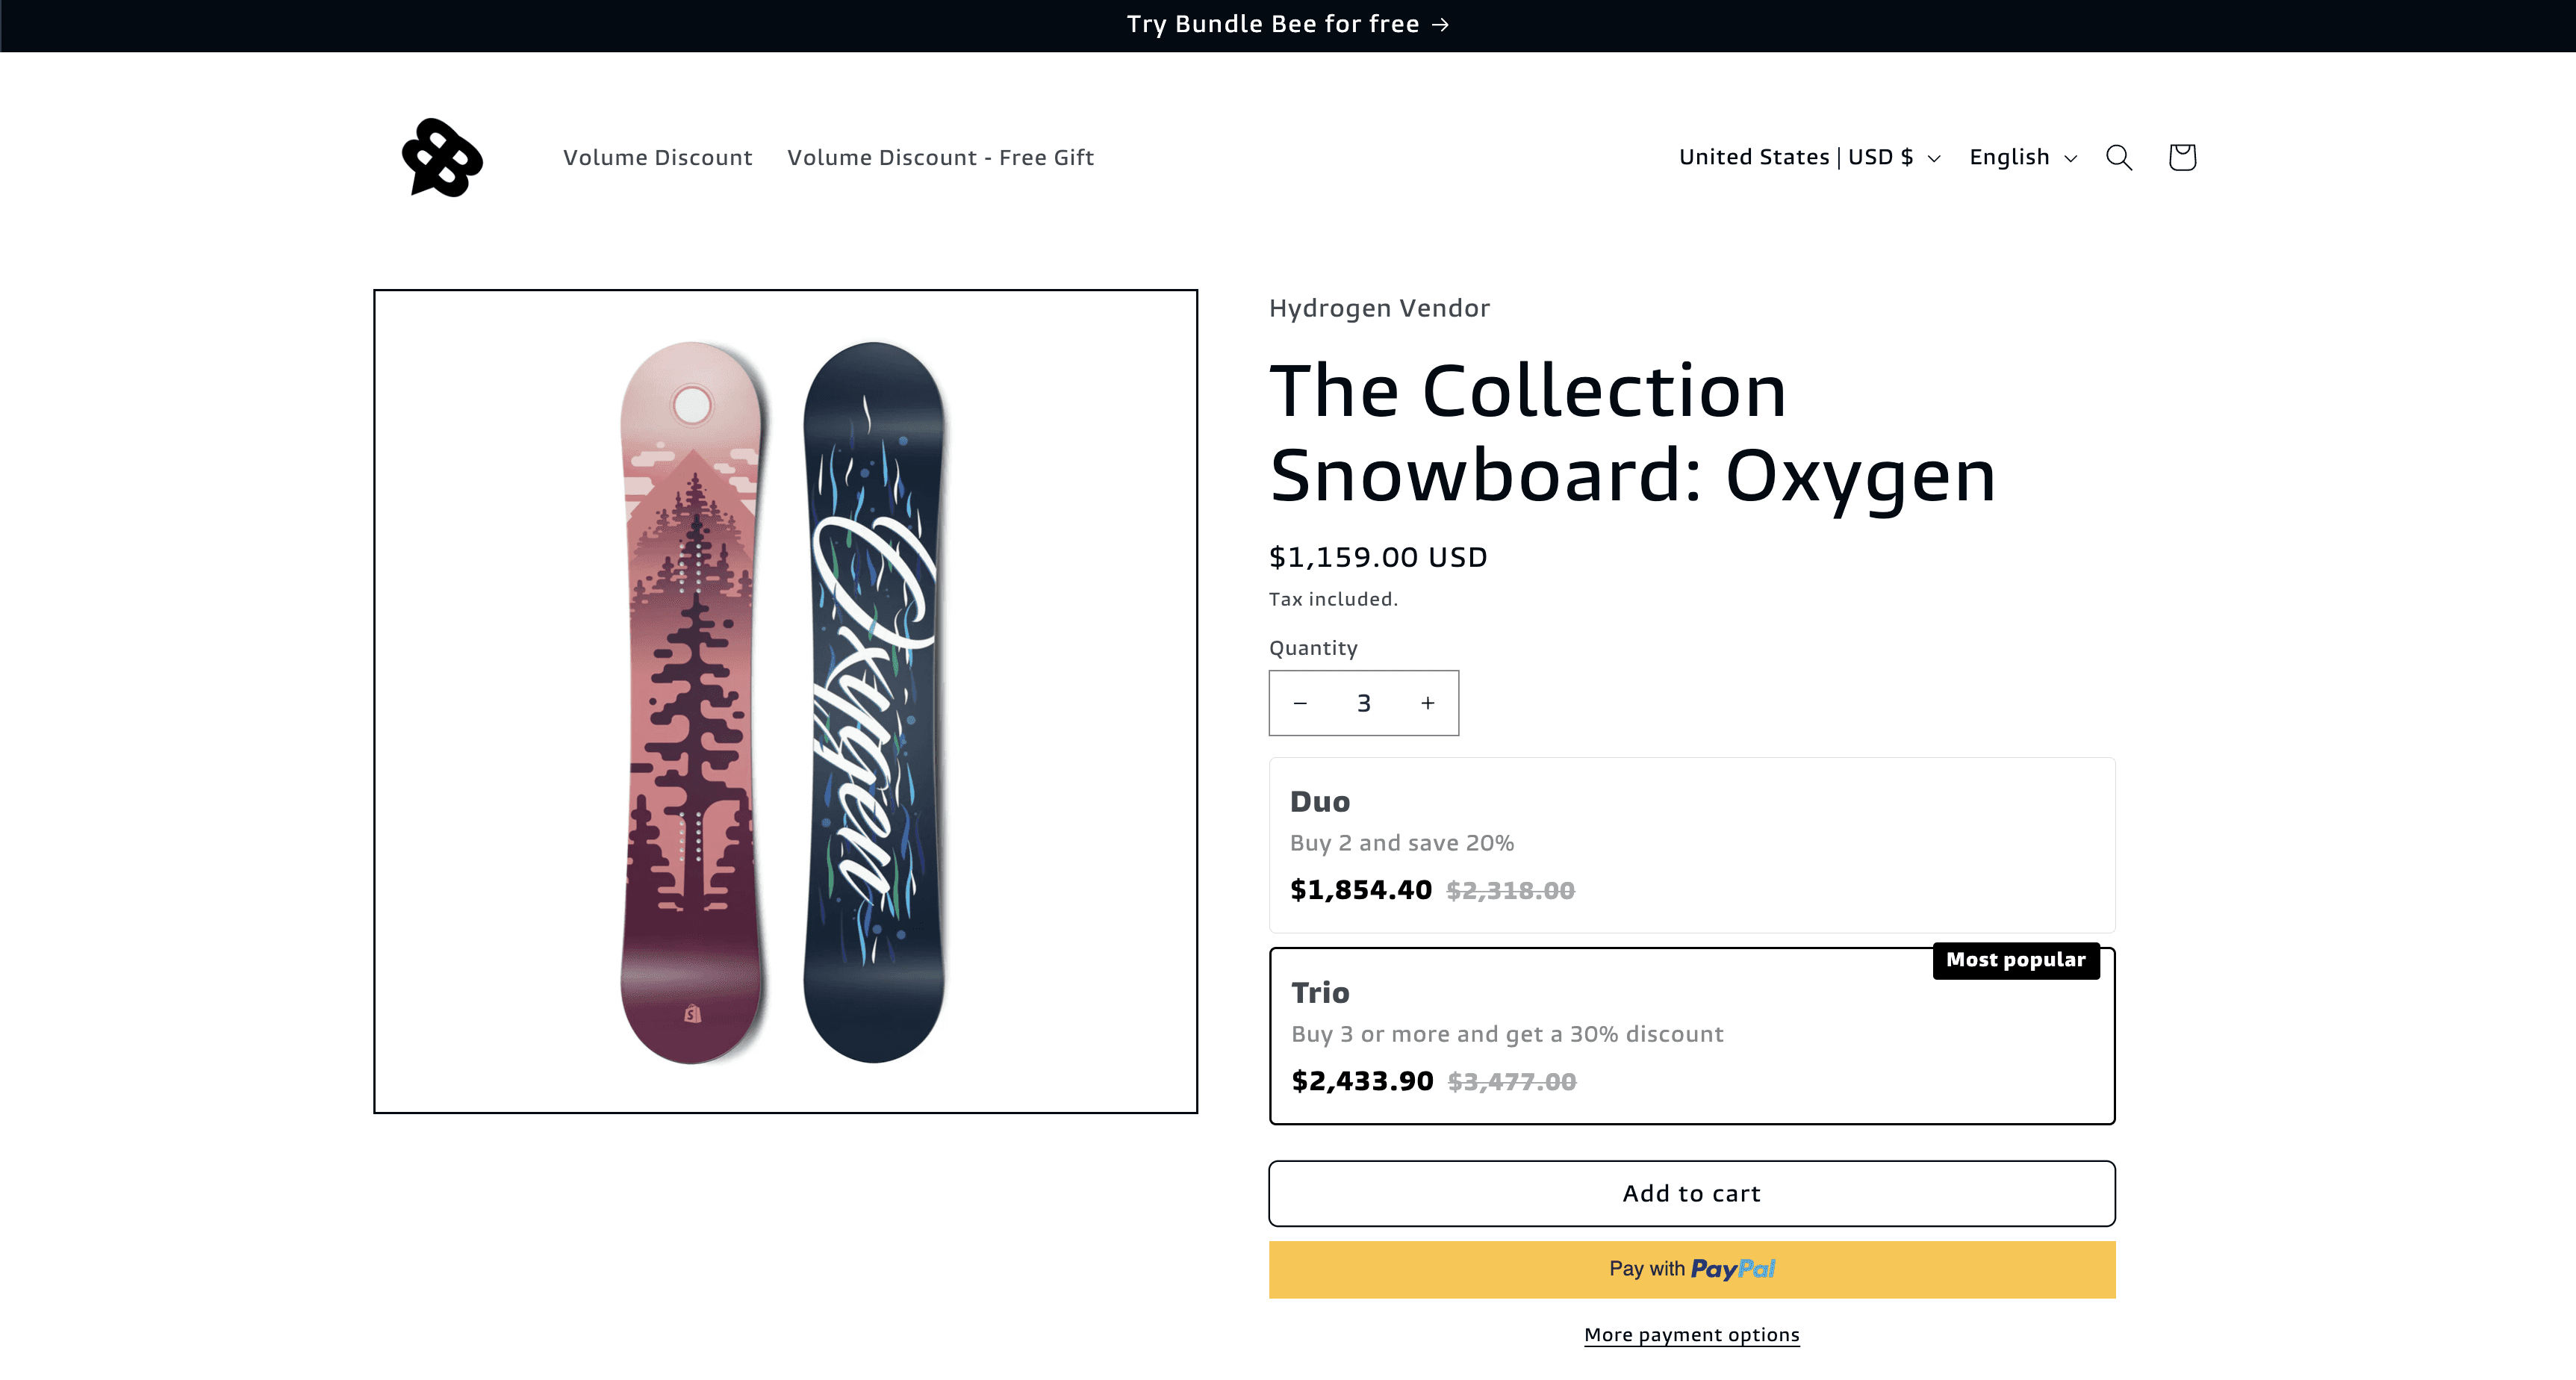
I will add two Quantity Break metaobjects to the list, one will be called Duo and the other Trio. The order in which you add them will determine how they are displayed on the product page.
Duo:

Trio:

Save the Product:
Once you've added the quantity breaks, save the product.
5. Add the Code as a Snippet in the Theme
This is the part where it gets technical and a bit more complex. But it's something you have to do once and you'll be able to reuse it in the theme editor without the need to dive into the code. To display the quantity breaks on the product page, you need to add a code snippet to your theme.
Steps to Add the Snippet:
Go to Themes:
In your Shopify Admin, navigate to Online Store > Themes.
Click on Actions > Edit Code for your active theme.
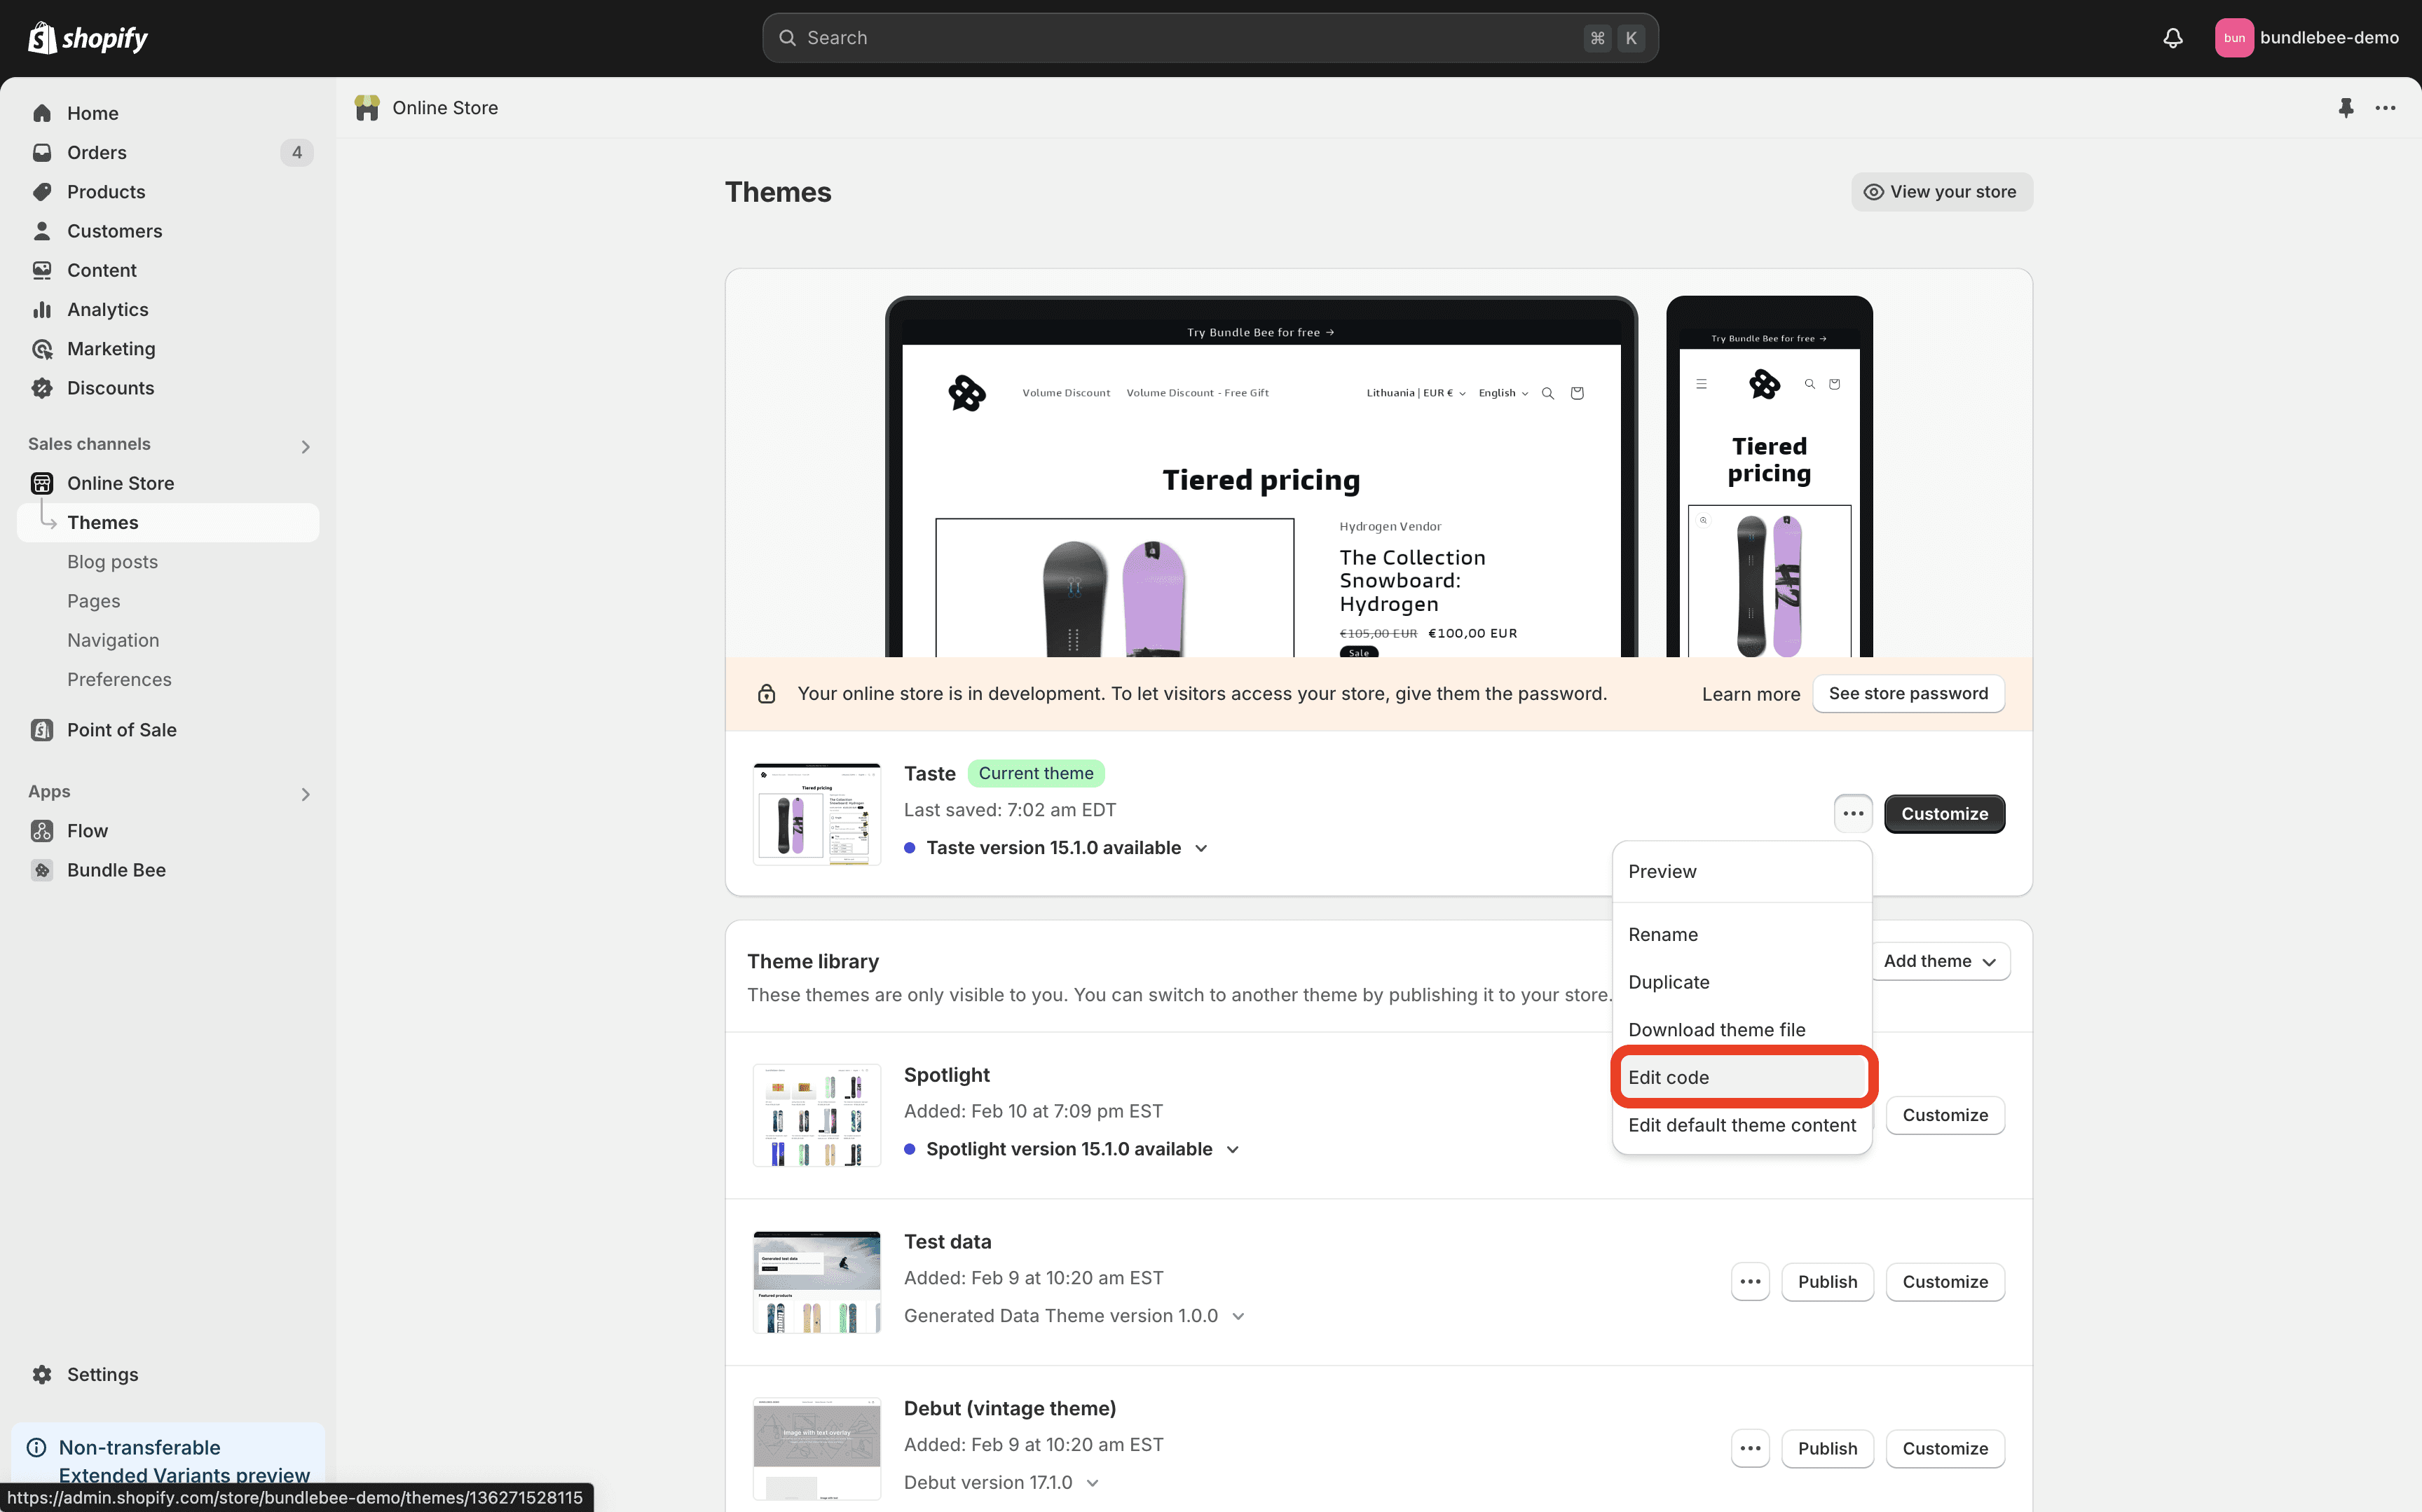
Create a New Snippet:
In the Snippets folder, click Add a new snippet.
Name the snippet "quantity-breaks".
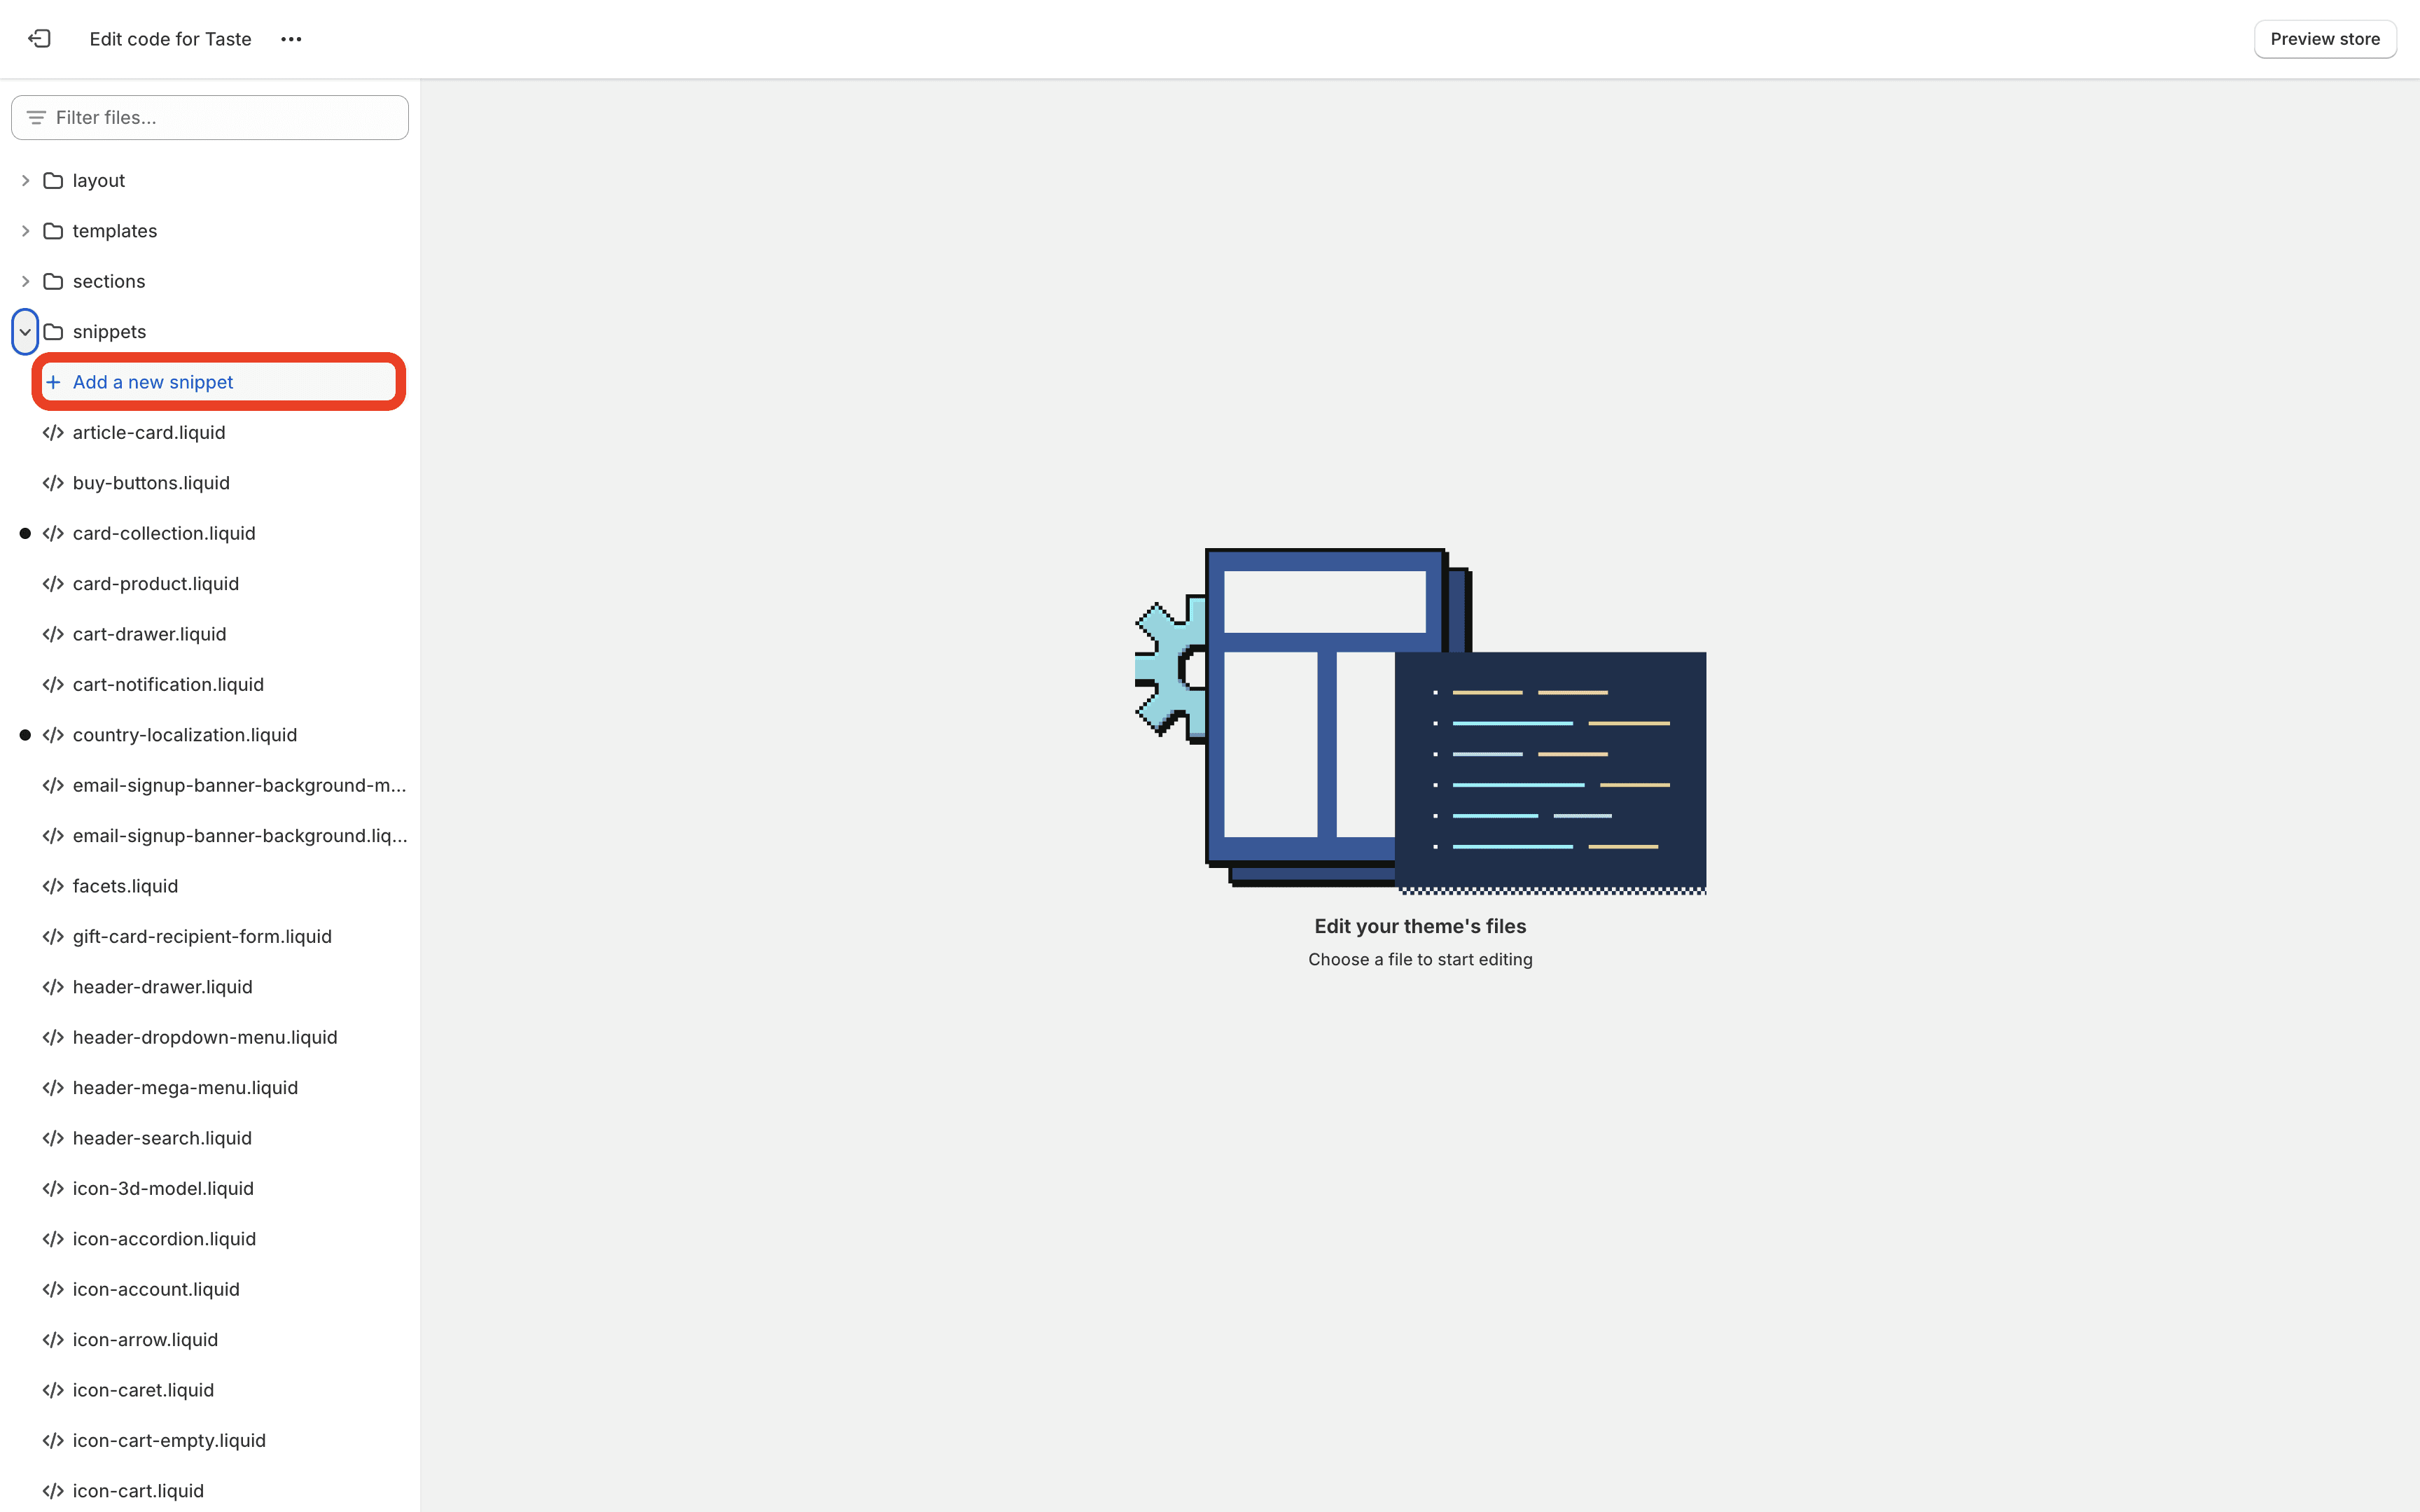
Add the Code:
Paste the Liquid, HTML, CSS, and JavaScript code for the quantity breaks you can find below into this snippet and then make sure to save the snippet.
6. Add Block to Product Section and Render the Snippet
Next (and last complex step), you need to add the snippet to your product page template. I highly suggest getting a Shopify developer to follow these last steps, as you can easily break your store by simply forgetting a comma.
Steps to Add the Block:
Edit the Product Section:
Still in the theme code editor, locate your main product section. In my theme (Taste) and many other themes this is called
main-product.liquidin thesectionsfolder.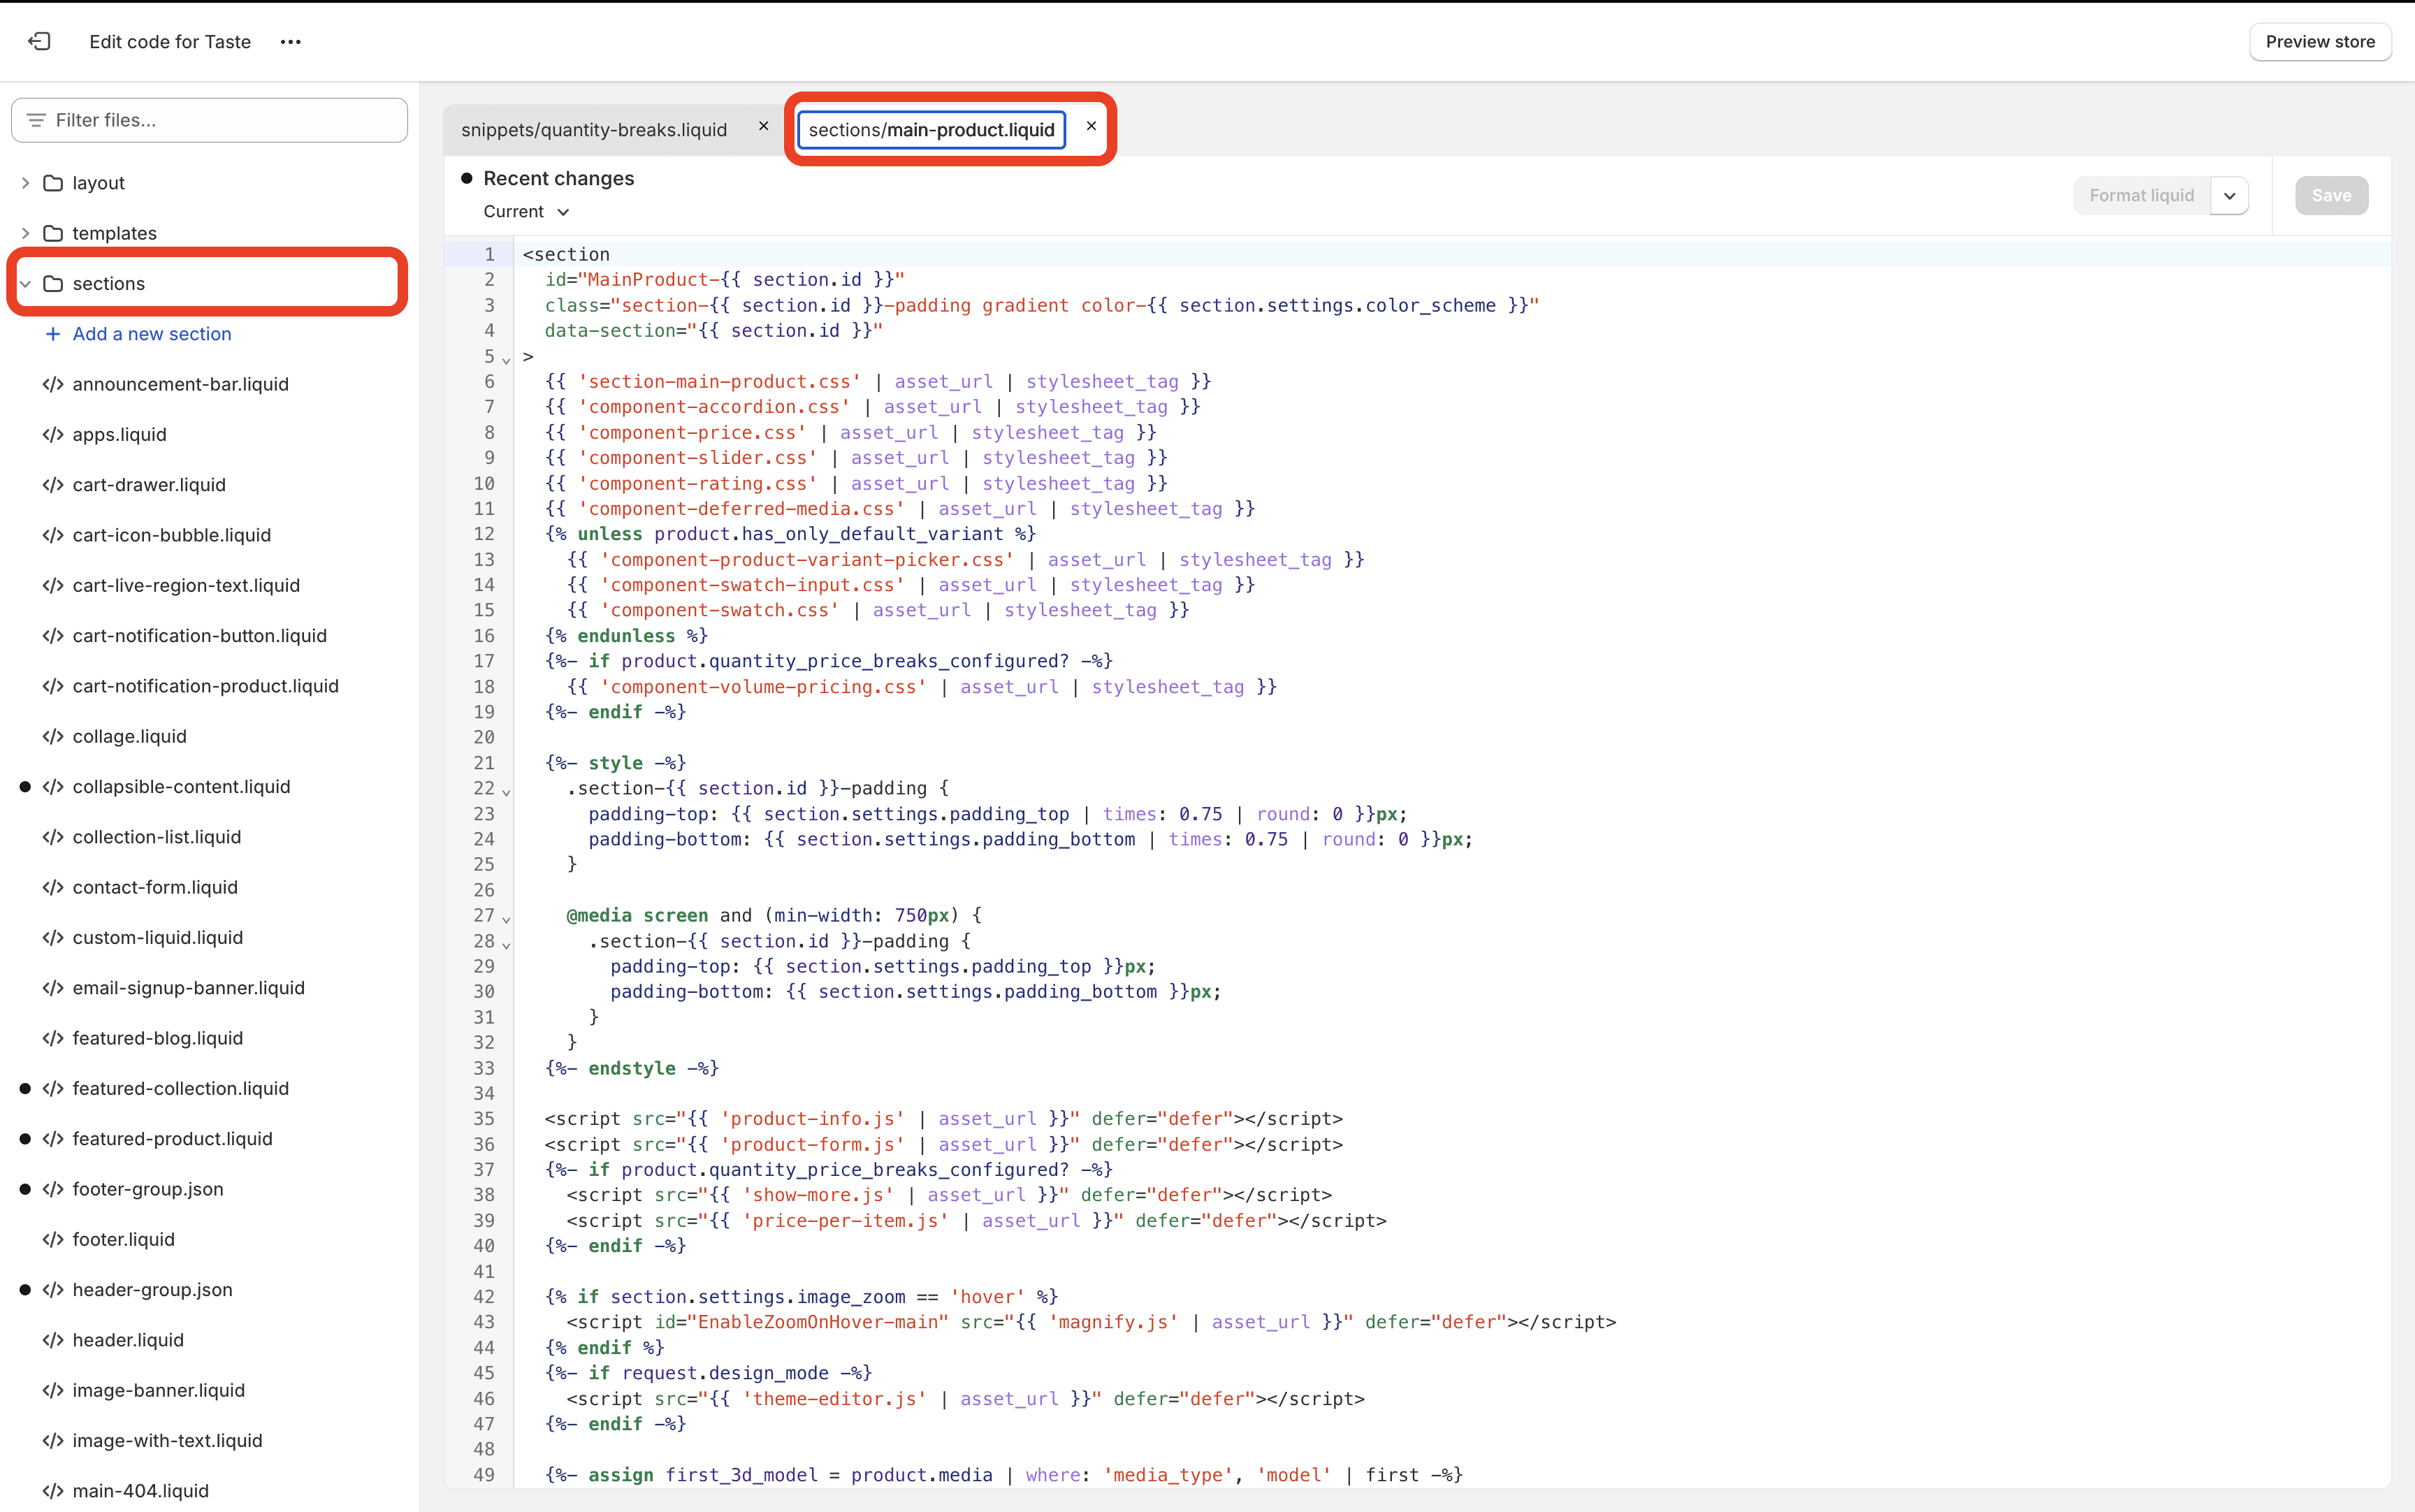
Add a Block for the Snippet:
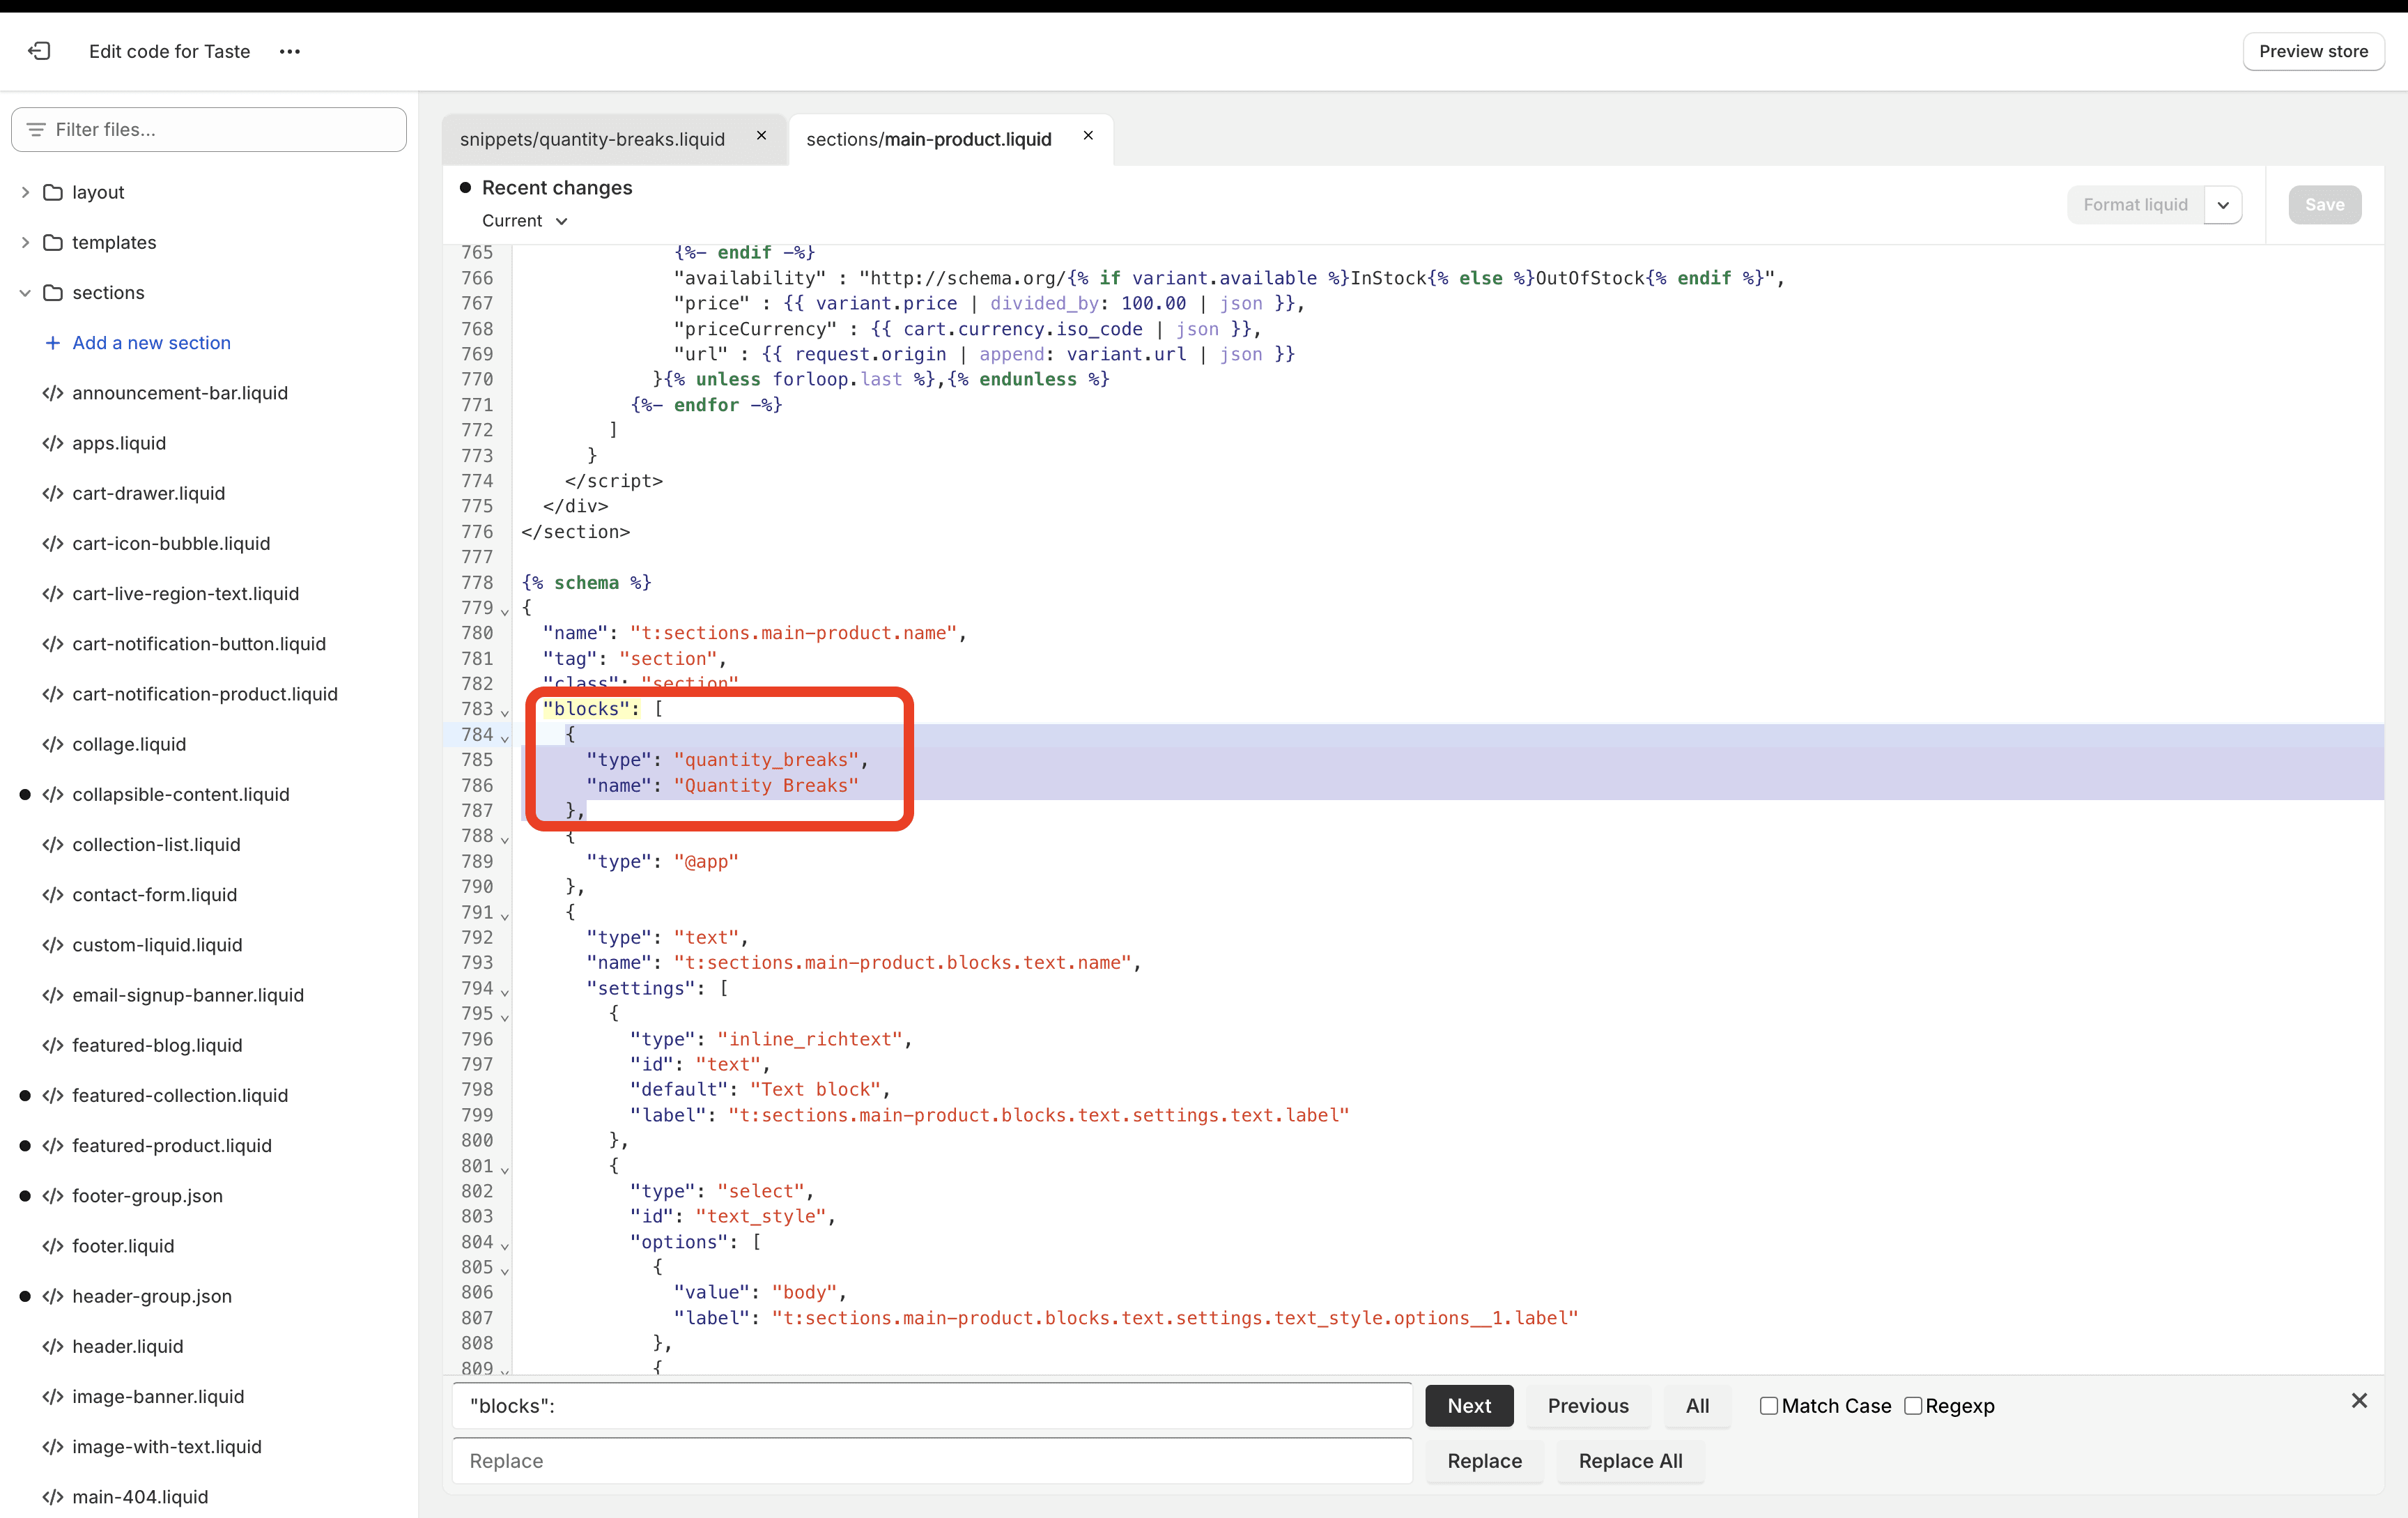
Use
command+f(control+fon Windows) to activate the search feature in this file and look for this exact piece of code"blocks":(quotation marks and colon included).Then add the following code:
It should look like the following screenshot:
Now using the search tool, just like we did earlier look for this exact piece of code
for block in section.blocksand then add this code and make sure it looks like the screenshot below: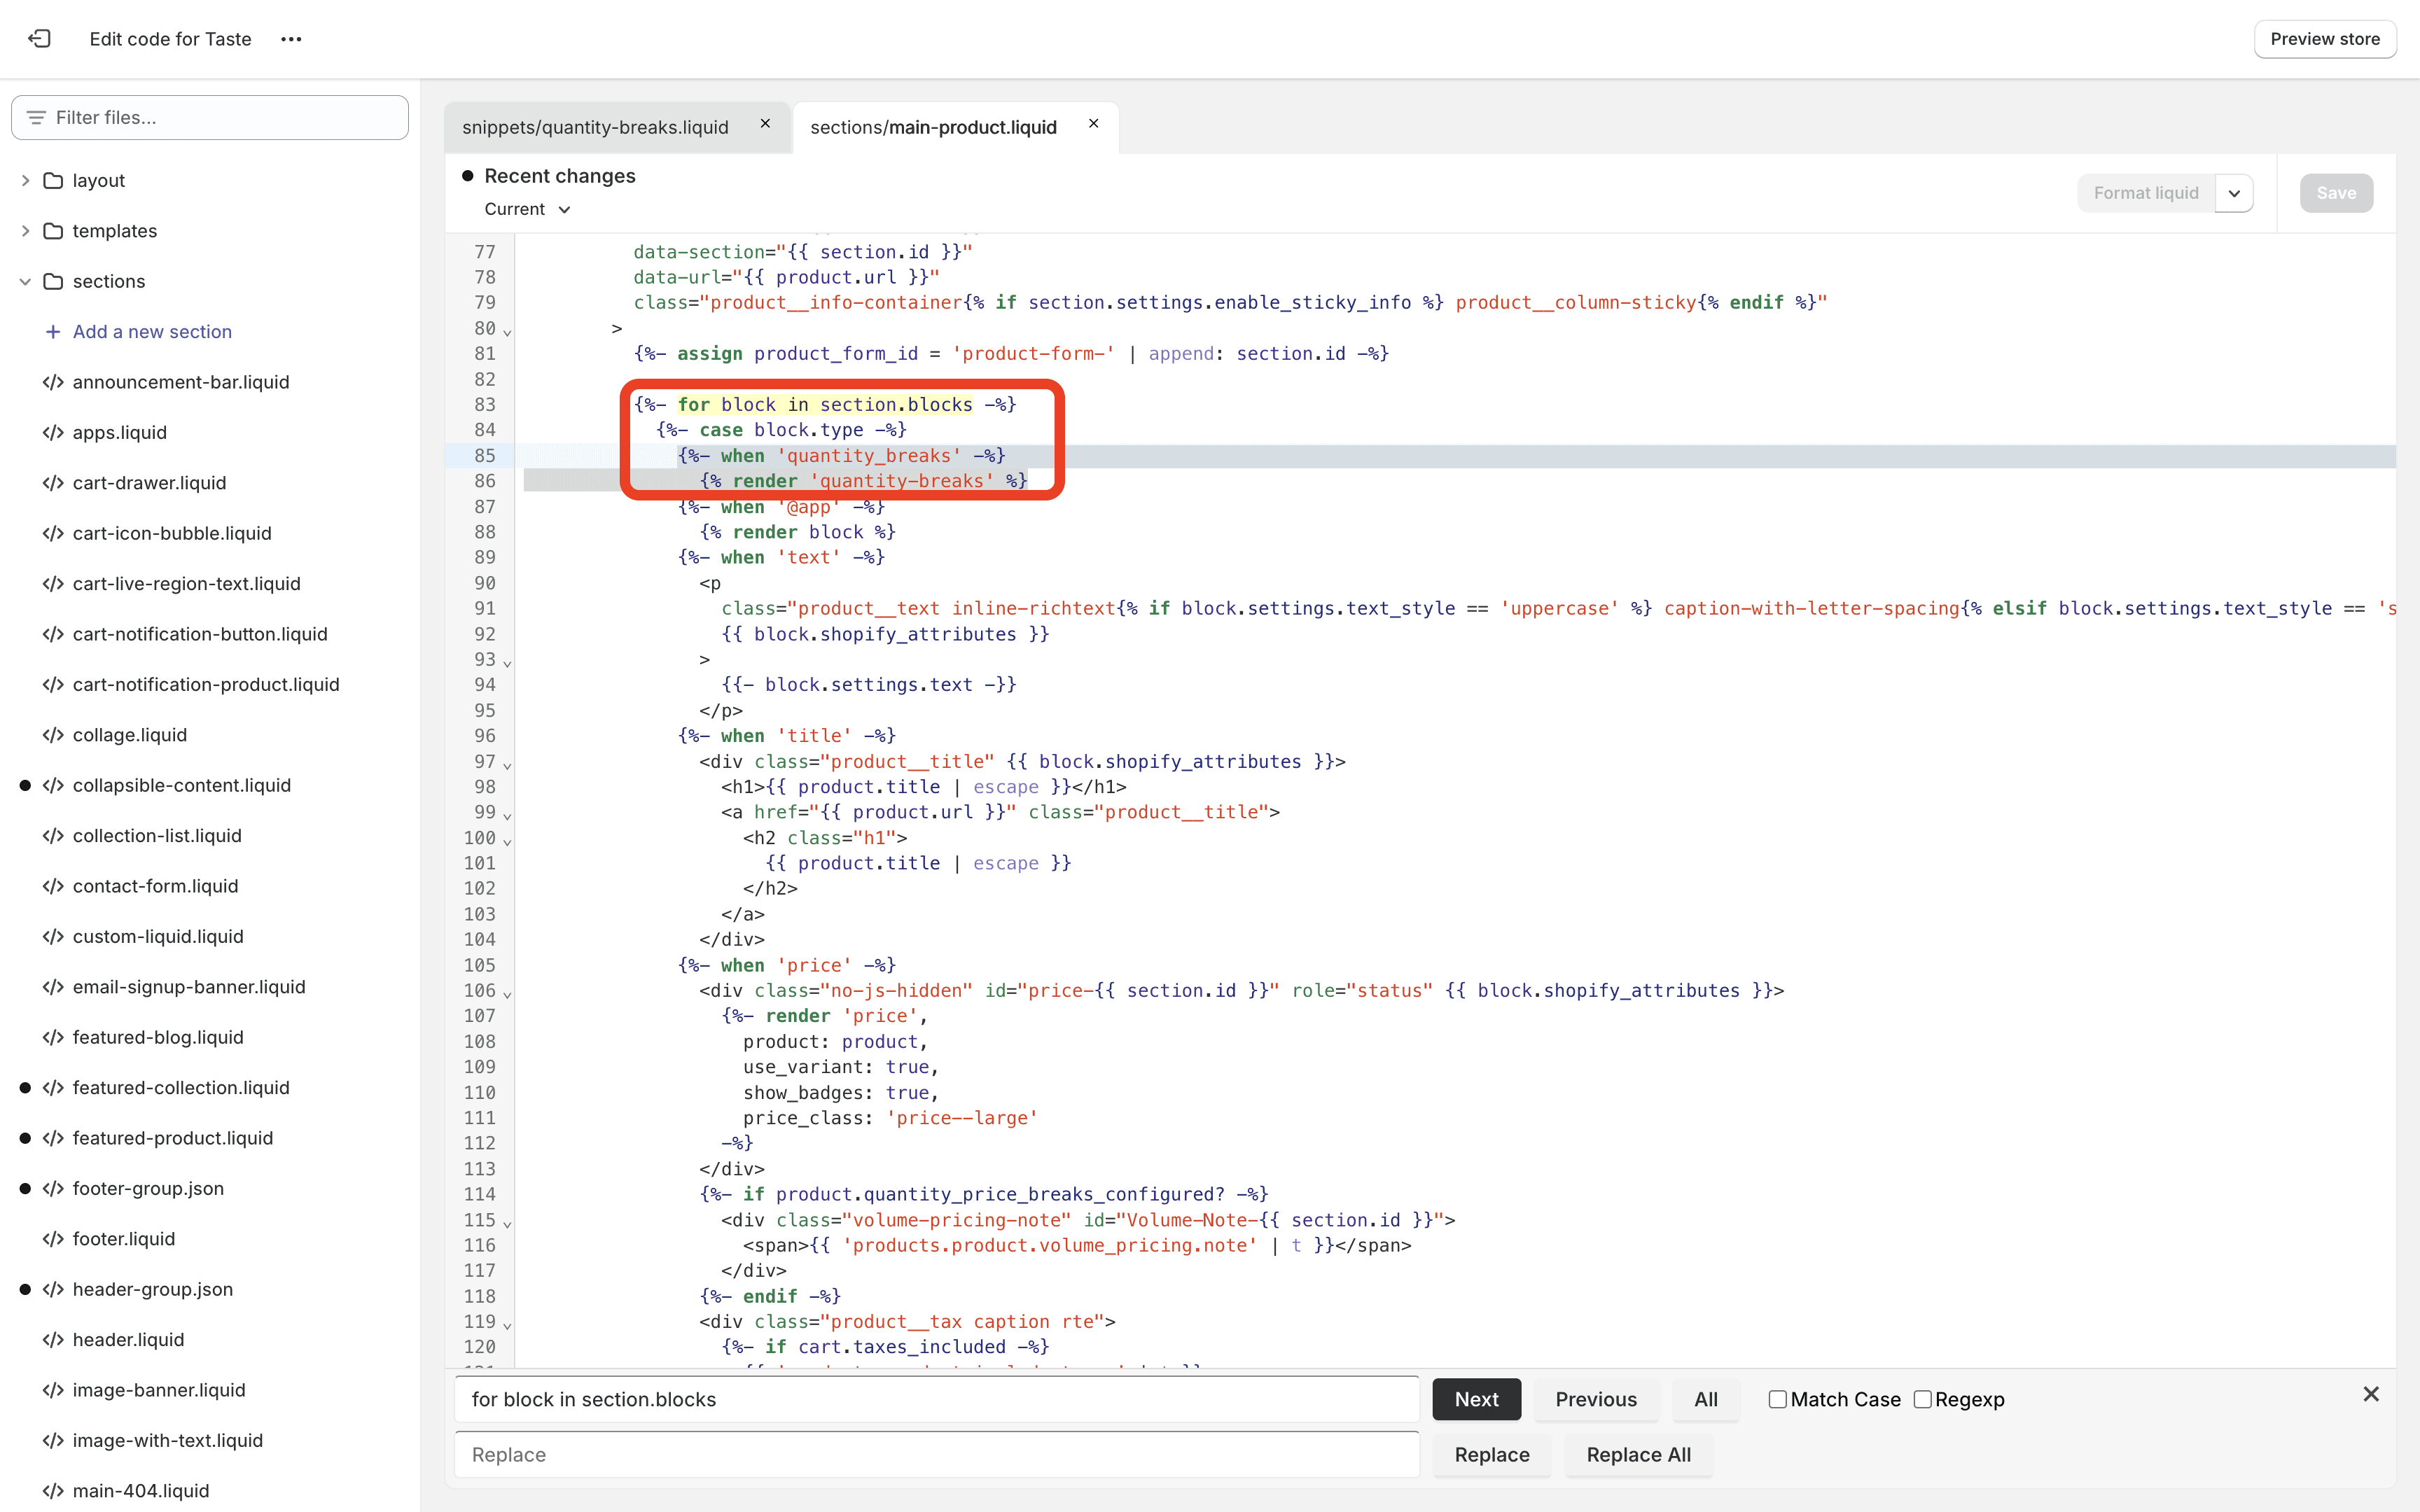
Save the Changes:
Save your changes to the product section file.
7. Add the Block to the Product Page in the Theme Editor
Finally, you’ll need to ensure that the block is enabled in your theme’s customizer.
Steps to Enable the Block:
Go to Theme Editor:
Navigate to Online Store > Themes.
Click on Customize for your active theme.

Add the Block:
In the customizer, navigate to a product page.
Add the new "Quantity Breaks" block to the product section.
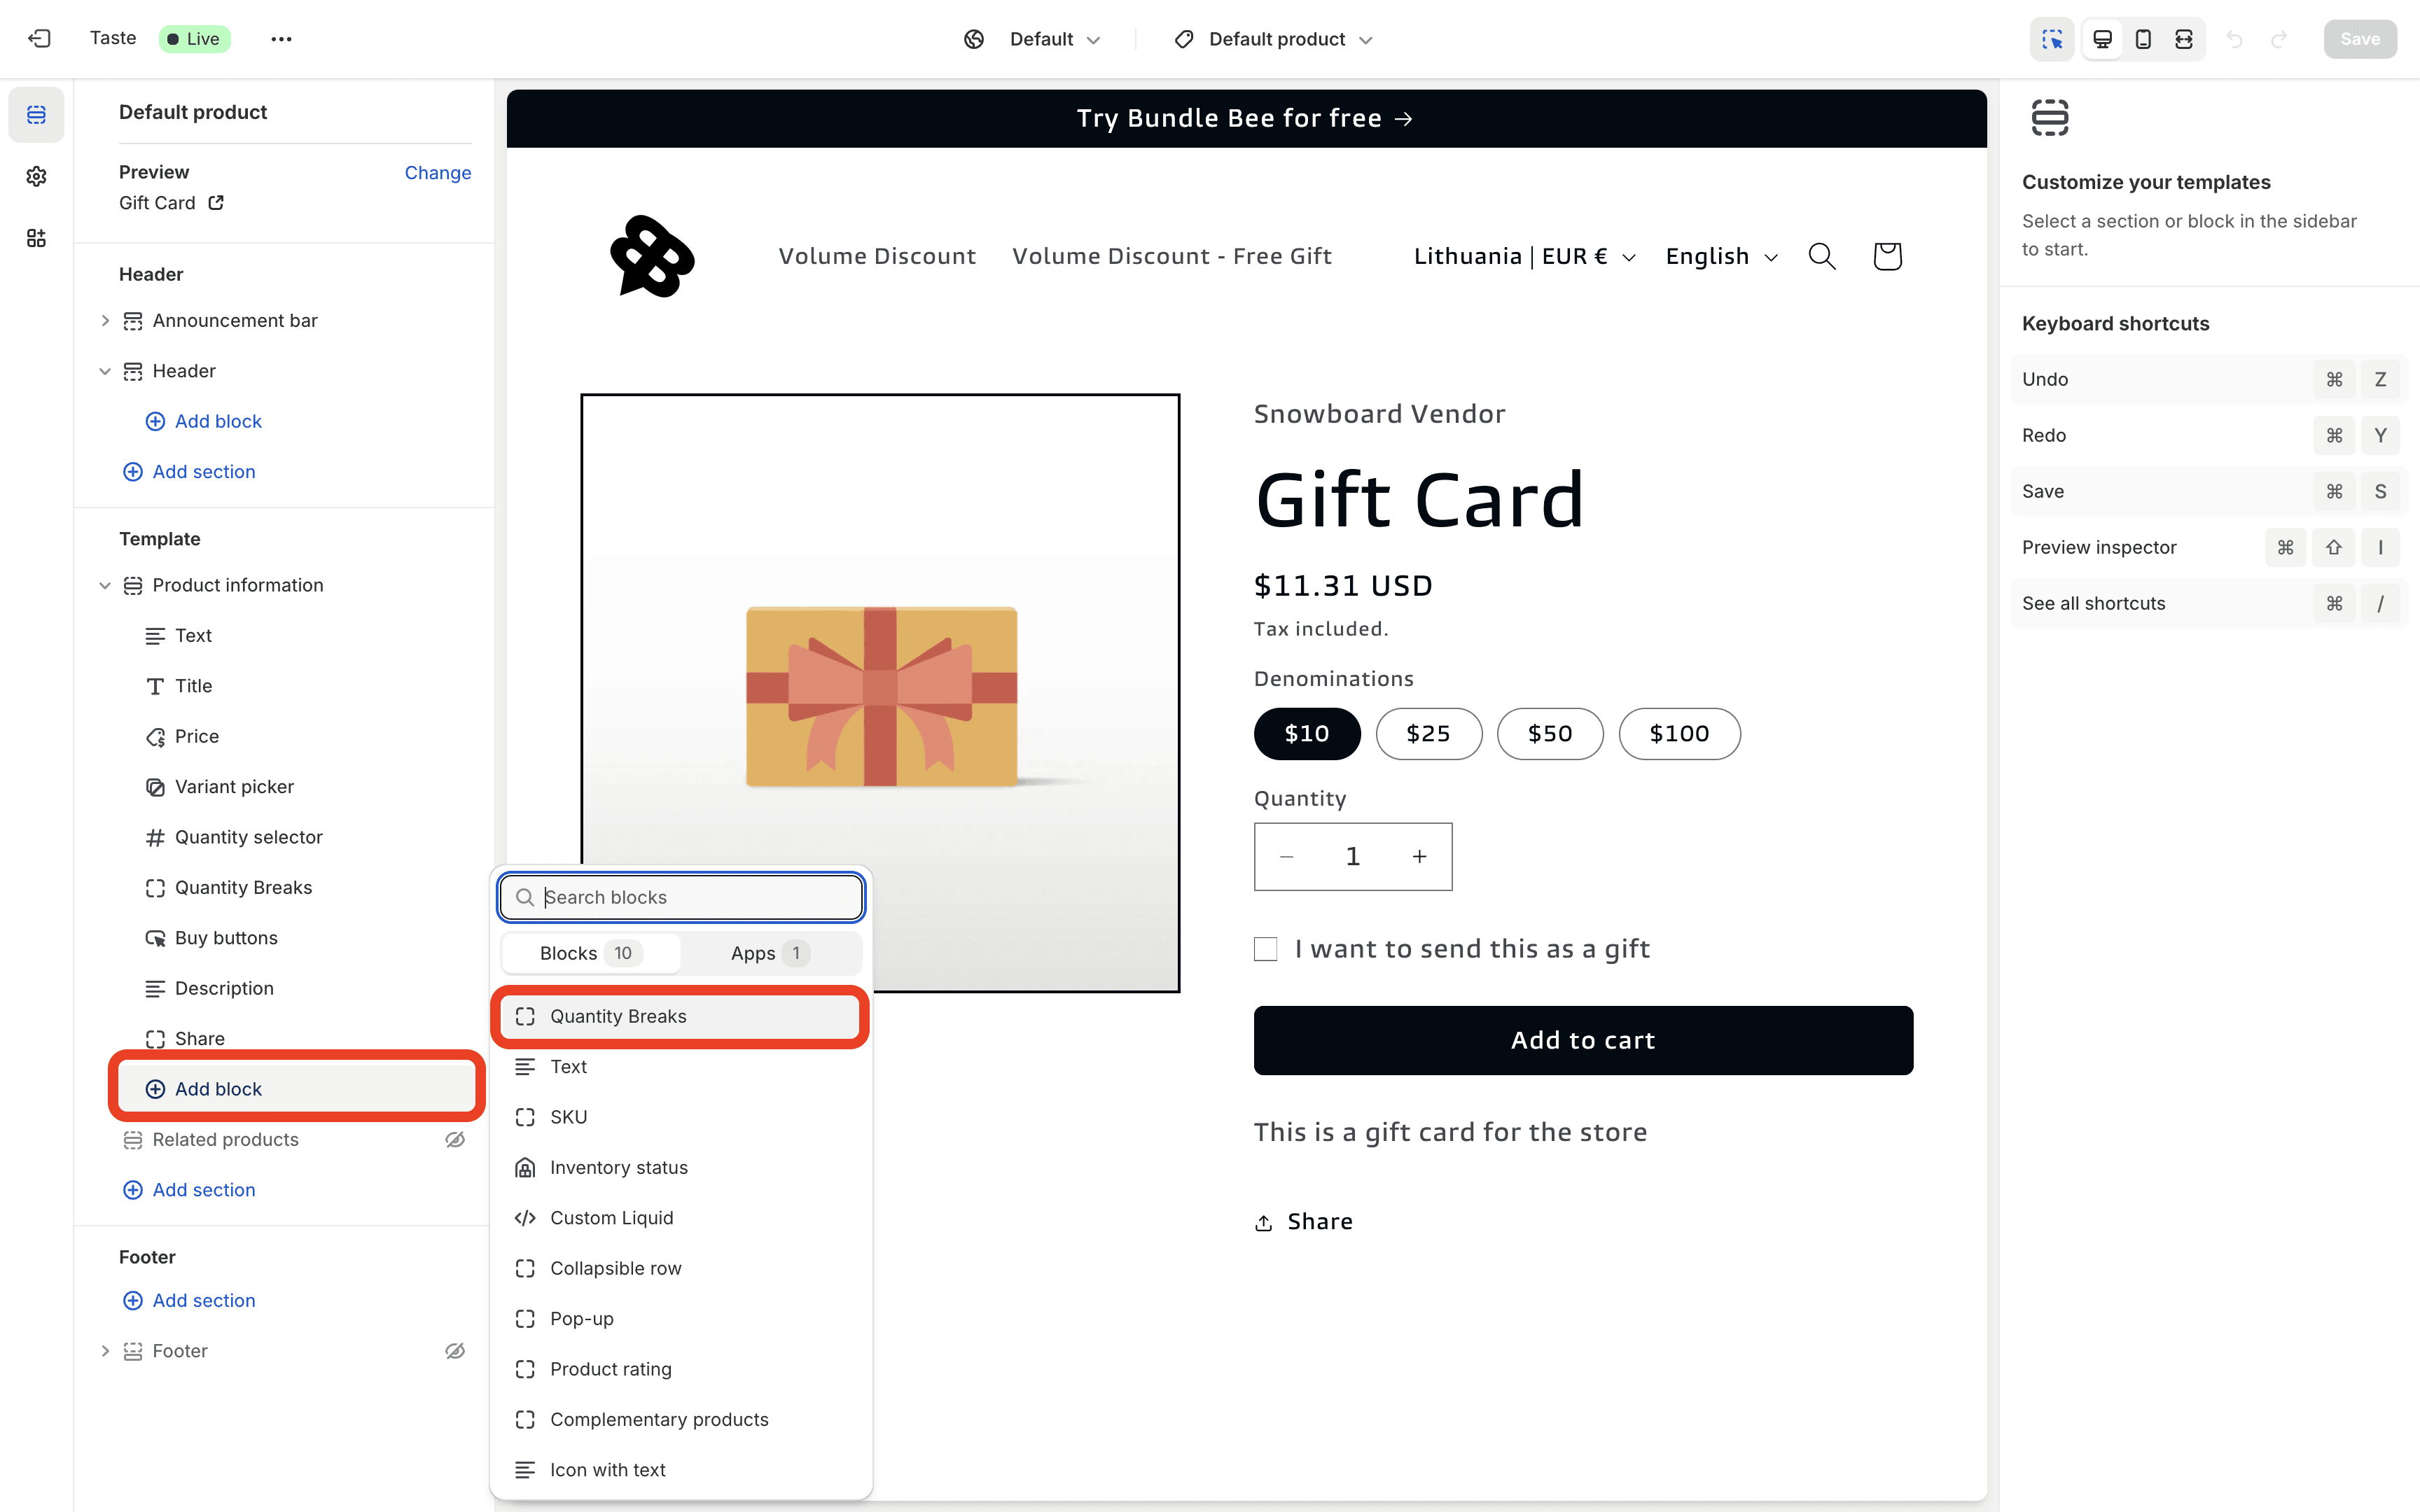
Save the Layout:
Save your changes in the theme editor.
Navigate to the product you added the automatic discount and the Quantity Break metaobjects and you should be able to see the widget display correctly.
Limitations and Maintenance Considerations
While this approach gets the job done for small stores with simple discount configurations, it comes with a few limitations:
Manual Setup: Each discount must be manually created and linked to the products and the correct metaobjects assigned to the product, which can become tedious as your store grows.
Limited Functionality: This method only supports basic discount configurations and lacks features like advanced customizations, dynamic pricing display, and multi-language support.
Maintenance: Managing and updating multiple discounts can be time-consuming and prone to errors.
Simplify and Enhance with Bundle Bee - Quantity Breaks App
For larger stores or those looking for more advanced features, my Shopify app, Bundle Bee - Quantity Breaks, offers a powerful and user-friendly solution. Here’s what it brings to the table:
Streamlined Setup: Automatically create and manage quantity breaks with an intuitive interface.
Advanced Customization: Customize the appearance, behavior, and logic of your quantity breaks to fit your brand.
Internationalization (i18n): Easily support multiple languages and currencies, making your store more accessible globally.
Real-Time Sync: Ensure that discounts and quantity breaks stay in sync across your store without the need for manual intervention.
How to Get Started with Bundle Bee
Install the App:
Visit the Bundle Bee - Quantity Breaks app page and click on Add app.
Follow the on-screen instructions to set up the app.
Configure Your Quantity Breaks:
Use the app's intuitive interface to create and manage your quantity breaks.
Customize the appearance and behavior of your quantity breaks to match your store's branding.
Publish to Your Store:
Once you’re happy with your settings, publish the quantity breaks to your store with a single click.
Enjoy Enhanced Functionality:
Enjoy the benefits of a fully integrated quantity breaks solution that saves you time and enhances your customers' shopping experience.
By following this guide, you should now have a functional quantity breaks setup on your Shopify store. If you're looking to take things to the next level with more advanced features and easier management, be sure to check out Bundle Bee - Quantity Breaks.

Creating Product Bundles with Shopify Bundles App
Sep 21, 2024
4
min

Boost Your 2024 Shopify Sales with Conversion Optimization
Sep 20, 2024
10
min
How to Create Quantity Discounts Natively in Shopify for Free
Aug 29, 2024
5
min